No edit summary |
|||
| (10 intermediate revisions by 3 users not shown) | |||
| Line 2: | Line 2: | ||
==Training Mode Inaccuracies== | ==Training Mode Inaccuracies== | ||
Some training mode behaviour differs from actual gameplay. This includes: | Some training mode behaviour differs from actual gameplay. This includes: | ||
*Dummy can't block I-No's respect | *Dummy can't block I-No's respect | ||
* | *Millia's pin has longer cooldown before it can be picked up | ||
*Testament's Zeinest have longer cooldown after hit | *Testament's Zeinest have longer cooldown after hit | ||
==Collision Box Sizes== | ==Collision Box Sizes== | ||
{| class="wikitable sortable" style="margin: 1em auto 1em auto;text-align: center" | {| class="wikitable sortable" style="margin: 1em auto 1em auto;text-align: center" | ||
|- | |- | ||
! Character !! Standing Collision !! Crouch Collision | ! Character !! Standing Collision !! Crouch Collision !! Air Collision | ||
|- | |- | ||
| {{CLabel|GGACR|A.B.A}} || 81x121 || 65x91 | | {{CLabel|GGACR|A.B.A}} || 81x121 || 65x91 || 61x71 | ||
|- | |- | ||
| {{CLabel|GGACR|Anji}} || 61x131 || 65x101 | | {{CLabel|GGACR|Anji}} || 61x131 || 65x101 || 61x71 | ||
|- | |- | ||
| {{CLabel|GGACR|Axl}} || 61x131 || 65x101 | | {{CLabel|GGACR|Axl}} || 61x131 || 65x101 || 61x71 | ||
|- | |- | ||
| {{CLabel|GGACR|Baiken}} || 51x111 || 65x81 | | {{CLabel|GGACR|Baiken}} || 51x111 || 65x81 || 61x71 | ||
|- | |- | ||
| {{CLabel|GGACR|Bridget}} || 57x131 || 65x101 | | {{CLabel|GGACR|Bridget}} || 57x131 || 65x101 || 61x71 | ||
|- | |- | ||
| {{CLabel|GGACR|Chipp}} || 61x131 || 65x101 | | {{CLabel|GGACR|Chipp}} || 61x131 || 65x101 || 61x71 | ||
|- | |- | ||
| {{CLabel|GGACR|Dizzy}} || 57x121 || 61x91 | | {{CLabel|GGACR|Dizzy}} || 57x121 || 61x91 || 57x71 | ||
|- | |- | ||
| {{CLabel|GGACR|Eddie}} || 61x131 || 65x101 | | {{CLabel|GGACR|Eddie}} || 61x131 || 65x101 || 61x71 | ||
|- | |- | ||
| {{CLabel|GGACR|Faust}} || 77x121 || 81x81 | | {{CLabel|GGACR|Faust}} || 77x121 || 81x81 || 61x71 | ||
|- | |- | ||
| {{CLabel|GGACR|I-No}} || 61x131 || 65x101 | | {{CLabel|GGACR|I-No}} || 61x131 || 65x101 || 61x71 | ||
|- | |- | ||
| {{CLabel|GGACR|Jam}} || 61x121 || 65x101 | | {{CLabel|GGACR|Jam}} || 61x121 || 65x101 || 61x71 | ||
|- | |- | ||
| {{CLabel|GGACR|Johnny}} || 61x131 || 65x101 | | {{CLabel|GGACR|Johnny}} || 61x131 || 65x101 || 61x71 | ||
|- | |- | ||
| {{CLabel|GGACR|Justice}} || 77x141 || 81x111 | | {{CLabel|GGACR|Justice}} || 77x141 || 81x111 || 61x71 | ||
|- | |- | ||
| {{CLabel|GGACR|Kliff}} || 61x111 || 65x101 | | {{CLabel|GGACR|Kliff}} || 61x111 || 65x101 || 61x71 | ||
|- | |- | ||
| {{CLabel|GGACR|Ky}} || 61x121 || 65x91 | | {{CLabel|GGACR|Ky}} || 61x121 || 65x91 || 61x71 | ||
|- | |- | ||
| {{CLabel|GGACR|May}} || 61x111 || 65x81 | | {{CLabel|GGACR|May}} || 61x111 || 65x81 || 61x71 | ||
|- | |- | ||
| {{CLabel|GGACR|Millia}} || 61x121 || 65x101 | | {{CLabel|GGACR|Millia}} || 61x121 || 65x101 || 61x71 | ||
|- | |- | ||
| {{CLabel|GGACR|Order-Sol}} || 61x131 || 65x101 | | {{CLabel|GGACR|Order-Sol}} || 61x131 || 65x101 || 61x71 | ||
|- | |- | ||
| {{CLabel|GGACR|Potemkin}} || 81x141 || 85x111 | | {{CLabel|GGACR|Potemkin}} || 81x141 || 85x111 || 61x71 | ||
|- | |- | ||
| {{CLabel|GGACR|Robo-Ky}} || 61x121 || 65x91 | | {{CLabel|GGACR|Robo-Ky}} || 61x121 || 65x91 || 61x71 | ||
|- | |- | ||
| {{CLabel|GGACR|Slayer}} || 61x131 || 65x101 | | {{CLabel|GGACR|Slayer}} || 61x131 || 65x101 || 61x71 | ||
|- | |- | ||
| {{CLabel|GGACR|Sol}} || 61x131 || 65x101 | | {{CLabel|GGACR|Sol}} || 61x131 || 65x101 || 61x71 | ||
|- | |- | ||
| {{CLabel|GGACR|Testament}} || 61x131 || 65x101 | | {{CLabel|GGACR|Testament}} || 61x131 || 65x101 || 61x71 | ||
|- | |- | ||
| {{CLabel|GGACR|Venom}} || 61x131 || 65x91 | | {{CLabel|GGACR|Venom}} || 61x131 || 65x91 || 61x71 | ||
|- | |- | ||
| {{CLabel|GGACR|Zappa}} || 61x131 || 65x101 | | {{CLabel|GGACR|Zappa}} || 61x131 || 65x101 || 61x71 | ||
|} | |} | ||
*Collision box size is equal in both directions with origin point in the middle. | *Collision box size is equal in both directions with origin point in the middle. | ||
*Air collision box is 40 units above origin for every character except Kliff. | |||
Main takeaway is that throws have effectively +2 pixels of range on crouching characters. The exceptions are Baiken (+7 pixels), Bridget (+4 pixels), and A.B.A (-8 pixels). | Main takeaway is that throws have effectively +2 pixels of range on crouching characters. The exceptions are Baiken (+7 pixels), Bridget (+4 pixels), and A.B.A (-8 pixels). | ||
{{ReturnToTop}} | |||
==Fast wake-up after OTG and CH DAA== | |||
Counterhitting with Dead Angle disables hurtbox upon hitting the ground and makes the character stand up quicker similar to if you hit someone OTG and they don't tech. Ground slides also skips the OTG part.<br> | |||
The technical explanation for this is as following:<br> | |||
Knockdowns in this game are divided into 3 parts, the floor bounce, laying down and getting up. Characters can be hit OTG during the first two<br> | |||
The first part: Floor bounce as the name suggests is where your characters hits the ground and then bounces up a tiny bit. It lasts for as long as the character hangs in the air following the bounce. This state is also used by ground bounce moves except they bounce the opponent much higher and remove the OTG status the moment the character leaves the ground<br> | |||
The second part: Laying down is just where your character is laying down flat, it lasts for 11 frames before it goes into the next part. Your character is still able to be OTG'ed during this.<br> | |||
The last part: Getting up is where the invincibility normally kicks in and your character starts to get up.<br> | |||
When you hit someone with a CH DAA or OTG, they are immediately granted invincibility the moment they enter OTG state and additionally the second part of the knockdown is reduced to 1 frame. | |||
Ground slides on the other hand just always skip to the last part of knockdowns when their duration runs out. | |||
{{ReturnToTop}} | |||
==Special Clash Rules== | |||
By default 5P, 2P, 2K, j.P and j.K has a special property where they will always clash as long their hitboxes collide on the first frame of either move's active frames, regardless if they also touch a hurtbox. However some normals are an exception to the normals listed above. | |||
<gallery widths="450px" heights="450px" mode="nolines"> | |||
GGACR_Esoterica_Clash_Exception1.png| | |||
GGACR_Esoterica_Clash_Exception2.png|Notice how it clashes despite the hurtboxes being well inside the hitboxes | |||
</gallery> | |||
{{ReturnToTop}} | {{ReturnToTop}} | ||
| Line 77: | Line 98: | ||
GGACR_Esoterica_OnHitbox.png|Active for 2 frames. Strike invul before actives | GGACR_Esoterica_OnHitbox.png|Active for 2 frames. Strike invul before actives | ||
</gallery> | </gallery> | ||
===That's My Name=== | |||
Slashbacking Johnny's super in the air negates damage from first hit, but locks into animation to be hit by two more. This can be avoided by doing FD immediatly after SB. This will only work on early SB (frame before attack hits), late SB will result in animation lock regardless of FD. | |||
===APB Burst=== | |||
Performing Burst the frame Air Potemkin Buster hits or the frame after air SB will result in escape, but the damage will be taken regardless. Once Potemkin lands the character may or may not teleport back into his arms to continue animation. It is currently unknown how to avoid this consistently. | |||
{{ReturnToTop}} | {{ReturnToTop}} | ||
== | ==Venom Ballboxes== | ||
Like other things in the game balls are interactable with using boxes. Normally hitboxes are used for this purpose—balls can even be hit using currently inactive ones. However there are some solely ball interaction. | |||
In inert stage balls are interacted with using their "collision" box (orange), while active balls use their hitbox. | |||
<gallery widths=" | <gallery widths="150px" heights="150px" mode="packed"> | ||
GGACR_Venom_Ballbox1.png|Inert and active interaction zones comparison | |||
</gallery> | </gallery> | ||
Attacks that spawn balls, like Stinger Aim, also use those boxes and can be utilized to hit balls outside of launched projectile's trajectory. Another quirk about those is that ball spawns before startup and can be hit by other active balls. | |||
<gallery widths="150px" heights="150px" mode="packed"> | |||
GGACR_Venom_Ballbox2.png|Stinger early actives | |||
GGACR_Venom_Ballbox3.png|Stinger late actives | |||
GGACR_Venom_Ballbox4.png|Carcass | |||
GGACR_Venom_j236S_Hitbox_1.png|Red Hail reuses S Mad Struggle hitboxes | |||
</gallery> | |||
6H has two hitboxes exclusively for hitting balls. They will hit balls below or inside Venom and send them straight up. | |||
== | <gallery widths="150px" heights="150px" mode="packed"> | ||
GGACR_Venom-EX_6H_Hitbox_4.png|Frames 21-22 (was active hitbox before +R) | |||
GGACR_Venom_Ballbox5.png|Frames 23-24 | |||
</gallery> | |||
{{ReturnToTop}} | |||
==Venom Gold Burst Combo== | |||
[[File:GGACR_Venom_Combo_Into_Gold_Burst.mp4|right]] | |||
Venom's throw is one of the only known ways to combo into Gold Burst. This is because the ball the opponent gets trapped inside of has its own hurtbox which Gold Burst is able to make contact with. This isn't possible raw due to Gold Burst's slow startup, but it can be set up using {{MMC|chara=Venom|input=[2]8D|label=Force Break Carcass Raid}}. | |||
*Can also combo into Instant Kill | |||
{{clear}} | |||
{{ReturnToTop}} | {{ReturnToTop}} | ||
Latest revision as of 16:21, 22 September 2023
Please feel free to make edits, but include edit summaries and sources where applicable.
Training Mode Inaccuracies
Some training mode behaviour differs from actual gameplay. This includes:
- Dummy can't block I-No's respect
- Millia's pin has longer cooldown before it can be picked up
- Testament's Zeinest have longer cooldown after hit
Collision Box Sizes
| Character | Standing Collision | Crouch Collision | Air Collision |
|---|---|---|---|
| 81x121 | 65x91 | 61x71 | |
| 61x131 | 65x101 | 61x71 | |
| 61x131 | 65x101 | 61x71 | |
| 51x111 | 65x81 | 61x71 | |
| 57x131 | 65x101 | 61x71 | |
| 61x131 | 65x101 | 61x71 | |
| 57x121 | 61x91 | 57x71 | |
| 61x131 | 65x101 | 61x71 | |
| 77x121 | 81x81 | 61x71 | |
| 61x131 | 65x101 | 61x71 | |
| 61x121 | 65x101 | 61x71 | |
| 61x131 | 65x101 | 61x71 | |
| 77x141 | 81x111 | 61x71 | |
| 61x111 | 65x101 | 61x71 | |
| 61x121 | 65x91 | 61x71 | |
| 61x111 | 65x81 | 61x71 | |
| 61x121 | 65x101 | 61x71 | |
| 61x131 | 65x101 | 61x71 | |
| 81x141 | 85x111 | 61x71 | |
| 61x121 | 65x91 | 61x71 | |
| 61x131 | 65x101 | 61x71 | |
| 61x131 | 65x101 | 61x71 | |
| 61x131 | 65x101 | 61x71 | |
| 61x131 | 65x91 | 61x71 | |
| 61x131 | 65x101 | 61x71 |
- Collision box size is equal in both directions with origin point in the middle.
- Air collision box is 40 units above origin for every character except Kliff.
Main takeaway is that throws have effectively +2 pixels of range on crouching characters. The exceptions are Baiken (+7 pixels), Bridget (+4 pixels), and A.B.A (-8 pixels).
Fast wake-up after OTG and CH DAA
Counterhitting with Dead Angle disables hurtbox upon hitting the ground and makes the character stand up quicker similar to if you hit someone OTG and they don't tech. Ground slides also skips the OTG part.
The technical explanation for this is as following:
Knockdowns in this game are divided into 3 parts, the floor bounce, laying down and getting up. Characters can be hit OTG during the first two
The first part: Floor bounce as the name suggests is where your characters hits the ground and then bounces up a tiny bit. It lasts for as long as the character hangs in the air following the bounce. This state is also used by ground bounce moves except they bounce the opponent much higher and remove the OTG status the moment the character leaves the ground
The second part: Laying down is just where your character is laying down flat, it lasts for 11 frames before it goes into the next part. Your character is still able to be OTG'ed during this.
The last part: Getting up is where the invincibility normally kicks in and your character starts to get up.
When you hit someone with a CH DAA or OTG, they are immediately granted invincibility the moment they enter OTG state and additionally the second part of the knockdown is reduced to 1 frame. Ground slides on the other hand just always skip to the last part of knockdowns when their duration runs out.
Special Clash Rules
By default 5P, 2P, 2K, j.P and j.K has a special property where they will always clash as long their hitboxes collide on the first frame of either move's active frames, regardless if they also touch a hurtbox. However some normals are an exception to the normals listed above.
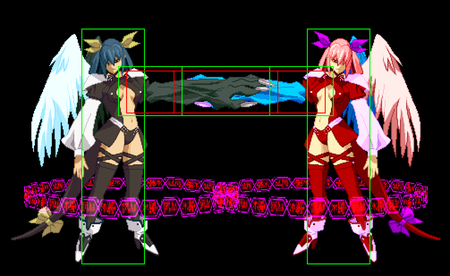

Notice how it clashes despite the hurtboxes being well inside the hitboxes


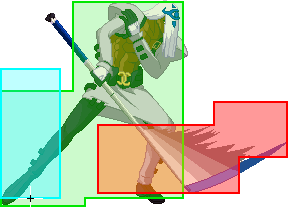
Air SB Interactions
On
Normally slashbacking On will still lock character in inescapable animation, but without scaling applied by the first hit. However using burst within 2 frames after slashback will result in character escaping, while still keeping Anji in animation. The animation is long enough for some characters to punish with Instant Kill.
FB On however recovers mid air leaving Anji with only 2 vulnerable frames and a big hitbox which can easily catch extended hurtboxes to force a favorable trade. Those factors make airthrow a preferable punish.

Active for 2 frames. Strike invul before actives

That's My Name
Slashbacking Johnny's super in the air negates damage from first hit, but locks into animation to be hit by two more. This can be avoided by doing FD immediatly after SB. This will only work on early SB (frame before attack hits), late SB will result in animation lock regardless of FD.
APB Burst
Performing Burst the frame Air Potemkin Buster hits or the frame after air SB will result in escape, but the damage will be taken regardless. Once Potemkin lands the character may or may not teleport back into his arms to continue animation. It is currently unknown how to avoid this consistently.
Venom Ballboxes
Like other things in the game balls are interactable with using boxes. Normally hitboxes are used for this purpose—balls can even be hit using currently inactive ones. However there are some solely ball interaction.
In inert stage balls are interacted with using their "collision" box (orange), while active balls use their hitbox.

Inert and active interaction zones comparison

Attacks that spawn balls, like Stinger Aim, also use those boxes and can be utilized to hit balls outside of launched projectile's trajectory. Another quirk about those is that ball spawns before startup and can be hit by other active balls.

Stinger early actives

Stinger late actives

Carcass

Red Hail reuses S Mad Struggle hitboxes


6H has two hitboxes exclusively for hitting balls. They will hit balls below or inside Venom and send them straight up.
Frames 21-22 (was active hitbox before +R)

Frames 23-24


Venom Gold Burst Combo
Venom's throw is one of the only known ways to combo into Gold Burst. This is because the ball the opponent gets trapped inside of has its own hurtbox which Gold Burst is able to make contact with. This isn't possible raw due to Gold Burst's slow startup, but it can be set up using Force Break Carcass Raid GuardAllStartup13RecoveryTotal 32Advantage+7.
- Can also combo into Instant Kill