You can help by editing it.
FD Brake
Tap Faultless Defense while Running
FD Brake is a technique that avoids the Run Skid animation by canceling one's run into Faultless Defense.
This lets the user block out of a run sooner than they normally would by bypassing the run skid animation. Additionally, FD Brake lets the user manipulate their forwards momentum. To perform an FD Brake, briefly tap the Fautlless Defense input while running.
Both standing and crouching FD Brake preserve some of the sliding momentum, but this can be negated by briefly transitioning to a backwards walk after the FD input.
FD Slide
Walk Forwards after FD Brake with Sliding Momentum
With a precise input, one can transition directly from the FD input to a forwards walk input. This will add the sliding momentum to the user's forwards walking speed.
SB Brake
Tap Slashback while Running
Slashback brake is similar to FD Brake for modifying the user's momentum, but without the blocking aspect.
SB Brake will completely negate forwards momentum, whether performed standing or crouching. Furthermore, all of the rules from Slashback apply. This means that the user will not be able to guard for a period of time after the SB brake.
FD Jump
Use Faultless Defense During Prejump
FD Jump is a defensive technique used to avoid getting hit while jumping.
This technique will cause the user's character to immediately enter their air FD state as soon as the prejump animation ends. This has the obvious benefit of allowing the user to block grounded attacks immediately after jumping, but also has character specific benefits based on their air FD Hurtbox. Some characters, such as ![]() Kliff and
Kliff and ![]() Venom, have especially small air FD hurtboxes. This can cause the opponent's attacks to miss where they would normally hit the standard air hurtbox.
Venom, have especially small air FD hurtboxes. This can cause the opponent's attacks to miss where they would normally hit the standard air hurtbox.
A successful FD Jump will not show the jumping smoke cloud effect, nor play the jumping sound effect.

Venom's hurtbox on the first frame after prejump
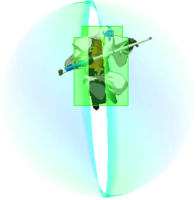
Venom's air FD hurtbox on the first frame after prejump


Instant Air Dash
956 (forwards) or 754 (backwards)
Instant Air Dash, IAD, is a method of performing an air dash, either forwards or backwards, as quickly as possible from a grounded state.
This technique works because the initial, diagonal jump input counts as the first forwards or backwards input of the air dash. IAD is useful in combos, neutral, and sometimes defense depending on the character.
Common Option Selects
Button Priority
In +R, button inputs have a priority system. If two buttons are pressed at the same time, then the move whose input uses the higher priority button will come out.
The priority for buttons is, from highest to lowest, D > P > K > S > H.
Throw OS
6+H+a Higher Priority Button
Throw OS is an option select A technique where one command (or series of commands) will perform a different action depending on the circumstances, thereby allowing one action to be able to handle two distinct situations. that allows the user to default to a normal other than 5H or 6H when the opponent is potentially not throwable.
+R Throws consist of a distance check, a check to see if the opponent is in a throwable state, and a check to see if the opponent matches the thrower's airborne/grounded state. If the conditions for a throw are not met, then the thrower will instead perform whatever attack matches the buttons they input. This would normally result in the thrower's character performing 5H or 6H. 5H will occur if the direction + H input does not correspond to a valid 6H input—in the case the character does not have a 6H move, or the throw was input with 4.
Throw OS allows the user to have their throw-misses default to faster, safer normals. OSing a throw is as simple as inputting another, higher priority button during a throw input. Which normal is used will depend on the character, but common examples include 6P and 6K—6PH or 6KH. In these examples, the thrower will perform 6P or 6K if the opponent cannot be thrown at that moment.

If all conditions for ground throw are met, then ground throw will occur

A throw input of 6H will give 6H if the throw conditions aren't met

A throw input of 6KH will give 5K if the throw conditions aren't met


Throw OSes also apply to air throws, and are input in the same manner. Air throws are most commonly OSed using a character's j.P because most are fast, and are generally safe to whiff due to their short duration.

If all conditions for air throw are met, then air throw will occur

An air throw input of j.6H will give j.H if the throw conditions aren't met
An air throw input of j.6PH will give j.P if the throw conditions aren't met


Throw Burst OS
4 or 6+H+D
Because throw has higher input priority than Burst, the user will perform a throw with a 6HD input if all of the conditions for a throw are met, and will otherwise perform Burst.
Tech FD
Hold 1 button for FD, a backwards direction, and rapidly press other buttons for FD
Tech FD is an option select A technique where one command (or series of commands) will perform a different action depending on the circumstances, thereby allowing one action to be able to handle two distinct situations. that mitigates the risk associated with teching.
Normally, it is possible for the defending player to press buttons either too slowly or too quickly when attempting to air tech. This would result in them either missing tech opportunities, or accidentally attacking after teching.
By option selecting the air tech input with Faultless Defense, Tech FD protects against over-mashing. Instead of accidentally performing a normal attack if you press buttons too many times, you will instead perform Faultless Defense, which is notably lower risk. Furthermore, Faultless Defense can be an inherently favorable option to perform after teching, because it allows you to block the opponent's attempts at using air-unblockable attacks as resets.
6FRC6
6 > FRC > 6
6FRC6 is a technique used to dash immediately after an FRC.
By inputting the first forwards direction of a dash immediately before an FRC, a player can then dash immediately after the FRC with their next forwards input.
This technique is required for certain combos, but it can be beneficial in general because it allows the user to dash sooner and more fluidly after their Roman Cancels. Although 6FRC6 can seem intimidating, in reality it can make sequences easier than they otherwise would be, thanks to the aforementioned dash benefits.
In order to still gain a dash input, there cannot be too many frames between the first and second 6 inputs. This window is 10 frames. Additionally, if a down input (1, 2, or 3) is done between the 6 inputs, there will not be a dash.
Jump Install
Most characters will be able to either double jump or airdash after jumping normally. Sometimes, you can go into the air without using your jump, such as if Sol does 623H and RCs it late. In this case, Sol will be in the air but unable to double jump or airdash. This is a consequence of how the game tracks air actions per jump.
Normally, the game grants air actions when you jump, and takes them away upon use or landing. By doing 623H and RCing it late, Sol got into the air without manually jumping, therefore bypassing the normal way the game grants air actions. Therefore, Sol is in the air without the ability to doublejump or airdash. Jump install is how you grant yourself air actions when you otherwise would not have access to them, opening up many new options. If you have air actions available you may consider yourself "jump installed", with the act of performing a jump install being how those actions were granted.
In notation, jump install will be notated as JI, indicating that you must jump install (or already be jump installed by that point in the combo) in order to continue with the notated combo.
Techniques for Jump Install
Cancel Jump Startup into Special (Solo JI)
Jump startup can be canceled into special moves, so a way to jump install special moves is to end the motion on a jump input, and then press the button for the move. In example, I-No 632146K must be jump installed in order for her to airdash after FRCing it, done with a 6FRC6 input. To input this, you may input 632146 to buffer the special, then input 7, 8, or 9 to jump, then press K during jump startup in order to do a grounded 632146K out of jump startup. This will allow I-No to airdash after FRCing the move by doing a 6FRC6 input.
This is often easy to think of as doing a TK motion, jump installing a 236S move by inputting 2369S for example. Due to how most special move inputs work, if you do the motion quickly you'll often end up doing a superjump canceled into a special move. As discussed further below, superjumps do not grant doublejumps, so if you get a superjump in your input you will only be granted airdash(es).
This technique of canceling jump startup into special moves can also be done when cancelling into a special move off a jump-cancelable normal. In this case, so long as the jump cancel was input during hitstop of the move, you are jump installed. You do not need to wait for jump startup to actually start for air actions to be granted.
This may be notated such as JI 632146K.
Attack > Jump Cancel > Attack
When a jump-cancelable attack connects, you may input jump during the hitstop of the move to be granted air actions. You may then stay on the ground by inputting another attack your first could cancel into. In essence you are doing an attack, canceling it into jump, then canceling into a different attack before the jump happens.
Note that a jump from a neutral state cannot be canceled into normals, but a jump cancel done off a normal move can be canceled into any move that normal could have been canceled into. This allows you are able to carry a jump install from a normal that is jump-cancelableto a normal that is not.
This may be notated such as c.S > JI 5H or c.S > 8 > 5H.
Landing Recovery Jump Install (Land JI)
When landing from a jump, you maintain your air actions for the landing recovery of your jump, which is 3 frames for most characters. If you do an attack during this landing recovery, you may avoid entering a neutral grounded state which would remove your air actions. This allows you to preserve your air actions and remain jump-installed during a non-jump-cancelable attack upon landing.
This may be notated such as Land JI 2S > 632146K. [I-No Example]:
Block > Attack (Blockstun JI)
As discussed before, blocking grants air actions, while being in a neutral grounded state removes them. Therefore, if you block an attack, and then input a move on the frame you would recover, you avoid ever being in a neutral grounded state and your air actions are not removed.
Normal Jump Install vs. Superjump Install
Normal jump and superjump have two notable distinctions.
- Normal jump grants a double jump while superjump doesn't.
- After a normal jump you will not autoturn towards the opponent in the air, whereas after a superjump you will.
If you jump install with either of these types of jump, you will inherit these properties. This can lead to things such as Chipp grounded teleports autoturning towards the opponent if you superjump install into them.
You may double jump after a superjump cancel if you connect a jumpcancelable move, jump cancel in order to jump install and gain your double jump air action, and then superjump cancel immediately after. This cannot be done without canceling off a button, as normal jump startup cannot be canceled into superjump.
Auto Jump Install
Certain moves in this game will grant air actions even though you did not manually jump. One such move is Sol's 214K (Riot Stamp), which can be FRCed into an airdash during the animation. These moves are often extremely helpful for you as a player but not all moves that make you airborne will do this, such as I-No's 632146K (Horizontal Chemical Love).
Because these moves provide JI automatically, this does not need to be notated when writing a combo.
How it Works
Gaining Air Actions
There are several ways to gain air actions.
- Enter jump startup.
- Block something (normal block, IB, FD, or SB).
- Air tech out of a combo.
If you initiate a jump, you do not need to actually leave the ground to gain the air actions. This includes both jumping normally and canceling into a jump off a jump-cancelable move.
Blocking grants you all your air actions back, regardless of type of blocking. This applies to both air blocking and grounded blocking, although grounded blocking requires you to act on the exact frame you leave blockstun to retain your air actions. While in the air, this helps you defend yourself as after you recover from blockstun you may attempt to position yourself better. While it's frame perfect, the blockstun recovery jump install can provide unique punish opportunities after blocking moves.
Air tech providing air actions is helpful for escaping the opponents pressure after they drop a combo, but is not useful for the purposes of this section.
Losing Air Actions
You lose access to your air actions once you either consume them, or land. Specifically, when you are in a neutral grounded state (standing, crouching, walking, or dashing) your air actions are removed. This may be avoided by acting during landing recovery.
Maintaining Air Actions
Whenever you land from a jump, you enter a landing recovery state where you may not dash, walk, or jump. All other actions are allowed. This state does not remove air actions, so if you do an attack during this state you will retain whatever air actions you had leftover from your jump. This recovery is 3 frames for most characters, so you may either act during this window or on the frame after to avoid having any frames where you are in a neutral grounded state.
Additionally, any grounded attacks will not count as a state where your air actions may be removed. This means if you have air actions while grounded (whether from maintaining them through landing recovery, you may carry those air actions through a series of canceled attacks. You may even link attacks together without canceling and maintain the air actions, so long as you never enter a neutral grounded state for any amount of time at all. This would be very difficult to do, but technically possible.
Not particularly useful, but if you had air actions prior to being knocked down, if you do a move perfectly timed on wakeup you may carry your air actions through to your wakeup attack. This would most likely be extremely niche to find useful situations for this, but it does exist. Mostly, this demonstrates the strict nature of what states/actions grant and remove air actions.
Impossible Dust
By performing a specific trick, you can make Dust combos "impossible" to tech. The opponent is launched, hit, rises then falls almost to the ground, and is hit again by a standing player. This is called an Impossible Dust (ID) combo.
The way ID works is that after a Dust launch, the opponent cannot tech for 48 frames. Hitting them within the first 29 frames makes them unable to tech for another 48 frames. Usually most ID combos require that you hit them between frames 25 and 29, and that you land before your opponent does.
There are a couple ways to set up an ID combo. The first is to use a momentum-changing move like ![]() Millia Rage's Turbo Fall
Millia Rage's Turbo Fall GuardStartupRecoveryUntil landing+12Advantage- to bring you close to the ground, where you can then follow up. Another way is by double jumping before hitting the opponent after 5D, which will make your character fall as if they were in a normal air combo. One last way to do it is by cancelling the Homing Jump with FD Faultless DefenceA special type of blocking in Guilty Gear that negates chip damage and pushes the opponent back further than usual. This type of blocking comes at the cost of a resource.. This changes your momentum, causing you to fall as normal.
Downwards Movement
Certain characters have moves that affect their movement. By tagging your opponent during the Homing Jump and then performing a move to fall to the ground, you can pick them up when you land. An example is ![]() Millia performing 5D~8 > j.S > jc > j.S > j.236KGuardStartupRecoveryUntil landing+12Advantage-, where the last j.S will tag them to add the untech frames. She then rapidly falls to the ground with Turbo Fall, and continues the combo when she lands.
Millia performing 5D~8 > j.S > jc > j.S > j.236KGuardStartupRecoveryUntil landing+12Advantage-, where the last j.S will tag them to add the untech frames. She then rapidly falls to the ground with Turbo Fall, and continues the combo when she lands.
Double Jump
By performing another jump during 5D Homing Jump (ex. 5D~8 (Activates Homing Jump) > 8), you cancel the Homing Jump into a regular jump, where you can hit your opponent with a button and then fall down. Your opponent will still be affected by the Homing Jump momentum, meaning you land faster, and can pick up from there. Characters like ![]() Ky use this technique to set up into their preferred combo routes.
Ky use this technique to set up into their preferred combo routes.
Faultless Defense
Using FD (5D~8 > FD) to cancel the Homing Jump is very similar to using a double jump. Right after activating Homing Jump, you press and quickly release FD to cancel, and then perform a move. This way, you cancel the Homing Jump and start moving downwards, hit your opponent as you're falling, and then pick up once you land. To perform this technique more easily, FD can be held at any time prior to Homing Jump start (5D~[7+FD]). Note that this shortcut will not work for ![]() Testament.
Testament.
Additionally Slashback can be used for the same purpose to avoid meter gain penalty. However unlike FD it must be timed manually.
FD Cancel
Faultless Defense Cancel (also abbreviated as FDC) is kara cancel A type of cancel where the beginning of an action is quickly canceled into another before the first action completes its startup.ling normals into FD on frames 2 and 3. Note that normals can only be cancelled when done by themselves and not as a gatling. Can also be done with Slashback.
Often used unintentionally simply to perform FD while not pressing both buttons on same frame. This makes FD input less strict, but can result in occasional counter hit if timed too close to the attack.
Intentional usage is based upon FD retaining momentum of the move while returning character to neutral state. Applications include air stalling, mixups, and moving ![]() Zappa's Sword.
Zappa's Sword.
| Character | Normal |
|---|---|
| Universal | 5H, j.H, 5D |
| 6K, 3K, 3S | |
| j.2S | |
| 6K | |
| 6K, j.2K |
Tech Buttons
Slashback Input Tricks
Slashback has a 2f window to successfully parry an attack, but this can be doubled to 4f by holding 4S and double tapping the H button. In notation terms, this would look like [4]S~HH.
This technique is excellent if you feel like the opponent is going for a large, slow button or special to reset pressure, such as Sol's Bandit Bringer. It can also be used in blockstrings as a makeshift momentum stealer, but comes with all the associated risks of failing a Slashback. 4f is a much larger window to successfully hit a Slashback (akin to Kliff's 236S FRC), so doing this can be a great way to more easily work the technique into your defensive gameplan.