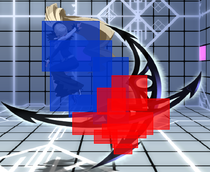
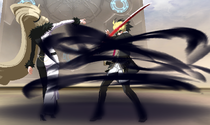
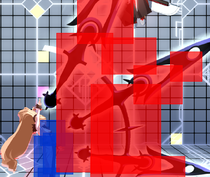
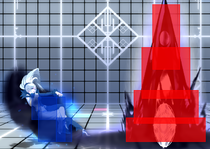
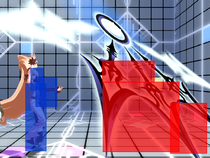
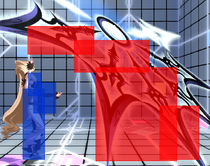
(→j.C) |
Tag: Manual revert |
||
| (25 intermediate revisions by 6 users not shown) | |||
| Line 1: | Line 1: | ||
{{ | {{BBTag_Construction_Card}} | ||
= | ==Overview== | ||
{{Overview | {{BBTag/CharacterLinks}} | ||
| | <div id="home-content" class="home-grid"> | ||
| | {{card|width=4 | ||
| | |header=Overview | ||
|content=Hilda is a long range zoner similar to Nu-13. Her normals keep the opponent out and attack from a distance, with {{clr|2|5B}} covering the whole screen. She has many ways to mix up the opponent, with the low attack {{clr|3|2C}}, Fallen Pain, and her ridiculously long ranged Clash Assault. In addition to mixups and playing keepaway, Hilda can easily apply wakeup pressure thanks to Condensity Gloom. Despite her low damage output, Hilda can relentlessly pressure the opponent once a knockdown is secured, though she suffers when being pressured herself by rushdown characters due to not having much in the way of defensive options outside of Reject Guard and Reversal Action. To play Hilda effectively, keep the opponent away with her far reaching normals, apply okizeme, and do not let the opponent get in close. | |||
| | }} | ||
{{BBTag/Infobox | |||
| fastestAttack = [[#2A|2A]] (11F) | |||
| reversal = [[#Trifurcate|A+D]] (23F)<br/>[[#Impalement|236B+C]] (20F) | |||
}} | |||
{{ProsAndCons | |||
|intro= | |||
|pros= | |pros= | ||
* Very strong keep-out game. 5A pushes opponents back quite a distance and 214A prevents button presses on wakeup. | * Very strong keep-out game. {{clr|1|5A}} pushes opponents back quite a distance and {{clr|1|214A}} prevents button presses on wakeup. | ||
* Large hitboxes that can be thrown out to disrupt momentum. | * Large hitboxes that can be thrown out to disrupt momentum. | ||
* DP is extremely large, easily punishing players who like to super jump-in and block. | * DP is extremely large, easily punishing players who like to super jump-in and block. | ||
| Line 22: | Line 28: | ||
* Attacks and assists have higher than average startup and recovery. | * Attacks and assists have higher than average startup and recovery. | ||
}} | }} | ||
</div> | |||
==Normal Moves== | ==Normal Moves== | ||
===<big>5A</big>=== | ===<big>{{clr|1|5A}}</big>=== | ||
{{BBTag Move Card|game=BBTag | |||
|input=5A,5AA,5AAA,5AAAA | |||
|versioned=input | |||
|description= | |||
{ | |||
{ | |||
| | |||
| | |||
| | |||
* Jump cancelable. | * Jump cancelable. | ||
* Throw cancelable. | * Throw cancelable. | ||
Hilda projects a spinning blade in front of her that cuts four times. Each hit has significant pushback on both hit and block, in order to ensure that chaining into normals such as 2C or 2B won't whiff. Due to being on a common "default" button, this normal is seen a decent amount despite not being great to start pressure or even start a combo. With a P1 of 80, 5A is actually a relatively weak combo starter and if not for being a UNI 5A that allows jump cancel on block, it would be a fairly mediocre pressure button as well. The hitbox has good horizontal reach, but is lower than the actual sprite effect, so 5A is not as useful for catching aerial opponents as it might look. | Hilda projects a spinning blade in front of her that cuts four times. Each hit has significant pushback on both hit and block, in order to ensure that chaining into normals such as {{clr|3|2C}} or {{clr|2|2B}} won't whiff. Due to being on a common "default" button, this normal is seen a decent amount despite not being great to start pressure or even start a combo. With a P1 of 80, {{clr|1|5A}} is actually a relatively weak combo starter and if not for being a UNI {{clr|1|5A}} that allows jump cancel on block, it would be a fairly mediocre pressure button as well. The hitbox has good horizontal reach, but is lower than the actual sprite effect, so {{clr|1|5A}} is not as useful for catching aerial opponents as it might look. | ||
---- | ---- | ||
* Throw cancelable | * Throw cancelable | ||
Hilda creates a blade above her that spins away, pushing the opponent back. Mostly just combo filler. Can be bad to whiff with in pressure if the opponent happened to pushblock against 5A. | Hilda creates a blade above her that spins away, pushing the opponent back. Mostly just combo filler. Can be bad to whiff with in pressure if the opponent happened to pushblock against {{clr|1|5A}}. | ||
---- | ---- | ||
* Throw cancelable | * Throw cancelable | ||
* Launches on hit | * Launches on hit | ||
Hilda uses the blade from 5AA and causes it to spin towards her, bringing the opponent in and launching on hit. Decent launcher for combo routes, and the vacuum pushback on block guarantees Hilda to be in range to connect with 2A afterward. | Hilda uses the blade from {{clr|1|5AA}} and causes it to spin towards her, bringing the opponent in and launching on hit. Decent launcher for combo routes, and the vacuum pushback on block guarantees Hilda to be in range to connect with {{clr|1|2A}} afterward. | ||
---- | ---- | ||
* Opponent cannot Cross Burst during this attack | * Opponent cannot Cross Burst during this attack | ||
* Wall bounces on hit | * Wall bounces on hit | ||
The same animation as Hilda's throw. Hilda materializes a field of darkness around the opponent from the ground that catches them on hit and sends them flying backward. Though it looks like a hit-grab, it's mysteriously able to still hit two characters at once, allowing for a happy birthday Cross Raid afterward. | The same animation as Hilda's throw. Hilda materializes a field of darkness around the opponent from the ground that catches them on hit and sends them flying backward. Though it looks like a hit-grab, it's mysteriously able to still hit two characters at once, allowing for a happy birthday Cross Raid afterward. | ||
}} | |||
===<big>5B</big>=== | ===<big>{{clr|2|5B}}</big>=== | ||
{{BBTag Move Card|game=BBTag | |||
|input=5B,5BB,5BBB | |||
|versioned=input | |||
|description= | |||
{ | |||
{ | |||
| | |||
| | |||
| | |||
* Launches on hit | * Launches on hit | ||
* Jump cancelable on hit | * Jump cancelable on hit | ||
| Line 112: | Line 65: | ||
---- | ---- | ||
* Ground bounce on hit | * Ground bounce on hit | ||
Tracking overhead pin, low ground bounce on hit. There will always be a gap on block between 5BB and 5BBB, so be careful about using this against characters with invincible options at fullscreen distance. While very minus on block, Hilda is able to special cancel the pin to either be safer afterward or sneak in advantage/setup against an opponent who continues waiting. | Tracking overhead pin, low ground bounce on hit. There will always be a gap on block between {{clr|2|5BB}} and {{clr|2|5BBB}}, so be careful about using this against characters with invincible options at fullscreen distance. While very minus on block, Hilda is able to special cancel the pin to either be safer afterward or sneak in advantage/setup against an opponent who continues waiting. | ||
}} | |||
===<big>5C</big>=== | ===<big>{{clr|3|5C}}</big>=== | ||
{{BBTag Move Card|game=BBTag | |||
|input=5C | |||
|description= | |||
Body attribute, which means it can't be invul'd through with anti-airs, but attacks that have body invul or armor, such as Yang {{clr|2|5B}}, will work against it. Since Hilda has no shortage of overhead options with reasonable returns, generally this is just used as a combo ender after {{clr|2|5BBB}} to close distance and set up a safejump. | |||
{| | |||
| | |||
| | |||
}} | }} | ||
===<big>2A</big>=== | |||
===<big>{{clr|1|2A}}</big>=== | |||
{{BBTag Move Card|game=BBTag | |||
|input=2A | |||
|description= | |||
{ | |||
{ | |||
| | |||
| | |||
| | |||
* Jump cancelable | * Jump cancelable | ||
* Throw cancelable | * Throw cancelable | ||
Mostly the same as in UNI, but no longer has a point blank blindspot. Hilda's fastest normal (aside from universal throw). While Hilda has no good whiff cancel options compared to other UNI characters, this generally isn't an issue since 5A and 2A have enough reach to almost always connect on block anyway. Despite appearances, 2A is a mid, though it's still foot attribute for the purposes of getting past body armor or invul. | * Not a low | ||
Mostly the same as in UNI, but no longer has a point blank blindspot. Hilda's fastest normal (aside from universal throw). While Hilda has no good whiff cancel options compared to other UNI characters, this generally isn't an issue since {{clr|1|5A}} and {{clr|1|2A}} have enough reach to almost always connect on block anyway. Despite appearances, {{clr|1|2A}} is a mid, though it's still foot attribute for the purposes of getting past body armor or invul. | |||
When used in sandwich mixups, 2A > 2C is useful for setting up a low with a very small gap. | When used in sandwich mixups, {{clr|1|2A}} > {{clr|3|2C}} is useful for setting up a low with a very small gap. | ||
}} | |||
===<big>2B</big>=== | ===<big>{{clr|2|2B}}</big>=== | ||
{{BBTag Move Card|game=BBTag | |||
|input=2B,2BB | |||
|versioned=input | |||
|description= | |||
Somewhat unwieldy anti-air. Can cancel into {{clr|2|2BB}} even on whiff. | |||
---- | |||
Wider extra hitbox that can be generated even if {{clr|2|2B}} whiffed. However, it's much less flexible, having only {{clr|2|5B}} as a gatling option afterward and not being jump cancelable even on hit. {{clr|2|2BB}} has a very long untech time, which enables routings such as delayed cancels into {{clr|1|236A}}. | |||
| | |||
{{ | |||
{{ | |||
| | |||
| | |||
| | |||
}} | }} | ||
|} | |||
===<big>{{clr|3|2C}}</big>=== | |||
{{BBTag Move Card|game=BBTag | |||
|input=2C,2CC | |||
|versioned=input | |||
|description= | |||
A far-reaching, low-hitting normal. Unlike most {{clr|3|2C}} normals, this one doesn't launch on hit. Can be canceled into {{clr|3|2CC}} even on whiff. | |||
---- | ---- | ||
Wider extra hitbox that can be generated even if | Wider extra hitbox that can be generated even if {{clr|3|2C}} whiffed. However, it's much less flexible, having only {{clr|2|5B}} as a gatling option afterward and not being jump cancelable even on hit. Like {{clr|3|2C}}, {{clr|3|2CC}} also hits low, which can be used to check for opponents trying to either jump after blocked {{clr|3|2C}} or guess-block against a potential overhead. {{clr|3|2CC}} also launches on hit, giving Hilda some of her better combo routings. | ||
}} | |||
===<big> | ===<big>{{clr|1|j.A}}</big>=== | ||
{{BBTag Move Card|game=BBTag | |||
|input=j.A,j.AA | |||
|versioned=input | |||
|description= | |||
This can be used as a rising overhead against a decent number of characters. | |||
---- | |||
Mostly just an afterthought for continuing pressure or a combo. It's relatively quick, so it maintains tight blockstun from {{clr|1|j.A}}. | |||
| | |||
| | |||
}} | }} | ||
===<big>j.B</big>=== | ===<big>{{clr|2|j.B}}</big>=== | ||
{{BBTag Move Card|game=BBTag | |||
|input=j.B,j.BB | |||
|versioned=input | |||
|description= | |||
{{ | |||
| | |||
| | |||
| | |||
* Jump cancelable | * Jump cancelable | ||
* Special cancelable | * Special cancelable | ||
* Has recovery until landing | * Has recovery until landing | ||
A more diagonal and less horizontal version of UNI j.236A/B. Fairly decent for setting up an air-to-ground snipe, the combination of Hilda's j.A and this move emphasize her relative lack of air-to-air options. | * Not an overhead | ||
A more diagonal and less horizontal version of UNI {{clr|1|j.236A}}/{{clr|2|B}}. Fairly decent for setting up an air-to-ground snipe, the combination of Hilda's {{clr|1|j.A}} and this move emphasize her relative lack of air-to-air options. | |||
---- | ---- | ||
* Jump cancelable | * Jump cancelable | ||
* Special cancelable | * Special cancelable | ||
* Has recovery until landing | * Has recovery until landing | ||
Hilda teleports to above and in front of the opponent with this move. Due to the teleport, you're pretty much guaranteed to connect with it even if the j.B hits from fairly low in an air-hit situation. On block, the teleport lets Hilda quickly shift from far zoning into close-mid-range pressure. On occasion after a blocked j.B, all of the spears of this attack can whiff depending on the opponent's current momentum, leaving Hilda fully vulnerable to a punish. | Hilda teleports to above and in front of the opponent with this move. Due to the teleport, you're pretty much guaranteed to connect with it even if the {{clr|2|j.B}} hits from fairly low in an air-hit situation. On block, the teleport lets Hilda quickly shift from far zoning into close-mid-range pressure. On occasion after a blocked {{clr|2|j.B}}, all of the spears of this attack can whiff depending on the opponent's current momentum, leaving Hilda fully vulnerable to a punish. | ||
< | }} | ||
</ | |||
===<big>{{clr|3|j.C}}</big>=== | |||
{{BBTag Move Card|game=BBTag | |||
|input=j.C | |||
|description= | |||
* Also not an overhead | |||
One of Hilda's best movement tools because of its range and speed. Will get you out of very sticky situations sometimes. This move is a mid and cannot be special canceled even on hit. You'll often want assist support when throwing this out in neutral, unless the objective is purely to escape out of a bad spot. In basic air combos, {{clr|3|j.C}} is fine as a standard knockdown hit after {{clr|2|j.BB}}. Depending on height, it might end up side-swapping afterward. | |||
Generally safe if they crouch block. If it hits higher up (due to the opponent stand blocking) typically -6 (vs yumi height), but up to -8 (vs tager height). | |||
}} | }} | ||
<br style="clear:both;"/> | <br style="clear:both;"/> | ||
==Universal Moves== | ==Universal Moves== | ||
===<big>Ground Throw</big>=== | ===<big>Ground Throw</big>=== | ||
{{InputBadge|{{clr|2|5B}}+{{clr|3|C}}}} | |||
{{BBTag Move Card|game=BBTag | |||
|input=BC | |||
|description= | |||
Wall-sticks in corner, wall-bounces otherwise. Since this throw always combos into {{clr|2|236B}}, which results in her highest-damage throw routes, you generally actually want to throw in the direction ''opposite'' where you intend to end the combo in. Due to Hilda's moveset being very slow across the board, ground throw ends up actually being her fastest button as the only one with a single-digit startup - this makes it her only option for punishing -10 attacks, as well as her only real contesting option against -4 attacks. | |||
{{ | |||
}} | }} | ||
===<big>Trifurcate</big>=== | ===<big>Trifurcate</big>=== | ||
{{InputBadge|{{clr|1|5A}}+{{clr|4|D}} (Air OK)}} | |||
{{BBTag Move Card|game=BBTag | |||
|input=AD,j.AD | |||
|versioned=input | |||
|description= | |||
Very slow but incredibly ranged DP. Hilda moves upward and slightly forward for this attack, and doesn't have any hitboxes directly above or behind her, which potentially leaves her open to the opponent jumping or airdashing past it. However, with the absurd reach both vertically and horizontally, there's not really any other means to avoid it, making this a fairly strong option to deny opponents trying to stay comfortable in the air against Hilda's otherwise relatively unwieldy anti-air options. | |||
{{ | |||
| | |||
| | |||
| | |||
}} | }} | ||
<br style="clear:both;"/> | <br style="clear:both;"/> | ||
| Line 430: | Line 173: | ||
==Skills== | ==Skills== | ||
===<big>Interference</big>=== | ===<big>Interference</big>=== | ||
{{InputBadge|{{clr|1|236A}}/{{clr|2|B}}}} | |||
{{BBTag Move Card|game=BBTag | |||
|input=236A,236B | |||
|versioned=input | |||
|description= | |||
| | |||
{| | |||
{{ | |||
| | |||
| | |||
| | |||
| | |||
Wallbounce spike hit. Decent combo ender to put the opponent full-screen, and in the corner from certain heights will even provide a safejump. At the upper tip of the hitbox when midscreen, this can be used to extend combos against launched opponents from the ground. | Wallbounce spike hit. Decent combo ender to put the opponent full-screen, and in the corner from certain heights will even provide a safejump. At the upper tip of the hitbox when midscreen, this can be used to extend combos against launched opponents from the ground. | ||
---- | ---- | ||
Wallbounce spike hit that sends toward Hilda. Very slow, but decently plus on block. Horizontally tracks to just behind the opponent, guaranteeing that the attack will be in range as long as they don't jump. | Wallbounce spike hit that sends toward Hilda. Very slow, but decently plus on block. Horizontally tracks to just behind the opponent, guaranteeing that the attack will be in range as long as they don't jump. | ||
}} | |||
===<big>Condensity Gloom</big>=== | ===<big>Condensity Gloom</big>=== | ||
{{InputBadge|{{clr|1|214A}} (Air OK)}} | |||
{{BBTag Move Card|game=BBTag | |||
|input=214A,j.214A | |||
|versioned=input | |||
|description= | |||
Hilda floats backward while summoning a dark orb that fires spears downward and slightly angled towards opponent. Decent for setting up corner oki while simultaneously repositioning Hilda.Is also a great active switch tools since the spears will still come out even if your partner is hit. | |||
{{ | |||
| | |||
| | |||
| | |||
}} | }} | ||
===<big>Aspersivity</big>=== | ===<big>Aspersivity</big>=== | ||
{{InputBadge|{{clr|2|214B}} (Air OK)}} | |||
{{BBTag Move Card|game=BBTag | |||
|input=214B,j.214B | |||
|versioned=input | |||
|description= | |||
Six projectiles with incredibly long startup that slowly converge inward as they travel. Hilda has very low recovery after creating the projectiles, which can keep her safe when used as oki, and allow her to move in from behind the projectile cover to follow up with pressure or a mixup. The projectiles themselves have incredible durability, which can be useful for directly asserting horizontal space against another projectile user. | |||
{{ | |||
| | |||
| | |||
}} | }} | ||
==Extra Skills== | ==Extra Skills== | ||
===<big>Pillar of Revenance</big>=== | ===<big>Pillar of Revenance</big>=== | ||
{{InputBadge|{{clr|3|236C}}}} | |||
{{BBTag Move Card|game=BBTag | |||
|input=236C | |||
|description= | |||
Fullscreen tracking projectile that costs meter but hits low for fullscreen high/low mixup. Doesn't allow for a solo combo on hit, and just barely doesn't have enough knockdown advantage to allow a safejump. On hit, however, the rest of the move is unburstable. | |||
{| | |||
{{ | |||
{{ | |||
| | |||
| | |||
| | |||
}} | }} | ||
===<big>Fallen Pain</big>=== | ===<big>Fallen Pain</big>=== | ||
{{InputBadge|{{clr|3|214C}} (Air OK)}} | |||
{{BBTag Move Card|game=BBTag | |||
|input=214C,j.214C | |||
|versioned=input | |||
|description= | |||
Fullscreen tracking air-ok projectile that hits high. In conjunction with {{clr|3|236C}} you can use this to make the opponent guess between high and low. Can be used for restand mixups with {{clr|1|2A}} since it does a crumple. You can combo off it even with {{clr|2|5B}} from fullscreen, won't lead to much damage but will give you time. | |||
| | |||
{| | |||
{{ | |||
| | |||
| | |||
| | |||
}} | }} | ||
<br style="clear:both;"/> | <br style="clear:both;"/> | ||
==Partner Skills== | ==Partner Skills== | ||
===<big>5P</big>=== | ===<big>{{clr|5|5P}}</big>=== | ||
{{InputBadge|{{clr|1|5A}}}} | |||
{{BBTag Move Card|game=BBTag | |||
|input=5P | |||
|description= | |||
Roughly the same as Hilda performing a running {{clr|1|5A}}, though this one launches on hit. Standard-esque {{clr|5|5P}} with multiple hits to provide serviceable lockdown on block, though the slower startup makes it impossible for this to meaty with against wakeups. This is your only usable assist to punish bursts with. | |||
{| | |||
{{ | |||
{{ | |||
| | |||
| | |||
}} | }} | ||
===<big>6P</big>=== | |||
===<big>{{clr|5|6P}}</big>=== | |||
{{InputBadge|Aspersivity}} | |||
{{BBTag Move Card|game=BBTag | |||
|input=6P | |||
|description= | |||
Just like the point version, this move has a ton of startup but very low recovery, which can make it a little awkward to active switch with outside of Cross Combo. The projectiles themselves have the same overall strengths and utility as the point version, though. | |||
{| | |||
| | |||
| | |||
}} | }} | ||
===<big>4P</big>=== | |||
===<big>{{clr|5|4P}}</big>=== | |||
{{InputBadge|UNI {{clr|3|5[C]}}}} | |||
{{BBTag Move Card|game=BBTag | |||
|input=4P | |||
|description= | |||
A monstrous expanding assist that covers a wide area both on the ground and in the air, on top of dealing good damage. Being a very slow assist, this one is best used with something else from the point character to cover for its startup, though the insane coverage and lockdown offered afterward provide all sorts of possibilities. Despite appearances, this attack does not count as a projectile. | |||
{| | |||
| | |||
| | |||
}} | }} | ||
<br style="clear:both;"/> | <br style="clear:both;"/> | ||
| Line 694: | Line 257: | ||
==Distortion Skills== | ==Distortion Skills== | ||
===<big>Impalement</big>=== | ===<big>Impalement</big>=== | ||
{{InputBadge|{{clr|2|236B}}+{{clr|3|C}}}} | |||
{{BBTag Move Card|game=BBTag | |||
|input=236BC | |||
|description= | |||
One of the true fullscreen supers in this game, you cannot dodge it without invulnerability as it hits literally everywhere. Single target super but doesn't deal as much damage as that kind of super usually does. The enhanced version deals a whopping 1 more minimum damage than the regular one - this is a very lackluster super to end a combo with. Projectile attribute. Has enough advantage on knockdown to allow a safejump afterward. | |||
| | |||
{| | |||
{{ | |||
| | |||
| | |||
| | |||
}} | }} | ||
===<big>Nail Torrent</big>=== | ===<big>Nail Torrent</big>=== | ||
{{InputBadge|{{clr|2|214B}}+{{clr|3|C}} (Air OK)}} | |||
{{BBTag Move Card|game=BBTag | |||
|input=214BC,j.214BC | |||
|versioned=input | |||
|description= | |||
Lockdown utility super with relatively poor invulnerability but excellent for forcing pressure. If opponent air-blocks, this lasts more than long enough to punish with an air-unblockable DP. Fairly good for forced chip damage during Resonance as well. Can also be used for stalling | |||
{{ | |||
| | |||
| | |||
| | |||
}} | }} | ||
<br style="clear:both;"/> | <br style="clear:both;"/> | ||
==Distortion Skill Duo== | ==Distortion Skill Duo== | ||
===<big>Impalement</big>=== | ===<big>Impalement</big>=== | ||
{{InputBadge|{{clr|5|P}} during Partner's Distortion Skill}} | |||
{{BBTag Move Card|game=BBTag | |||
|input=Distortion Skill Duo | |||
|description= | |||
Works just like point Impalement, but follows the DSD rules of single-target supers, dealing very solid damage unlike the point version. If you plan on ending a combo in double supers, you almost always want Hilda to be the one going second, due to the severe damage difference between her point and Duo versions. | |||
{{ | |||
| | |||
| | |||
| | |||
}} | }} | ||
<br style="clear:both;"/> | <br style="clear:both;"/> | ||
==Astral Heat== | ==Astral Heat== | ||
===<big>In The Darkness</big>=== | ===<big>In The Darkness</big>=== | ||
{{InputBadge|{{clr|2|222B}}+{{clr|3|C}} when [[BBTag/Mechanics#Astral Heat|Astral Conditions]] are met}} | |||
{{BBTag Move Card|game=BBTag | |||
|input=222BC | |||
|description= | |||
Hilda summons a bunch of swords from the ground under the opponent. You probably won't get the opportunity for this often, since Hilda has plenty of very good reasons to spend her meter on other things most of the time. | |||
| | |||
{{ | |||
| | |||
| | |||
| | |||
}} | }} | ||
<br style="clear:both;"/> | <br style="clear:both;"/> | ||
== | ==Colors== | ||
*[https://blazblue.wiki/wiki/Hilda#Palettes Color Palettes on https://blazblue.wiki] | *[https://blazblue.wiki/wiki/Hilda#Palettes Color Palettes on https://blazblue.wiki] | ||
==Navigation== | ==Navigation== | ||
<center>{{Character Label|BBTag|Hilda|36px}}</center> | <center>{{Character Label|BBTag|Hilda|size=36px}}</center> | ||
{{ | {{BBTag/CharacterLinks}} | ||
{{notice|To edit frame data, edit values in [[{{PAGENAME}}/Data]].}} | {{notice|To edit frame data, edit values in [[{{PAGENAME}}/Data]].}} | ||
{{ | |||
{{BBTag/Navigation}} | |||
Latest revision as of 20:18, 22 April 2024
The BBTag wiki has major gaps in information. The game has gone through numerous significant changes since its release. As a result, many BBTag pages on Dustloop Wiki are out of date or lacking important information.
We need your help expanding the content for this game. If you have knowledge to share, or know people who can help, please contribute to the wiki by editing sections where you can.Overview
 |
| Health |
| 17,000 |
| Prejump |
| 4F |
| Backdash |
| 28F (1~7F Inv All) |
| Fastest Attack |
| 2A (11F) |
| Reversals |
| A+D (23F) 236B+C (20F) |
- Very strong keep-out game. 5A pushes opponents back quite a distance and 214A prevents button presses on wakeup.
- Large hitboxes that can be thrown out to disrupt momentum.
- DP is extremely large, easily punishing players who like to super jump-in and block.
- Three very large multi-hit assists.
- Has tracking high/low moves.
- Great use of meter, especially in resonance.
- Has great active switch tools.
- Difficult to do exceed 5k damage in a combo without meter or assist.
- Projectile invulnerable options allow characters to ignore many of her moves.
- Struggles against quick / rushdown characters.
- DP is directional, slow, and does not auto-correct against cross-ups.
- Attacks and assists have higher than average startup and recovery.
Normal Moves
5A
| Version | Damage | Guard | Startup | Active | Recovery | On-Block | Attribute | Invuln |
|---|---|---|---|---|---|---|---|---|
| 5A | 550×4 | All | 12 | 2,2,2,2 | 24 | -9 | B | |
| 5AA | 1500 | All | 11 | 3 | 24 | -17 | B | |
| 5AAA | 1500 | All | 16 | 1 | 20 | -19 | B | |
| 5AAAA | 0×2, 2500 | All | 16 | 9 | 33 | -20 | B |
- Jump cancelable.
- Throw cancelable.
Hilda projects a spinning blade in front of her that cuts four times. Each hit has significant pushback on both hit and block, in order to ensure that chaining into normals such as 2C or 2B won't whiff. Due to being on a common "default" button, this normal is seen a decent amount despite not being great to start pressure or even start a combo. With a P1 of 80, 5A is actually a relatively weak combo starter and if not for being a UNI 5A that allows jump cancel on block, it would be a fairly mediocre pressure button as well. The hitbox has good horizontal reach, but is lower than the actual sprite effect, so 5A is not as useful for catching aerial opponents as it might look.
- Throw cancelable
Hilda creates a blade above her that spins away, pushing the opponent back. Mostly just combo filler. Can be bad to whiff with in pressure if the opponent happened to pushblock against 5A.
- Throw cancelable
- Launches on hit
Hilda uses the blade from 5AA and causes it to spin towards her, bringing the opponent in and launching on hit. Decent launcher for combo routes, and the vacuum pushback on block guarantees Hilda to be in range to connect with 2A afterward.
- Opponent cannot Cross Burst during this attack
- Wall bounces on hit
The same animation as Hilda's throw. Hilda materializes a field of darkness around the opponent from the ground that catches them on hit and sends them flying backward. Though it looks like a hit-grab, it's mysteriously able to still hit two characters at once, allowing for a happy birthday Cross Raid afterward.
| Version | Level | P1 | P2 |
|---|---|---|---|
| 5A | 3 | 80 | 80 |
| 5AA | 3 | 100 | 80 |
| 5AAA | 3 | 100 | 70 |
| 5AAAA | 4×2, 5 | 100 | 100, 85, 100 |
5A:
5AA:
5AAA:
5AAAA:
5B
| Version | Damage | Guard | Startup | Active | Recovery | On-Block | Attribute | Invuln |
|---|---|---|---|---|---|---|---|---|
| 5B | 1700 | All | 21 | 2 | Total 52 | -7 | P1 | |
| 5BB | 1700 | All | 21 | 3 | Total 46 | -7 | P1 | |
| 5BBB | 1500 | High | 21 | Until L | Total 58 | -15 | P1 |
- Launches on hit
- Jump cancelable on hit
Fullscreen laser type projectile. Hitbox is a fair bit lower than the visual appearance, making it worse for catching people out of the air than it looks. The jump cancel property makes this a staple of Hilda's corner carry bnb.
Tracking ground spike, hits mid. As long as you're at a distance, this is decently safe to end with on block.
- Ground bounce on hit
Tracking overhead pin, low ground bounce on hit. There will always be a gap on block between 5BB and 5BBB, so be careful about using this against characters with invincible options at fullscreen distance. While very minus on block, Hilda is able to special cancel the pin to either be safer afterward or sneak in advantage/setup against an opponent who continues waiting.
| Version | Level | P1 | P2 |
|---|---|---|---|
| 5B | 4 | 80 | 75 |
| 5BB | 4 | 80 | 85 |
| 5BBB | 3 | 80 | 90 |
5B:
5BB:
5BBB:
- Startup to hit standing Ragna is 24, frame adv listed is based on this
- Startup to hit crouching Ragna is 26
5C
| Damage | Guard | Startup | Active | Recovery | On-Block | Attribute | Invuln |
|---|---|---|---|---|---|---|---|
| 1500 | High | 26 | 3 | 5+13L | -4 | B |
Body attribute, which means it can't be invul'd through with anti-airs, but attacks that have body invul or armor, such as Yang 5B, will work against it. Since Hilda has no shortage of overhead options with reasonable returns, generally this is just used as a combo ender after 5BBB to close distance and set up a safejump.
| Level | P1 | P2 |
|---|---|---|
| 3 | 100 | 100 |
2A
| Damage | Guard | Startup | Active | Recovery | On-Block | Attribute | Invuln |
|---|---|---|---|---|---|---|---|
| 1000 | All | 11 | 3 | 22 | -11 | F |
- Jump cancelable
- Throw cancelable
- Not a low
Mostly the same as in UNI, but no longer has a point blank blindspot. Hilda's fastest normal (aside from universal throw). While Hilda has no good whiff cancel options compared to other UNI characters, this generally isn't an issue since 5A and 2A have enough reach to almost always connect on block anyway. Despite appearances, 2A is a mid, though it's still foot attribute for the purposes of getting past body armor or invul.
When used in sandwich mixups, 2A > 2C is useful for setting up a low with a very small gap.
| Level | P1 | P2 |
|---|---|---|
| 2 | 100 | 75 |
2B
| Version | Damage | Guard | Startup | Active | Recovery | On-Block | Attribute | Invuln |
|---|---|---|---|---|---|---|---|---|
| 2B | 1500 | All | 11 | 3 | 21 | -17 | B | 9~13 H |
| 2BB | 1500 | 13 | 3 | 32 | -18 | B |
Somewhat unwieldy anti-air. Can cancel into 2BB even on whiff.
Wider extra hitbox that can be generated even if 2B whiffed. However, it's much less flexible, having only 5B as a gatling option afterward and not being jump cancelable even on hit. 2BB has a very long untech time, which enables routings such as delayed cancels into 236A.
| Version | Level | P1 | P2 |
|---|---|---|---|
| 2B | 3 | 90 | 80 |
| 2BB | 3 | 100 | 80 |
2B:
2BB:
2C
| Version | Damage | Guard | Startup | Active | Recovery | On-Block | Attribute | Invuln |
|---|---|---|---|---|---|---|---|---|
| 2C | 1500 | Low | 14 | 3 | 29 | -15 | F | |
| 2CC | 1500 | Low | 13 | 3 | 32 | -18 | F |
A far-reaching, low-hitting normal. Unlike most 2C normals, this one doesn't launch on hit. Can be canceled into 2CC even on whiff.
Wider extra hitbox that can be generated even if 2C whiffed. However, it's much less flexible, having only 5B as a gatling option afterward and not being jump cancelable even on hit. Like 2C, 2CC also hits low, which can be used to check for opponents trying to either jump after blocked 2C or guess-block against a potential overhead. 2CC also launches on hit, giving Hilda some of her better combo routings.
| Version | Level | P1 | P2 |
|---|---|---|---|
| 2C | 3 | 90 | 80 |
| 2CC | 3 | 90 | 80 |
2C:
2CC:
j.A
| Version | Damage | Guard | Startup | Active | Recovery | On-Block | Attribute | Invuln |
|---|---|---|---|---|---|---|---|---|
| j.A | 1500 | High | 16 | 3 | 20 | H | ||
| j.AA | 1500 | High | 10 | 3 | 24 | H |
This can be used as a rising overhead against a decent number of characters.
Mostly just an afterthought for continuing pressure or a combo. It's relatively quick, so it maintains tight blockstun from j.A.
| Version | Level | P1 | P2 |
|---|---|---|---|
| j.A | 3 | 80 | 80 |
| j.AA | 3 | 80 | 80 |
j.A:
j.AA:
j.B
| Version | Damage | Guard | Startup | Active | Recovery | On-Block | Attribute | Invuln |
|---|---|---|---|---|---|---|---|---|
| j.B | 1700 | All | 21 | 2 | Total Until L+6L | H | ||
| j.BB | 450×4 | All | 20 | P{(3)P}×3 | Total Until L+20L | P1 | 9~15 All |
- Jump cancelable
- Special cancelable
- Has recovery until landing
- Not an overhead
A more diagonal and less horizontal version of UNI j.236A/B. Fairly decent for setting up an air-to-ground snipe, the combination of Hilda's j.A and this move emphasize her relative lack of air-to-air options.
- Jump cancelable
- Special cancelable
- Has recovery until landing
Hilda teleports to above and in front of the opponent with this move. Due to the teleport, you're pretty much guaranteed to connect with it even if the j.B hits from fairly low in an air-hit situation. On block, the teleport lets Hilda quickly shift from far zoning into close-mid-range pressure. On occasion after a blocked j.B, all of the spears of this attack can whiff depending on the opponent's current momentum, leaving Hilda fully vulnerable to a punish.
| Version | Level | P1 | P2 |
|---|---|---|---|
| j.B | 4 | 80 | 75 |
| j.BB | 2 | 80 | 80 |
j.B:
j.BB:
- Each P in active frames represents a projectile spawned
j.C
| Damage | Guard | Startup | Active | Recovery | On-Block | Attribute | Invuln |
|---|---|---|---|---|---|---|---|
| 1700 | All | 15 | Until L | 22 | 0~-8 | H |
- Also not an overhead
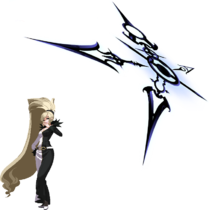
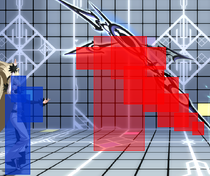
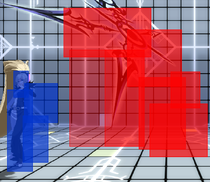
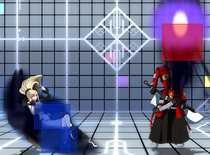
One of Hilda's best movement tools because of its range and speed. Will get you out of very sticky situations sometimes. This move is a mid and cannot be special canceled even on hit. You'll often want assist support when throwing this out in neutral, unless the objective is purely to escape out of a bad spot. In basic air combos, j.C is fine as a standard knockdown hit after j.BB. Depending on height, it might end up side-swapping afterward.
Generally safe if they crouch block. If it hits higher up (due to the opponent stand blocking) typically -6 (vs yumi height), but up to -8 (vs tager height).
| Level | P1 | P2 |
|---|---|---|
| 4 | 80 | 85 |
Universal Moves
Ground Throw
5B+C
| Damage | Guard | Startup | Active | Recovery | On-Block | Attribute | Invuln |
|---|---|---|---|---|---|---|---|
| 0, 2000 | Throw | 7~30 | 3 | 23 | T |
Wall-sticks in corner, wall-bounces otherwise. Since this throw always combos into 236B, which results in her highest-damage throw routes, you generally actually want to throw in the direction opposite where you intend to end the combo in. Due to Hilda's moveset being very slow across the board, ground throw ends up actually being her fastest button as the only one with a single-digit startup - this makes it her only option for punishing -10 attacks, as well as her only real contesting option against -4 attacks.
| Level | P1 | P2 |
|---|---|---|
| 0, 5 | 100 | 50 |
- Minimum damage 2000
Trifurcate
5A+D (Air OK)
| Version | Damage | Guard | Startup | Active | Recovery | On-Block | Attribute | Invuln |
|---|---|---|---|---|---|---|---|---|
| AD | 1200×3 | Air Unblockable | 23 | 5,4×3 | 34+12L | -35 | B | 1~26 All |
| j.AD | 1200×3 | All | 23 | 5,4×3 | Until L+12L | H | 1~26 All |
Very slow but incredibly ranged DP. Hilda moves upward and slightly forward for this attack, and doesn't have any hitboxes directly above or behind her, which potentially leaves her open to the opponent jumping or airdashing past it. However, with the absurd reach both vertically and horizontally, there's not really any other means to avoid it, making this a fairly strong option to deny opponents trying to stay comfortable in the air against Hilda's otherwise relatively unwieldy anti-air options.
| Version | Level | P1 | P2 |
|---|---|---|---|
| AD | 4 | 80 | 60 |
| j.AD | 4 | 80 | 60 |
AD:
- Minimum Damage 60×3 (180)
j.AD:
- Minimum Damage 60×3 (180)
Skills
Interference
236A/B
| Version | Damage | Guard | Startup | Active | Recovery | On-Block | Attribute | Invuln |
|---|---|---|---|---|---|---|---|---|
| 236A | 2000 | All | 16 | 3 | Total 55 | -14 | P1 | |
| 236B | 2000 | All | 37 | 3 | Total 55 | +3 | P1 |
Wallbounce spike hit. Decent combo ender to put the opponent full-screen, and in the corner from certain heights will even provide a safejump. At the upper tip of the hitbox when midscreen, this can be used to extend combos against launched opponents from the ground.
Wallbounce spike hit that sends toward Hilda. Very slow, but decently plus on block. Horizontally tracks to just behind the opponent, guaranteeing that the attack will be in range as long as they don't jump.
| Version | Level | P1 | P2 |
|---|---|---|---|
| 236A | 5 | 80 | 90 |
| 236B | 5 | 80 | 90 |
236A:
- Minimum Damage 100
236B:
- Minimum Damage 100
Condensity Gloom
214A (Air OK)
| Version | Damage | Guard | Startup | Active | Recovery | On-Block | Attribute | Invuln |
|---|---|---|---|---|---|---|---|---|
| 214A | 500×8 | All | 65 | P{(3)P}×7 | Total 42+12L | P1 | ||
| j.214A | 500×8 | All | 65 | P{(3)P}×7 | Total Until L+12L | P1 |
Hilda floats backward while summoning a dark orb that fires spears downward and slightly angled towards opponent. Decent for setting up corner oki while simultaneously repositioning Hilda.Is also a great active switch tools since the spears will still come out even if your partner is hit.
| Version | Level | P1 | P2 |
|---|---|---|---|
| 214A | 2 | 80 | 80 |
| j.214A | 2 | 80 | 80 |
214A:
- Each P in active frames represents a projectile spawned
- Minimum Damage 25×8 (200)
j.214A:
- Each PP in active frames represents a projectile spawned
- Minimum Damage 25×8 (200)
Aspersivity
214B (Air OK)
| Version | Damage | Guard | Startup | Active | Recovery | On-Block | Attribute | Invuln |
|---|---|---|---|---|---|---|---|---|
| 214B | 800×6 | All | 55 | P×6 | Total 67 | +9 | P1 | |
| j.214B | 800×6 | All | 55 | P×6 | Total Until L+6L | P1 |
Six projectiles with incredibly long startup that slowly converge inward as they travel. Hilda has very low recovery after creating the projectiles, which can keep her safe when used as oki, and allow her to move in from behind the projectile cover to follow up with pressure or a mixup. The projectiles themselves have incredible durability, which can be useful for directly asserting horizontal space against another projectile user.
| Version | Level | P1 | P2 |
|---|---|---|---|
| 214B | 3 | 80 | 90×6 |
| j.214B | 3 | 80 | 90×6 |
214B:
- Each P in active frames represents a projectile spawned
- Minimum Damage 40×6 (240)
j.214B:
- Each P in active frames represents a projectile spawned
- Minimum Damage 40×6 (240)
Extra Skills
Pillar of Revenance
236C
| Damage | Guard | Startup | Active | Recovery | On-Block | Attribute | Invuln |
|---|---|---|---|---|---|---|---|
| 1700, 2000 | Low | 21 | 3 | Total 59 | -10 | P1 |
Fullscreen tracking projectile that costs meter but hits low for fullscreen high/low mixup. Doesn't allow for a solo combo on hit, and just barely doesn't have enough knockdown advantage to allow a safejump. On hit, however, the rest of the move is unburstable.
| Level | P1 | P2 |
|---|---|---|
| 4 | 70, 63 | 90, 100 |
- Minimum Damage 170, 200 (370)
Fallen Pain
214C (Air OK)
| Version | Damage | Guard | Startup | Active | Recovery | On-Block | Attribute | Invuln |
|---|---|---|---|---|---|---|---|---|
| 214C | 1700, 0 | High | 23 | Until L+2 | Total 60 | -12 | P1 | |
| j.214C | 1700, 0 | High | 33 | Until L+2, 3 | Total 62 | P1 |
Fullscreen tracking air-ok projectile that hits high. In conjunction with 236C you can use this to make the opponent guess between high and low. Can be used for restand mixups with 2A since it does a crumple. You can combo off it even with 5B from fullscreen, won't lead to much damage but will give you time.
| Version | Level | P1 | P2 |
|---|---|---|---|
| 214C | 4 | 80 | 75 |
| j.214C | 4 | 80 | 75 |
214C:
- Startup to hit standing Ragna is 27, frame adv listed is based on this
- Startup to hit crouching Ragna is 30
- Minimum Damage 170
- Crumple Duration 100F, Crumple Fall 41F
j.214C:
- Minimum Damage 170
- Crumple Duration 100F, Crumple Fall 41F
Partner Skills
5P
5A
| Damage | Guard | Startup | Active | Recovery | On-Block | Attribute | Invuln |
|---|---|---|---|---|---|---|---|
| 650×4 | All | (18)+18 | 2×4 | 32 | -17 | B |
Roughly the same as Hilda performing a running 5A, though this one launches on hit. Standard-esque 5P with multiple hits to provide serviceable lockdown on block, though the slower startup makes it impossible for this to meaty with against wakeups. This is your only usable assist to punish bursts with.
| Level | P1 | P2 |
|---|---|---|
| 3 | 70 | 80 |
- Minimum Damage 32×4 (128)
6P
Aspersivity
| Damage | Guard | Startup | Active | Recovery | On-Block | Attribute | Invuln |
|---|---|---|---|---|---|---|---|
| 800×6 | All | (18)+54 | P×6 | Total (18)+66 | +9 | P1 |
Just like the point version, this move has a ton of startup but very low recovery, which can make it a little awkward to active switch with outside of Cross Combo. The projectiles themselves have the same overall strengths and utility as the point version, though.
| Level | P1 | P2 |
|---|---|---|
| 3 | 70 | 90×6 |
- Each P in active frames represents a projectile spawned
- Minimum Damage 40×6 (240)
4P
UNI 5[C]
| Damage | Guard | Startup | Active | Recovery | On-Block | Attribute | Invuln |
|---|---|---|---|---|---|---|---|
| 800×4 | All | (18)+30 | 3×4 | 38 | -22 | B |
A monstrous expanding assist that covers a wide area both on the ground and in the air, on top of dealing good damage. Being a very slow assist, this one is best used with something else from the point character to cover for its startup, though the insane coverage and lockdown offered afterward provide all sorts of possibilities. Despite appearances, this attack does not count as a projectile.
| Level | P1 | P2 |
|---|---|---|
| 4 | 70 | 85 |
- Minimum Damage 40×4 (160)
Distortion Skills
Impalement
236B+C
| Damage | Guard | Startup | Active | Recovery | On-Block | Attribute | Invuln |
|---|---|---|---|---|---|---|---|
| 450, 262×11, 7685 [450, 185×33, 7139] | All | 11+(63 Flash)+9 | 5 | Total 78 | -40 | P2 | 1~24 All |
One of the true fullscreen supers in this game, you cannot dodge it without invulnerability as it hits literally everywhere. Single target super but doesn't deal as much damage as that kind of super usually does. The enhanced version deals a whopping 1 more minimum damage than the regular one - this is a very lackluster super to end a combo with. Projectile attribute. Has enough advantage on knockdown to allow a safejump afterward.
| Level | P1 | P2 |
|---|---|---|
| 4 | 80 | 60 |
- Values in [] are for Enhanced version
- Minimum Damage 90, 20×11, 1383 (1693)
- [Minimum Damage 90, 14×33, 1142 (1694)]
Nail Torrent
214B+C (Air OK)
| Version | Damage | Guard | Startup | Active | Recovery | On-Block | Attribute | Invuln |
|---|---|---|---|---|---|---|---|---|
| 214BC | 460×28 [460×35] | All | 9+(28 Flash)+1 | P{(2)P}×28 [P{(2)P}×35] | Total 45 | P2 | 1~8 All | |
| j.214BC | 460×28 [460×35] | All | 9+(28 Flash)+1 | P{(2)P}×28 [P{(2)P}×35] | Total 45 | P2 | 1~8 All |
Lockdown utility super with relatively poor invulnerability but excellent for forcing pressure. If opponent air-blocks, this lasts more than long enough to punish with an air-unblockable DP. Fairly good for forced chip damage during Resonance as well. Can also be used for stalling
| Version | Level | P1 | P2 |
|---|---|---|---|
| 214BC | 4 | 60 | 80 |
| j.214BC | 4 | 60 | 80 |
214BC:
- Each P in active frames represents a projectile spawned
- Values in [] are for Enhanced version
- Minimum Damage 79×28 (2212) [79×35 (2765)]
j.214BC:
- Each P in active frames represents a projectile spawned
- Values in [] are for Enhanced version
- Minimum Damage 79×28 (2212) [79×35 (2765)]
Distortion Skill Duo
Impalement
P during Partner's Distortion Skill
| Damage | Guard | Startup | Active | Recovery | On-Block | Attribute | Invuln |
|---|---|---|---|---|---|---|---|
| 250, 50×11, 1700 [250, 50×33, 1100] | All | 1+(107 Flash)+1 | 5 | 43 | -28 | B |
Works just like point Impalement, but follows the DSD rules of single-target supers, dealing very solid damage unlike the point version. If you plan on ending a combo in double supers, you almost always want Hilda to be the one going second, due to the severe damage difference between her point and Duo versions.
| Level | P1 | P2 |
|---|---|---|
| 4 | 100 | 100 |
- Values in [] are for Enhanced version
- Minimum Damage 2500 [3000]
Astral Heat
In The Darkness
222B+C when Astral Conditions are met
| Damage | Guard | Startup | Active | Recovery | On-Block | Attribute | Invuln |
|---|---|---|---|---|---|---|---|
| All | 1+(70 Flash)+9 | 3×5 | Total: 102 | -55 | B | 1~28 All |
Hilda summons a bunch of swords from the ground under the opponent. You probably won't get the opportunity for this often, since Hilda has plenty of very good reasons to spend her meter on other things most of the time.
| Level | P1 | P2 |
|---|---|---|
| 5 |
Colors


