mNo edit summary |
(→j.2H) |
||
| Line 3: | Line 3: | ||
{{UnderConstructionDisclaimer}} | {{UnderConstructionDisclaimer}} | ||
{{CharaOverview | {{CharaOverview | ||
|overview= Frieza is designed to be a zoner, and he's a very good one on paper; he has several fast projectiles that cover many different angles, good normals with longer range than average, and excellent assists that are frustrating to deal with. The problem is that DBFZ is very rushdown-oriented, meaning that most of the cast has just as many options (more in some cases) for getting in on him. | |overview= Frieza is designed to be a zoner, and he's a very good one on paper; he has several fast projectiles that cover many different angles, good normals with longer range than average, and excellent assists that are frustrating to deal with. The problem is that DBFZ is very rushdown-oriented, meaning that most of the cast has just as many options (more in some cases) for getting in on him. Frieza simply can't keep his distance forever, so it's important to know what to do when the fight gets close and personal. Fortunately, Frieza has enough options up close to at least hold his own, and when he transforms into Golden Frieza, he becomes an absolute monster. This combined with the fact that Sparking Blast extends the length of his transformation means that he is usually played as an anchor, where the damage buffs from Golden, Sparking, AND Limit Break make him DBFZ's king of comebacks. | ||
|lore= Frieza is a vicious galactic tyrant who rules over many planets with an iron fist after inheriting part of his father (King Cold)'s empire. Personally responsible for driving the Saiyan race to the brink of extinction, Frieza would be defeated by Goku, one of the very Saiyans he loathed. He would later be killed by Trunks, a half-Saiyan youth from the future. Unfortunately, death would not keep Frieza for long, as his henchmen would wish him back to life with the Dragon Balls. With a new lease on life, Frieza would train in order to carry out his revenge against Goku and his friends. | |lore= Frieza is a vicious galactic tyrant who rules over many planets with an iron fist after inheriting part of his father (King Cold)'s empire. Personally responsible for driving the Saiyan race to the brink of extinction, Frieza would be defeated by Goku, one of the very Saiyans he loathed. He would later be killed by Trunks, a half-Saiyan youth from the future. Unfortunately, death would not keep Frieza for long, as his henchmen would wish him back to life with the Dragon Balls. With a new lease on life, Frieza would train in order to carry out his revenge against Goku and his friends. | ||
|quote= Now, start begging for your life! Not that I'll listen...haha! | |quote= Now, start begging for your life! Not that I'll listen...haha! | ||
Revision as of 08:07, 12 March 2021
| Overview | Combos | Strategy/Counter Strategy | Full Frame Data | Discord |
| Disclaimer This section is still being written. It may be wildly inaccurate or missing significant data. Please feel free to make edits, but include edit summaries and sources where applicable. |
Normal Moves
5L


Krillin players hate this one


- Standard 5L.
- Standard 5LL.
- 5LLL tracks fullscreen.
- At very close range, the explosion sends them outward. Otherwise, it sends them inward.
- Counts as a Ki Blast.
Often useful after a vanish extension.
5M

- Deceptively good range.
Hops over a few lows, and is very useful in both combos and blockstrings.
5H
"Filthy monkey, meet General Mountain!"

- Smash on the first hit, wall bounces.
- The rocks themselves keep grounded opponent standing, can't be Super Dashed through, and disappear on Vanish.
Good for controlling ground space.
Despite the rocks being nullified by Broly's Powered Shell, the initial smash hit will break through it.
5S

- Hold or mash S to shoot all 6 Ki blasts.
- Sixth hit launches and wall bounces.
Can be followed up with 236M > Vanish. More useful than some other Ki Blasts due to how it pierces opponents, potentially stopping assist calls. Other than that, it's pretty average and loses to Z Broly.
2L

- Low-hitting 2L. Not the best range, but quite useful as a low nonetheless.
2M
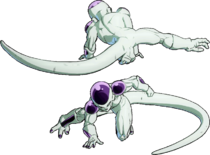
- DBFZ Frieza 2M-2.png
"I Whip My Tail Back And Forth!"

- Frieza's main low normal.
- Being -2 on block makes it extremely useful for stagger pressure.
2H

- Leaves a blind spot over Frieza's head
- Counts as a projectile, so certain moves can beat it (Janemba 22S, Z Broly 214S)
- Can't be super dashed through.
- It can also be destroyed by other projectiles, including assists.
The worst 2H in the game. It might not have the stubby hitbox of Krillin or Kid Buu's, but there's simply too many ways around it. If your opponent has a beam or any projectile assist at all, they can call it alongside a superdash and you'll be unable to anti-air them.
2S

THOT VAPORIZER!

- 1S shoots almost horizontally, 2S shoots at a 30 degree angle, 3S shoots at a 60 degree angle.
Good range and covers some useful anti-air angles, but it can unfortunately be super dashed through so it's not great at that job.
Mostly a combo filler.
6M
- DBFZ Frieza 6M.png
- Universal overhead.
j.L

Comrade Frieza

- Hits at a downward angle, useful for IAD-pressure.
- Ridiculously fast as an IAD crossup, but can only be converted with meter.
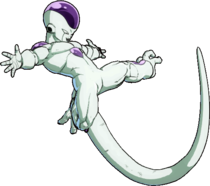
j.M

- DBFZ Frieza jM-2.png

- First hit has no range at all, second hit has much longer range.
- Great air-to-air normal.
The first hit has the same startup as his j.L, making it excellent for combos. Just don't use it for IAD overheads or pressure, the first hit will miss.
j.H
*whipcrack*

- 5LLLLLLL Smash hit wall bounces.
- j.H is a Heavy with a fairly good reach.
- Smash hit causes sliding knockdown.
j.S

- Hold or mash S to shoot all 3 blasts.
- Piercing projectiles that also beat Super Dash, sending the opponent full screen.
- Third hit wall bounces.
† Despite being a projectile, can be anti-air'd by Head invulnerable attacks.
j.2H
- DBFZ Frieza j2H.png
- Smash on air-to-air. Causes sliding knockdown.
j.S > j.2H is an everywhere meterless skd. j.H > j.2H can also be used as a surprise double overhead.
j.2S

- Fires a ki blast in a downward angle.
The angle isn't really great, is mostly used to combo into j.2H for knockdowns.
Special Moves
Death Slash
236L/M/H

"SCREW THIS AREA IN PARTICULAR"

- 236L explodes the ground in front of Frieza.
Frieza's main way of safely ending blockstrings.
- 236M explodes the ground on the other half of the screen. Doesn't reach fullscreen.
Can be used after a long-range 5H or 5S to tack on some additional damage either by itself, or can be vanished for even more damage.
- 236H creates 2 explosions that covers the entire screen.
A good way to catch people trying to do anything. Can be casted 2 times in a row to combo in itself.
You might not survive this time
236S (Air OK)

"Gotcha~!"

- Smash at point blank, the opponent will be locked inside the ball before it starts traveling, explodes once it touches the wall.
- On Smash hit, becomes full invulnerable until after recovery.
- Cancelling the move will cause the ball to explode early.
Good as a combo ender before going into Supers.
Death Saucer
214S

"HEY, MONKEY! YOU FORGOT YOUR PIZZAS!"

- Throws 2 discs forward that comes back after traveling off screen.
- Discs merely launch going forward, but cause a sliding knockdown to the opponent on the way back.
- The return trip discs can friendly fire and hit Frieza and his assists. Friendly fire discs scale less and deal more damage to Frieza than they do to the opponent (700+560 to foe and 700+630 to Frieza).
- Can be crouched under, including L+S Ki Charge.
- Disappear if Frieza's hit or tagged out, but not if he blocks.
Frieza is always plus after using this in a blockstring, so it's a very strong blockstring ender. Use 5L afterwards to catch jumps/vanish ect.
Warp Smash
22S

"SURPRISE, B*TCH!"

- Teleports a set distance forward, auto corrects. Can pull the opponent out of the corner.
- Invulnerable from frames 4 to 19.
- Ground bounces on airborne opponent. Keeps grounded opponent standing.
Can be used as a reversal, but it's very inconsistent on actually punishing the opponent since it tends to miss. It also doesn't have frame 1 invulnerability.
Z Assists
Assist A
Death Slash
- DBFZ Frieza AssistDeathSlash.png
KABOOM
- Hits slightly closer than the M version.
- The damage buff from Golden Frieza applies to this assist as well.
- Has a minimum distance, stunting it's use.
Extremely annoying assist. Forces the opponent to respect you in neutral because of how huge its hitbox is.
Assist B
You might not survive this time
- The damage buff from Golden Frieza applies to this assist as well
- Large enough hitbox to catch vanishes.
A projectile assist that is quite fast and difficult to punish. It is good as an approach tool, working almost like Guile walking in behind a fireball for your point. It has a lot of hitstun at 51f, but has the lowest blockstun in the game for "normal" assists. The blockstun, or lack thereof, makes it nonexistent for blockstring pressure, but handy for tick throw set-ups. Your opponent might also just respect it because it looks like it has far more blockstun than it actually has.
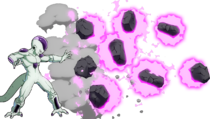
Assist C
Psychokinesis
DOOM ROCKS
- Fast start up
- Good screen carry
- Same properties as 5H
Super Moves
Death Ball
236L+M or 236H+S (Air OK)

"I'll reduce you and this entire planet to dust!"
- DBFZ Frieza DeathBall-2.png
""DIEEEE!"

- Costs 1 Ki Gauge.
- L+M version throws towards the middle of the screen, H+S version throws towards the edge of the screen.
- Minimum damage: 4*N, 754.
A useful level 1 super that does additional damage if done from big heights. Because of how slowly the ball travels, some characters can DHC and then get an extension afterward, usually in the form of air DR or j.H.
If Frieza is hit with Death Saucer in the middle of this move, he can then combo into You must die by my hand! without suffering from super scaling, as he hasn't entered neutral stance.
Nova Strike
214L+M (Air OK)
"I'll shut you up for good!"

"EEEEYAAAAAAAAAA!!!"


- Costs 3 Ki Gauges.
- Minimum damage: 1680.
- Inconsistent frame advantage on hit, based on which one of the two hits the ground first.
High damaging level 3. Is only one hit, which means an opponent in Sparking won't get any regeneration done during the animation, making it an excellent combo ender.
Can also be used as a reversal, though it has a tendency to go straight over the opponent in this case so this is generally not recommended.
You must die by my hand!
Hold H+S while knocked down

HAHAHA YES, THE ULTIMATE WAKEUP TOOL

THEY'LL NEVER SEE IT COMING


- Costs 3 Ki Gauges.
- Minimum damage: 192*10.
- Only invulnerable during active frames.
Not a good wakeup option compares to the 2 other Lv3s he has. However, the insanely high minimum damage means it's the best combo ender, used after getting hit by his own Death Saucer.
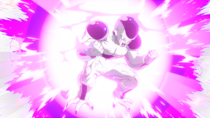
Golden Frieza
214H+S

LET IT OUUUUUUUUUT

The Emperor comes to reclaim his throne. Just don't run out of time.
- Costs 3 Ki Gauges. Can only be done once per match. Inputting 214H+S again will deactivate Golden Frieza.
- During Golden Frieza, gains a 20% damage buff, a second air dash, access to full reverse beat, and increased movement speed.
- Lasts about 21 seconds when he's the point character, won't deactivate until he returns to neutral ground stance. The timer is paused when he's tagged out or when he's in Sparking.
- Raw startup is long, but autoguards and recovers instantly after the super flash. Startup during combos is fast, so you can go Golden Frieza mid-combo.
- Has ~1 second of Ki gain cooldown.
If you're low on time and there's another character coming after a kill, you can cancel Golden Frieza during the short intermission before the fade to black and remain safe.
Sorbet's Ray Gun
S when Golden Frieza ends

"Even after my perfect golden form has decayed you're still not safe."

- Costs 1 Ki Gauge.
- Minimum damage: 840.
- Has some invulnerability and hits opponent during timestop.
- Crumples grounded opponent, causes a sliding knockdown on airborne.
Does hit off sliding knockdowns but since the shot is small and goes quite high up, it requires strict timings.
By timing the shot as late as possible into Frieza's crumple animation, you can get enough frame advantage for extra followups like Supers or even just run up 5L. Comboing after this Super doesn't receive Super scaling.