| Line 248: | Line 248: | ||
==== ==== | ==== ==== | ||
<!--Insert text below the =s and above the {{CloseCard}}--> | <!--Insert text below the =s and above the {{CloseCard}}--> | ||
* Sword normal overhead. | * Sword normal {{keyword|overhead}}. | ||
* Deflects Ki blasts. | * Deflects Ki blasts. | ||
* Uses the gigantic hitbox of his {{ | * Uses the gigantic hitbox of his {{MiniMoveCard|game=DBFZ|chara=Janemba|input=j.H|label=j.H}}. Max range {{MiniMoveCard|game=DBFZ|chara=Janemba|input=5M|label=5M}} > {{clr|M|6M}} can beat mashing against characters with stubbier normals. | ||
{{CloseCard}} | {{CloseCard}} | ||
Revision as of 16:04, 7 August 2022
Normal Moves
5L


The crossup no one's ready for


- 5L
- Janemba moves forward during the jab.
- Can be spaced to be safer.
Small hitbox that struggles to hit opponents superdashing or above him. Despite this, 5L is a good tool for his pressure To attack the opponent continuously and leave little room for counter attacks. game when combined with his 2L GuardAllStartup6Recovery9Advantage0 and 214L
 GuardThrowStartup20Recovery26Advantage-.
- 5LL
- Ground bounces on hit.
Large hitbox, good for mashing and "anti-airs." Extraordinary for combos and blockstrings. Will catch people attempting to jump 214LGuardThrowStartup20Recovery26Advantage- as well as back dash on vanish.
- 5LLL
- Teleports forward and can cross over the opponent. Hitbox is behind Janemba.
- Switches sides on hit.
The online special. Janemba can also input 214S GuardStartupinvul frame 4Recovery20Advantage- to fake the crossup Attacking your opponent after changing which horizontal side you are on, typically by jumping over them., but can be reacted to by watching the startup The time before an attack is active including the first active frame. For example, an attack with 10F startup means the attack will do nothing for 9 frames, then hit the opponent on the 10th frame. animation as Janemba will leer forward with this. Very slow, has a huge gap making it mashable, and unsafe on block. Use scarcely.
5M

Prime spacing tool

- Good range, moves Janemba forward.
- Always spaces perfectly for 2L
 GuardAllStartup6Recovery9Advantage0 to connect on block.
 - Hits from round start.
Janemba's only safe medium. Makes up a large portion of his Stagger Pressure The use of intentionally delaying gatlings or cancels in order to create frame traps with the intent of catching your opponent mashing or jumping. Loses to reversals.. Decent starter in terms of damage, but 2M GuardLowStartup11Recovery24Advantage-11 is still your go-to.
5H

- Deflects Ki blasts like other sword normals.
- Any normal > 5H is NOT a true blockstring.
Useful as a Frame Trap An offensive technique where the attacker leaves a small opening in their offense, goading the defender into performing an attack. This opening is designed such that the attacker can easily counter the defender's attack with their own. but not much else than that. In blockstrings you're most likely going to skip it because of the gap.
5S

- 5S, 2S, j.S are similar and has some limited tracking.
- Hold or mash S to shoot all 4 Ki blasts.
- Can controls where he shoots with


- Without inputs, the order is 5316.
- 5 and 6 ground bounces airborne opponent.
- Last Ki blast ground bounces even grounded opponent if it's 5 or 6, pops up grounded opponent if it's 1 or 3.
Janemba's Ki Blast is a tool with far more nuance than most other character's Ki Blasts. It's slow, but you can force the opponent to respect it by cancelling into 236L/M/H GuardAllStartup15Recovery24Advantage-5. Doing this with the first Ki Blast can force an opponent back to the ground and be cancelled into 214L/M/HGuardThrowStartup20Recovery26Advantage- instead once the opponent is conditioned to sit still. It's also an incredible combo tool, as steering the Ki Blasts to force a ground bounce gives way to all kinds of relaunch combos.
2L

0 on block btw
- Not a Low, but is instead 0 on block.
- Really good for staggers due to its reach.
Overall amazing button and a core tool for Janemba's Stagger Pressure The use of intentionally delaying gatlings or cancels in order to create frame traps with the intent of catching your opponent mashing or jumping. Loses to reversals..
2M
- Janemba's only low.
Too slow to allow for a High-Low A mixup where the opponent must choose between blocking high and low. 50/50 A mix-up where the opponent has a choice between two options, such as strike-throw or high-low. A "true 50/50" is used to describe a mix-up in which the defender must guess and commit to one option, without any way to determine which option the opponent will choose and react accordingly., so is rather used as his best starter off unsafe moves.
2H

- Anti-air. Deflects Ki blasts.
- Has the largest vertical range of any 2H in the game, but also has one of the worst horizontal ranges of any 2H as well.
- Bad in combos because of the low horizontal range.
Your anti-air and nothing more. Useful in that it enables a j.H GuardHighStartup15Recovery20Advantage- sliding knockdown, which in turn can enable Hell's Gate
 GuardAllStartup60Recovery37Advantage+24 okizeme, but that is mostly relegated to the corner.
2S

6DD > 2DD

- Slightly floats off the ground.
- Cancellable from 5S
 GuardAllStartup18-27Recovery42Advantage-21.
 - Unlike 5S and j.S
 GuardAllStartup18-27Recovery7 LandingAdvantage-, Janemba can't control the first Ki blast's direction.
 - No input order is 1536.
Similar in use to 5S, but it leaves you airborne instead of being grounded. Acts as an extension in a way, and adds an easy conversion to j.2M GuardHighStartup25-33RecoveryAdvantage-5 for a meterless sliding knockdown.
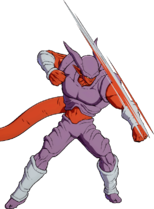
6M
- DBFZ Janemba 6M.png
- Sword normal overhead An attack that the opponent must block high..
- Deflects Ki blasts.
- Uses the gigantic hitbox of his j.H
 GuardHighStartup15Recovery20Advantage-. Max range 5M
 GuardAllStartup13Recovery17Advantage-5 > 6M can beat mashing against characters with stubbier normals.
j.L

- Good range for a j.L.
- Has enough priority to beat superdashes.
- Slightly slower than average.
j.M

The true demon is my IAD crossup

- Your most common jump-in.
j.M is forced to take the spotlight because of how bad j.H is. All things accounted for, it still has strong frame advantage if your opponent blocks it and it is really good for crossups.
j.H
- Deflects Ki blasts.
- Halts momentum and ground bounces grounded opponent.
- Use j.L or j.M for IAD overhead instead.
Huge hitbox. Despite it being like Hit's j.H it still has uses, especially in 2H Smash combos, as it is easier to set up j.214x oki with this move due to being able to special cancel it. It's not the best in neutral but it can be somewhat useful in the corner to keep your opponent in place, although this is tricky.
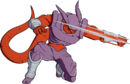
j.S
- DBFZ Janemba jS.png
j.5DD > j.6DD
- 5S but in the air.
- Freezes momentum.
j.2H

Air 2H, complete with head invul

- Gigantic wall bounce.
- Deflects Ki blasts.
- Moves Janemba backwards.
Special Moves
Shadow Kick
j.2M
Foot
dive
- Tracking overhead that causes sliding knockdown on Smash hit.
- Janemba teleports to the ground on hit. This makes frame advantage the same regardless of where you use it.
- Always leaves Janemba +32 on hit.
This is your go-to combo ender. When you're close, it allows a Superjump IAD j.M safejump for easy continued pressure.
Demonic Blade
236L/M/H (Air OK)

- Ridiculous range, deflects Ki blasts.
- 236L
- Reaches about half screen, no step forward.
- Safe, gapless blockstring ender.
Faster AND safer on block than a beam, but isn't full-screen and has less active frames.
- 236M
- Wall bounces.
- Ground version takes a step forward before attacking.
- Reaches fullscreen unlike the Light version.
- Can be used in blockstrings over 236L to add a frame trap.
- 236H
- Bigger wall bounce, can be comboed off of midscreen.
- Reaches fullscreen like the Medium version.
Mystical Arm
214L/M/H

Piccolo players weep
- 214L always causes sliding knockdown.
- Will whiff when immediately cancelling from anything other than Light normals, requiring you to delay the input a slightly to tick throw after other buttons.
- Max range is a backdash away at 23 frame start-up.
A borderline unreactable command grab and one of the best in the game, arguably almost as good as Z Broly's. Will perfect tick throw from 5L GuardAllStartup6Recovery12Advantage-3 and 2LGuardAllStartup6Recovery9Advantage0. This gives Janemba a powerful hit/throw mix-up. You should condition with this grab so that your opponent will be inclined to mash, leading into a massive punish if you hit them.
Don't be dissuaded by the slide knockdown, as you can just go into Level 3 GuardAllStartup12+3RecoveryAdvantage-33. A Janemba with meter is terrifying to block because of this, you take the frametrap and heavy damage along with it or the grab into oki that will most likely kill. It's a very bad situation for your opponent all around.
- 214M wall bounces on Smash hit, SKD on non-Smash.
- In the corner, can be followed up with 2M.
- Max range is 2/3rds of the screen away at 29 frame start-up.
While initially less threatening than 214L, this grab makes up for it with it's unexpected range which is around that of his 236LGuardAllStartup15Recovery24Advantage-5, an aspect that many will not be aware of when first facing Janemba. This combined with Janemba's massive sword specials, far-reaching medium buttons and tracking ki-blasts that can bring jumping opponents to the ground make his mid-range game scary to block.
In the corner this grab can easily be converted off of with either 2MGuardLowStartup11Recovery24Advantage-11 or 5LGuardAllStartup6Recovery12Advantage-3, but outside the corner will require either an assist or a tag-out.
- 214H does a big wall bounces on Smash hit, SKD on non-Smash.
- Can be followed up midscreen.
- Max range is 2/3rds of the screen away at 27 frame start-up.
Gives high reward and 24 frames isn't too awful to work with, but the light grab is still the better choice if you just want pure mix, with this also being given away more due to the EX flash.
Otherwise, it gives a best of both worlds between the light and medium grab by having the medium's range with slightly better framedata and much easier combo conversions, giving an almost braindead easy conversion with the enemy flying right to Janemba's feet. Outside the corner a small microdash needs to be buffered if you want to go for routes starting with 5LGuardAllStartup6Recovery12Advantage-3.
Hell Gate
j.214L/M/H


Who gave this magic cabbage solo extensions AND corner oki?!

- Shoots an electric ball with no hitbox that slowly travels along the ground, bouncing off walls.
- Only one ball can be on screen at a time. Ball detonates itself after a while.
- Hold up during startup to make the ball floats higher up.
- Pressing L while j.214L ball is still out will detonate it early instead of giving you L normals, same with j.214M, j.214H and their respective buttons.
- Heavy version can combo from smash j.2H by holding up and mashing the heavy attack button, allowing for a delayed 5LL into full combo.
- j214H is an important neutral tool and can be called safely thanks to its low recovery. j214L/M are largely useless outside of niche assist combos.
Absolutely crucial to Janemba's gameplan. Despite how it looks, Hell Gate is NOT classified as a ki-blast projectile. And so, it cannot be reflected on block or SD'd through. This allows for solo teleport oki in the corner with a SKD (excluding j.2M), on top of its uses for neutral and combos as already mentioned above.
Phantom Shift
236S (Air OK) or 214S (Air OK)

Suddenly, a mid 2L doesn't seem so bad.
- Teleports a set distance. Invulnerable from frame 4, making it a very strong escape option.
- After inputting either versions, holding any of the 8 directions will still make him teleport to that direction anyway. Default is for 236S and
 for 214S.
 - Grounded
 stays in place, and teleports slightly closer than and . All 5 off these versions keep Janemba grounded.
 - Air versions can only be performed once until landing, can also teleport back to the ground.
- Both ground and air versions don't consume air options, they also keep super jump's momentum control.
- Can be used in combos to link smash j.2H to j.L, letting Janemba confirm solo off of a raw superdash anywhere on screen.
Janemba's do-it-all character defining move. His grab is a better straightforward mixup, but teleport offers one thing that the grab doesn't: fakeouts, scarier okizeme setups, and neutral control. Use them in tandem to make your opponent crack under pressure, and use it with 5S, 236X and 22S to make your opponent not want to move in neutral.
Dimensional Hole
22S (Air OK)

"What goes around...

.....comes around."


- Guard point against non-Super projectiles and assists.
- On successful parry, he becomes fully invulnerable until after recovery and while shooting a tracking projectile behind the opponent.
Designed to completely shut down projectiles and assist calls. Upon activation, Janemba cannot be punished and the counter projectile will give him free pressure on block or combo on hit.
If you see projectiles and assists coming, there's actually no reason not to parry. Teabag away.
Z Assists
Assist A
Phantom Assault

SS Vegeta, but now it tracks.

- 5S but shoots from four times.
- Fourth Ki Blasts ground bounces.
- Fullscreen tracking, enable extensions even at high up.
- Like many ki blast-based assists, can be reflected/superdashed during. Interestingly, the first Ki Blast is not reflectable.
A very strong assist and easily the best combo assist in the game. Basically a faster SSJ Vegeta A that trades the defensive usage for full screen tracking.
Fullscreen confirms off of projectiles, air DR enders and high damage combo extensions allow characters to get big boosts to damage, meter gain or both. While it shines in combos, this assist is very strong in neutral as well. Using it while your opponent is in the air forces them to hold the assist or superdash through, giving you either an easy way in or a free punish with 2H. Ultimately, Janemba A does a lot of things that few other assists can do and it does them very well.
This assist is kind of tricky to get used to and may seem weak at first, but its uses in combos and neutral more than make up for the lack of true blockstun.
Assist B
Demonic Blade
- Deflects Ki Blasts while active.
This assist, while not being as strong in combos as Assist A, is also a very potent assist. It's half-screen range allows for it to be used almost as a beam, and it's blockstun solidifies this role. Best blockstring assist outside C, making it your go-to for characters that need blockstun.
Assist C
Hellblade Flurry
- Teleports to the opponent's position on the ground.
- 3rd hit comes out only on hit.
55-frame C Assist. Useful if you absolutely need a lockdown assist, and pretty decent because Janemba doesn't really need that kind of assist himself. Startup is lessened in combos allowing for easy extensions.
Super Moves
Rakshasa's Claw
236L+M (Air OK) or j.236H+S


- Minimum damage: 815
- Causes sliding knockdown.
- Teleports back to the ground on hit.
- Cinematic Super, cutting it early by DHC does slightly less damage without any benefit.
- Is Janemba's DHC Super.
- Always leaves you +4 on hit, no matter the height you started at before the super.
Good damage for a super. Because of it's cinematic nature, it will always result in a sliding knockdown. The entire time the opponent is falling and sliding is open for DHC's, making it really easy to extend into other supers. In terms of a normal combo ender, does not really allow continued pressure.
Savage Skewer
236H+S


- Minimum damage: 799
- Corner carries.
- Also a cinematic Super, cutting it early ruins the corner carries AND does slightly less damage.
- Doing j.236H+S will get Rakshasa's Claw.
- Unscaled damage is the year that his movie came out.
You'll mostly be using this super midscreen because of it's corner carry. Otherwise you'll be using 236L+M for it's superior damage.
Needle Light Shower
214L+M (Air OK) or 214H+S (Air OK)

- Minimum damage: 1672.
- Advantage on hit: +43
- Air version will always teleport Janemba back to the ground afterward.
Lets Janemba get a meaty midscreen and a teleport mixup in the corner. 236S[6] > 5L will cross up, 236S[3] > 5L will stay same side. They hit on the same frame and the opponent only has 16 frames to react to which side (10 frames of recovery from the teleport and 6 frame startup from 5L). Watch Alioune for more advanced setups, but this alone will get you pretty far.
Colors
- DBFZ Janemba color1.png
Color 1
- DBFZ Janemba color2.png
Color 2
- DBFZ Janemba color3.png
Color 3
- DBFZ Janemba color4.png
Color 4
- DBFZ Janemba color5.png
Color 5
- DBFZ Janemba color6.png
Color 6
- DBFZ Janemba color7.png
Color 7
- DBFZ Janemba color8.png
Color 8
- DBFZ Janemba color9.png
Color 9
- DBFZ Janemba color10.png
Color 10
- DBFZ Janemba color11.png
Color 11
- DBFZ Janemba color12.png
Color 12
- DBFZ Janemba color13.png
Color 131,2
- DBFZ Janemba color14.png
Color 141,2
- DBFZ Janemba color15.png
Color 151,2
- DBFZ Janemba color16.png
Color 161