(Added difficulty rating. Zamasu sucks. There) |
|||
| Line 291: | Line 291: | ||
<div class="attack-gallery"> | <div class="attack-gallery"> | ||
<gallery widths="210px" heights="210px" mode="nolines"> | <gallery widths="210px" heights="210px" mode="nolines"> | ||
DBFZ_Zamasu_EternalJustice.png | | DBFZ_Zamasu_EternalJustice.png |The worst lariat | ||
</gallery> | </gallery> | ||
</div> | </div> | ||
Revision as of 19:42, 16 February 2021
| Overview | Combos | Strategy/Counter Strategy | Full Frame Data | Discord |
This can be for a variety of reasons including but not limited to: spelling mistakes, unnecessary information, poor formatting, and other metrics per common sense reasoning.
Consider helping rewrite it.
Normal Moves
5L


This outfit is WHACK


| 5L |
|---|
| 5LL |
| 5LLL |
- 5L is short ranged, but fast. It's a standard 5L.
- Good for staggering from 2L or into 2L, or for setting up a dragon rush.
- 5LL advances forward slightly, but mostly just blockstring and combo filler.
- 5LLL can be used as a tick throw setup with a low blockstun assist, or with a properly timed use of his orbs.
- This move will beat deflect if your opponent goes for it... and is a useful stagger tool if you're willing to learn how to set up a tick throw for threat.
- Quite difficult to recapture with this autocombo, especially versus smaller characters.
5M

- Long range, but very punishable on whiff.
- As Zamasu lacks a slide, this is his best advancing normal.
5H

- Zamasu does a swinging midair kick that smashes, useful in pressure and combos.
- Cancelling 5H into Orbs and calling a beam assist allows an airtight blockstring and further pressure and mixups.
5S

- Combos into 236S reliably.
- Whiffs on all crouchers, and versus small characters.
- Can go over low high-priority beam attacks such as Goku's Kamehameha.
2L

- Can be chained twice.
- Great stagger tool in Season 3. 5L2L or 2L5L are great ways to prep your opponent for a dragon rush. 2L-4L will also work, with the added benefit of beating most low-hitting 2Ls.
Access to two lows is a key part of Zamasu's pressure. Having orbs set up turns blocking high or low into a nightmare.
2M
The Anakin killer.

- Zamasu maintains a small amount of momentum if executed during a dash, allowing this to advance forward slightly.
- Has a smaller hitbox than it seems.
2H

"HALT FOOLISH MORTAL!!"

- Small horizontal range.
- Large spherical hitbox above Zamasu's head, but will not hit crossups.
6M
- DBFZ Zamasu 6M.png
- Unlike many, Zamasu's universal overhead can be deadly thanks to orbs.
j.L

- Downward angle makes it perfect for instant air dash mixups.
- Allows for a double overhead after IAD j.M.
j.M

- Decently active and good range for air-to-airs.
- Allows for a double IAD overhead in conjunction with j.L.
j.H

- [] is on Smash hit.
- Flight cancels allow for multiple overheads.
- Deceptive horizontal reach.
j.S

- Can be repeated 3 times in total.
- Basic lv. 1 projectile.
- Completely resets your momentum, making you fall straight down afterward.
Zamasu's only actual neutral tool at full screen, as his 5S can be negated just by crouching and j.236[S] is too slow.
j.2H

- [] is on Smash hit.
- Spikes the opponent at a slightly more vertical angle than j.H.
- Ground bounces grounded opponent, though can't be extended with Vanish.
- Combos off of j.S.
- Only normal that can be done while in flight.
Special Moves
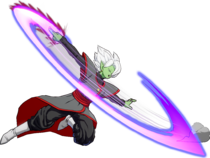
Eternal Justice
236L/M/H (Air OK)

The worst lariat

| Ground L |
|---|
| Air L |
| Heaven's Flash > L |
| Ground M |
| Air M |
| Heaven's Flash > M |
| Ground H |
| Air H |
| Heaven's Flash > H |
- Your safe, gapless blockstring ender.
- Heaven's Flash > L provides a short sliding knockdown.
- 236M is an important combo tool, gives a sliding knockdown.
- Combos reliably after a 236S wallbounce.
- Air version starts up 1f SLOWER than grounded version.
- Opponent falls slowly, allowing plenty of time to set up Wall of Light or Blades of Judgment.
- Heaven's Flash > M provides a lengthy sliding knockdown.
- Heaven's Flash > M is your main way of comboing into Blades of Judgement in assisted combos.
- 236H used for when you can't combo into M version, gives a sliding knockdown.
- Consistently combos into Blades of Judgement solo.
- Opponent falls slowly, allowing plenty of time to set up Wall of Light or Blades of Judgment.
- Heaven's Flash > H provides a ground bounce sliding knockdown.
- All versions keep dash momentum so you can 2366L/M/H to cover ground.
- Press S on hit or block to trigger Heaven's Flash.
- 236L > S keeps Zamasu in place.
- 236M > S pushes him back.
- 236H > S shoots him forward, going over the opponent.
Wall of Light
214L/M/H (Air OK)


| Ground L |
|---|
| Air L |
| Ground M |
| Air M |
| Ground H |
| Air H |
- 214L Orbs hit on frame 126.
- Can be combo'd into in the corner. Use it while an assist is locking down the opponent and keep comboing.
5L > 5H > 236M right after the ending of this move will ensure lightning hits, extending the combo. Alternatively, IAD j.ML > land > 5L > slight delay 5LL (lightning hits) > slight delay 5LLL will result in a tick throw. It can also be a low if you use 2M instead of 5LLL, making a strong 50/50.
- 214M Orbs hit on frame 219.
- Even slower than L version, useful for tricky mixups after an assist has been called.
- 214H Orbs will shoot out twice, first wave on frame 126, the second on frame 216.
- Can allow for unique combo extensions, especially when used in conjunction with flight combos.
- Freezes Zamasu in place while preserving (some of) his momentum.
- The orbs disappear if you take damage, block anything, activate a super, or land or break a Dragon Rush.
- Slow startup, important to have assists or distance before activation.
Divine Order
236S (Air OK)

You should REALLY think about pressing Super Dash

| Uncharged |
|---|
| Charged |
- Has smash properties and will trigger a wallbounce, even midscreen. Can be followed up.
- This move is the cornerstone of one of Zamasu's corner routes. After a partially charged 236S, you can land a follow up and go into damage.
- The blade's hitboxes can deflect Ki blasts.
- Always leaves a <4 gap on block if chained into from medium or heavy attacks.
- Held versions shoot a projectile that clashes with beams and can not be superdashed through.
- At close range the slash and projectile will both hit. Maintains the smash and wallbounce properties from the uncharged version.
- Allows follow up in the corner.
- The awkward startup means Zamasu can not use this to win a prolonged projectile struggle against characters with reliable beams. Instead, use this tool to force a jump, and then jail your opponent with an assist.
Heaven's Flash
214S (Air OK)

Flight!!! Except you can block now.

| Ground |
|---|
| Air |
- Buttons will now give you special attacks without having to manually input them.
- L/M/H trigger the corresponding Eternal Justice, with different properties. On hit or block, you can press S to flight again, resetting the flight duration.
- 4L/M/H give Wall of Light, this also resets flight duration. Repeating L version will keep you flying indefinitely.
- 1/2/3H cancel the flight into a downward j.2H.
- S does j.S. Right before this move ends, you can still sneak in an extra attack in flight mode.
- 6S gives Divine Order, this version can also be charged.
- 4S cancels flight without attacking, leaving you vulnerable for 10 frames.
- You can move around while doing attacks during flight, with the exception of Wall of Light freezing movement.
- Attacking or blocking will end the flight.
- Assists will not begin cooldown until your flight ends.
- Grounded flight puts you at a set height in the air.
- Aerial flight keeps you in place and starts up 9f faster. You can use tiger knee motion (2147S) to take advantage of this.
- Total flight lasts for 204f.
Z Assists
Assist A
Divine Order
"You summon a god!"
- Can't be super-dashed through.
- Only the projectile has hitboxes.
- Leaves the opponent in a good amount of hitstun, allowing for easier followups
Assist B
Eternal Justice
Assist C
Divine Authority
Super Moves
Divine Wrath
236L+M (Air OK)
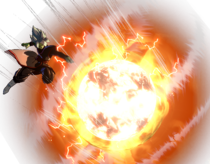
"My power... is great!"
- DBFZ Zamasu DivineWrath2.png
"FACE MY DIVINE WRATH!"

| Ground |
|---|
| Air |
- On the way down the ball hits for 700, explosion does 400*3, 800.
- Minimum damage is 210, 120*3, 240 (810)
- Descending ball super. If done high enough, DHC'ing into a faster super allows for Frieza-esque extensions thanks to the long descent and explosion animation.
- If you setup his Blades of Judgment super during a combo and input this immediately after, the blades will catch as the ball ends, allowing for extension.
Blades of Judgment
236H+S (Air OK)
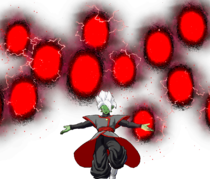
"I will show you the power of divine light."

that one friend you only call on special occasions


| Ground |
|---|
| Air |
- The blades obscure Zamasu significantly on the ground, allowing for ambiguous mix-ups while the opponent is locked down.
- Wormholes disappear as soon as Zamasu tags out.
- Each blade does 100 damage and ground bounces airborne opponent.
- Each explosion does 350 damage and pops the opponent up.
- Always shoots down at the same angle, activating Blades of Judgment at various heights on screen can yield different results and unique situations.
- Mediocre and inconsistent damage, every hit perpetuates scaling, but has the initial scaling of M normals (uses the least scaling table). Combos following after this super will have 15% minimum damage.
- Doesn't have a high minimum damage like other supers, and will inherit the scaling of the current combo.
- In open space, can be combo'd into by inputting 2H SD j.L j.M j.S 236H 236H+S. Quickly dash forward after activation so your opponent slides into the impact.
- In the corner, can be combo'd into alone with 2H M
 M 236L vanish 236M.
 - Most assists can also combo into this super in the corner. Some need Divine Order, others need a 5H, and some require a smash.
- Most C assists as well as Bardock B assist allows for combos that use two of these in one combo
Lightning of Absolution
214L+M or 214H+S (Air OK)

"LIGHTING OF ABSOLUTION!"

"Yes... THIS IS TRUE JUSTICE!"


| Ground |
|---|
| Air |
- Minimum damage is 12, 280*6 (1692)
- Zamasu's only invincible reversal. Is quite slow for a Level 3 super.
- Tracks the opponent anywhere on screen as long as they are in front of Zamasu.
- Quite good against assists, as he'll still do the entire lighting barrage even when it's blocked or whiffs.
- Can whiff if opponent is actively super dashing.
While it has below-average damage for a level 3 super, it is very reliable as a DHC super with its tracking.
External References
move and the move Full sections. One is shown on the character page, while the other is shown on the frame data page.