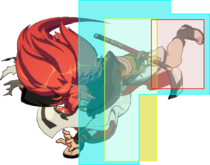
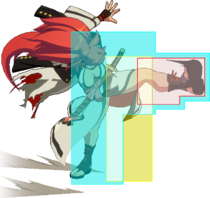
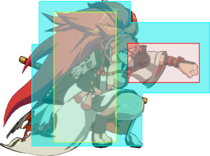
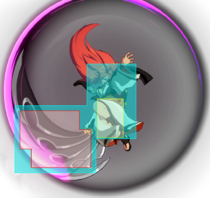
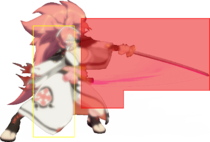
| Line 610: | Line 610: | ||
Images= | Images= | ||
<gallery widths="210px" heights="210px" mode="nolines"> | <gallery widths="210px" heights="210px" mode="nolines"> | ||
GGST_Baiken_jH.png| | |||
</gallery> | </gallery> | ||
|-| | |-| | ||
Revision as of 06:02, 29 January 2022
Please feel free to make edits, but include edit summaries and sources where applicable.
Baiken comes out January 28th for Season Pass Holders, and can be purchased individually on January 31st.
![]() Baiken
Baiken ![]() Baiken , classified as a Balance character, is a versatile midrange swordswoman capable of turning her enemies' attacks against them.
Baiken , classified as a Balance character, is a versatile midrange swordswoman capable of turning her enemies' attacks against them.
- Midrange: Baiken excels at taking screen space and forcing her opponent away while demanding respect. Both of her grounded HS buttons are disjoints that cover forward approaches, while Hiiragi keeps people away at close range and Kabari pushes them back out if they approach carelessly.
- Strong and Simple Oki: Tatami forces people to block on wakeup and can be used to set up all kinds of difficult pressure, especially if she has meter and tether. Her infamous TK Yousanzen is an instant overhead that can be RC'd out of to make it safe on block or combo on hit, though without meter she still has an effective strike/throw game to work with.
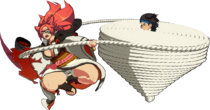
- Tether: Applied with either her throw or the S variant of Kabari, the tether is a short-range rope that binds Baiken and her opponent together. Baiken's tethering allows her to stay glued to opponents and apply unique pressure/combo sequences once she's roped them into an unfavorable situation.
- Defense: A parry active from frame 1, Hiiragi is a powerful defensive tool that allows Baiken to callout gapped/predictable pressure in ways most characters cannot. Her grab forces tether which can swing momentum incredibly in her favor, her 5f attacks yield decent reward as well, and with 50 meter she has access to a fully invulnerable super.
- Tether: Baiken's tethering forces her to stay glued to opponents until it breaks, leading to unique damage/routes against Baiken should she make a mistake or apply it recklessly.
- Limited Midscreen Confirms: Despite her great buttons, Baiken's ability to confirm these buttons from range without counter hit is very limited as tatami has limited range and kabari is too slow to combo. She can use these moves to link into tether, but keep in mind that it is 0 on block.
- Risky Specials: As well as the aforementioned tether, Hiiragi and Youzansen are both important to her overall gameplay, yet immensely punishable if the opponent is expecting them.
After landing a grab or S Kabari, the opponent is connected to Baiken via a rope. Should either opponent move a certain proximity away from the other, the rope will repel them back toward their respective opponent.
| Baiken |
|---|
Normal Moves
5P
- Baiken's fastest normal.
- Hits all crouching opponents.
Is stubby and minus on block, but her suite of command normals means she has a very workable spread of options to threaten with from 5P.
Particularly noteworthy for a 5P as it hits crouching opponents (Including Faust crouch walk). Will still lose to attacks with heavy low profile (i.e Sol's vortex). Combos naturally into 6P or 6K > Tatami, allowing for a small combo mid-screen, chase into oki, or outright wallbreak combo in the corner.
Gatling Options: 5P, 2P, 6P, 6K, 6H
5K
- Jump Cancellable
- Moves Baiken forward
- Placeholder.
Gatling Options: 6P, 6K, 6H, 5D, 2D
c.S
- Jump cancelable on block.
- Leads to a mixup with TK Youzansen/2D.
Gatling Options: 6P, f.S, 2S 5H, 2H, 6H, 5D, 2D
f.S
Fairly standard poke. Appear's similar to Anji's f.S. Lacks the disjointed hitboxes of 5H/6H or the ranges of 2S/2H, but low recovery make this safer to whiff punish vs some of those alternatives. Gatling Options: 5H, 2H
5H
- Placeholder.
- Counter hit forces crouching state on the opponent.
5D
- Uncharged Dust
- Uncharged dust on-hit is 0 or neutral frame advantage and causes float
- Causes 80% proration on-hit
Universal overhead attack. Baiken performs a palm thrust infused with ki. A pretty bad overhead option considering the much quicker youzansen exists, which gatlings and naturally combos from the same attacks. Perks include being only slightly less punishable and being able to link this from 2K.
- Charged Dust
- Charged dust leads to soft knockdown (+36).
- Holding up during the hitstop frames of charged dust will activate homing jump:
- Doing a homing jump will cause an area shift and put the opponent into a unique high damaging air combo state.
- Pressing any attack twice without jump/dash cancel will activate the homing jump finisher causing a hard knockdown (+23).
Similar to uncharged but is slow enough to be reacted to, but if it does land it gives a very high damaging combo no matter where you are on the screen. Like any charged dust, only use this on guaranteed punishes (Ky's RTL, Gio's Ventania, etc.) or opponents that are sleeping on defense; Very worth learning what moves can be punished with 5[D] to increases mid-screen damage potential.
6P
- Baiken's main anti-air.
6P is a true blockstring from any P or K normals, giving her a gapless option along with a frame trap option in 6K. 6P is also a decent anti-air and counterpoke, but it's range leaves a little to be desired. HS Kabari makes for a reliable anti-air followup on hit or block
6K
- Combo filler and frame trap.
Always has a 2-frame gap if chained from a P or K normals. On counterhit, 6K can be linked into c.S or f.S for a high-damage pickup.
6H
- 4-frame gap when immediately canceled from c.S
- Ground bounces on counterhit.
Baiken slowly swings her sword, striking directly in front of her with a disjoint attack. Despite the animation, this attack's hitbox is entirely in front of Baiken, and it and strikes at and below her head's height. The ground bounce and large time slow effect on counterhit make this attack a potent frametrap option against characters that lack fast mash options or against players who have been conditioned out of using their fast buttons with Baiken's other pressure options.
2P
- Placeholder.
2K
- Placeholder.
Gatling Options: 6P, 6H, 5D, 2D
2S
- Placeholder.
Gatling Options: 5H, 2H
2H
- Advancing, low poke.
Catches jump startup from her longer pokes and launches on hit for easy confirms. Don't whiff this.
2D
- Two-hit sweep, both hits are lows.
Combos into Tatami anywhere and is the low complement to Youzansen.
j.P
- Placeholder.
Gatling Options: j.P
j.K
- Placeholder.
Gatling Options: j.D
j.S
- Placeholder.
Gatling Options: j.H, j.D
j.H
- Placeholder.
Gatling Options: j.D
j.D
- Freezes Baiken's momentum.
- Wallbounces on hit.
A slightly disjointed hitbox, pushback, range close to Ram's j.S, and CH reward make this a strong improv anti-air/air-to-air option.
Universal Mechanics
Ground Throw (Tether)
6D or 4D
- Tethers opponent to Baiken.
- Tether effect gets stronger with more distance.
- Tether can "pull" Baiken out of her backdash or other airborne states.
Baiken's tether throw allows her to set up strong mixups and pressure at the cost of being a detriment in some matchups. Use 4[D] or 6[D] in matchups where you do not want your opponent close to you (like Potemkin). Using the tether, she can take advantage of how her backdash leaves her airborne and go for crossups, as well as setting up an easy meaty Tatami with IAD back 236K.
Ground Throw (Knockback)
6[D] or 4[D]
- Alternative throw to 4D/6D.
- Knocks opponent further away from Baiken instead of applying tether.
- Similar damage/frame data as tethered throw.
- Pulls opponent in if they are tethered before thrown.
An alternative throw option that lets Baiken avoid tethering the opponent on a grab. Good for potential matchups/situations where being upclose would be less preferrable.
When performing this on a tethered opponent, this allows Baiken perform cheeky crossup setups due to the pullback.
Air Throw
j.6D or j.4D
- Placeholder.
Special Moves
Tatami Gaeshi
236K (Air OK)
- Ground Tatami
- Physical hit in front of Baiken that launches opponents.
This move does it all. Launches opponents for combos and sets up safejumps when no combo is available. It's just slow enough to frametrap after most of Baiken's normals, giving a huge launch.
- Air Tatami
- Spawns a projectile.
- Tatami mat is active until it lands.
IAD Tatami (or Kire Tatami) is an excellent approach tool that has been made a lot easier thanks to the extended airdash startup and dash macro.
Kabari
41236S/H
- Both versions of Kabari cause a vacuum effect on the opponent on hit and block
- Tethers opponent to Baiken temporarily on hit or block.
Usually can only be comboed into with a counterhit. Used to set up tether loops or as a combo ender to mix the opponent on oki
- Causes a vacuum effect on the opponent on hit and block
- Pressing
 again after Kabari performs a follow-up slash that can be charged to delay the slash
 - The charged follow-up can pass through the opponent while traveling.
Baiken's main combo ender. Ending a combo with the follow-up slash allows for a meaty Kire Tatami.
Youzansen
j.236S
- Hits overhead, very fast if TK'd (2369S)
Baiken's main high mixup option if TK'd and additional high hit for jump-ins. TK Youzansen is incredibly fast but also incredibly negative on block. It can only be comboed off of with meter, but it will be +2 on hit. If used after a normal jump-in, it will be plus enough to link after while also adding an extra high hit for your opponent to block.
Hiiragi
236P
- Baiken's counter and defensive callout.
- Catch has a close and far version: Close catch deals high damage and knocks down, Far catch deals no damage but forces a recoil animation, resetting her and the opponent to neutral.
- Far Catch cannot be RC'd
- Unparryable moves include: all Happy Chaos shooting attacks, all Zato=1 Shadow moves, all Jack-O servant attacks, all Faust items, Chipp Alpha/Gamma Blade, Nagoriyuki 236S and Bloodrage explosion, Anji Fuujin > P and 632146H, Axls Rensengeki > S and One Vision, and moves that are obvious projectiles.
- Moves that are parryable despite not seeming so include: Axl's Byakue Renshou and Snail, Potemkin's Garuda Impact and the very first hit of Giganter.
A meterless frame 1 reversal, the threat of this move alone will force opponents to vary the timing of any strings or pressure with even the slightest gaps within them unless they want to eat a sizeable chunk of damage. While mashable in blockstun, an extremely tight window for the parry can make this extremely tight to land in neutral or extended delays.
Be wary on using this move predictably without meter, the recovery will allow for very easy punishes otherwise.
If Baiken catches an attack from far away the opponent is locked into a guard crush; Unfortunately, she is forced to play out her recovery animation, and is not able to RC. This simply forces a neutral reset (Which isn't necessarily a bad situation for Baiken depending on the MU).
Overdrives
Tsurane Sanzu-watashi
236236S
- Baiken's reversal super.
Kenjyu
214214P (Air OK)
- Utility/whiff punish super.
- Firework explodes on contact with opponent or automatically after travelling a certain distance.
- The projectile can be PRCed and you can use the firework-effects to somewhat hide your mix-ups.
- Air version fires diagonally towards the ground.
External References
 Anji Mito [★]
 Asuka R♯ [★]
 Axl Low [★]
 Baiken [★]
 Bedman? [★]
 Bridget [★]
 Chipp Zanuff [★]
 Faust [★]
 Giovanna [★]
 Goldlewis [★]
 Happy Chaos [★]
 I-No [★]
 Jack-O' [★]
 Johnny [★]
 Ky Kiske [★]
 Leo Whitefang [★]
 May [★]
 Millia Rage [★]
 Nagoriyuki [★]
 Potemkin [★]
 Ramlethal [★]
 Sin Kiske [★]
 Sol Badguy [★]
 Testament [★]
 Zato-1 [★]
Click [★] for character's full frame data
Essentials
• HUD •
Controls •
FAQ •
The Basics
• Movement/Canceling •
Offense •
Defense •
Gauges •
Universal Strategy •
Detailed & Advanced Information
• Damage/Combo •
Frame Data & System Data •
Attack Attributes •
Misc •
Archived Information
• Patch Notes • Tier Lists •
- Attack Level
- Blocking
- Burst Gauge
- Cancels
- Clash
- Dash Cancel
- Faultless Defense
- Frame Advantage
- Gatling
- Gravity
- Guard Crush
- Guts
- Hitstop
- Hitstun
- Instant Air Dash (IAD)
- Instant Block
- Instant Faultless Defense
- Invalid Combos
- Knockdown Recovery
- Low Profile
- Minimum Damage
- Negative Penalty
- Off the Ground (OTG)
- Positive Bonus
- Prejump
- Proration
- Psych Burst
- Punish
- Overdrive (Super Attack)
- R.I.S.C. Level
- Roman Cancel (RC)
- Stagger Recovery
- Tension Gauge
- Throw
- Throw Clash
- Wall


