
Clutch Anti-Air jab
< GGACR
mNo edit summary |
No edit summary |
||
| Line 63: | Line 63: | ||
*Hits far above the ground, can be ducked under. Useful for "tick" throws. | *Hits far above the ground, can be ducked under. Useful for "tick" throws. | ||
*Comes with a unique recovery animation where Bridget drops and retracts the yo-yo, which can lead to odd setups against him in very specific scenarios. | *Comes with a unique recovery animation where Bridget drops and retracts the yo-yo, which can lead to odd setups against him in very specific scenarios. | ||
[[{{PAGENAME}}/Frame_Data#Gatling_Table|Gatling Options]]: {{clr|1|5P}}, {{clr|1|2P}}, {{clr|1|6P}}, {{clr|2|5K}}, {{clr|2|2K}}, {{clr|2|6K}}, {{clr|3|c.S}}, {{clr|3|f.S}}, {{clr|3|2S}}, {{clr|3|6S}}, {{clr|5|5D}}, {{clr|5|2D}} | |||
</div> | </div> | ||
</div> | </div> | ||
| Line 96: | Line 96: | ||
Makes for a decent meaty with some okay range, but otherwise not spectacular. | Makes for a decent meaty with some okay range, but otherwise not spectacular. | ||
*Mostly useful in relaunch combos into 6S. | *Mostly useful in relaunch combos into 6S. | ||
[[{{PAGENAME}}/Frame_Data#Gatling_Table|Gatling Options]]: {{clr|1|6P}}, {{clr|2|6K}}, {{clr|3|c.S}}, {{clr|3|f.S}}, {{clr|3|2S}}, {{clr|3|6S}}, {{clr|5|5D}}, {{clr|5|2D}} | |||
</div> | </div> | ||
</div> | </div> | ||
| Line 132: | Line 132: | ||
*Has a large gap between hits which might make second hit whiff on FD, but it can be special canceled at any point after the first hit which mitigates this problem. | *Has a large gap between hits which might make second hit whiff on FD, but it can be special canceled at any point after the first hit which mitigates this problem. | ||
*Combos to KSMH, but only on crouching hit or by canceling into KSMH before the second hit.. | *Combos to KSMH, but only on crouching hit or by canceling into KSMH before the second hit.. | ||
[[{{PAGENAME}}/Frame_Data#Gatling_Table|Gatling Options]]: {{clr|1|6P}}, {{clr|3|f.S}}, {{clr|3|2S}}, {{clr|5|5D}}, {{clr|5|2D}} | |||
</div> | </div> | ||
</div> | </div> | ||
| Line 147: | Line 147: | ||
Hitboxes = | Hitboxes = | ||
<gallery widths="210px" heights="210px" mode="nolines"> | <gallery widths="210px" heights="210px" mode="nolines"> | ||
GGXXACPR_Bridget_fS-1-Hitbox.png| | GGXXACPR_Bridget_fS-1-Hitbox.png|Frame 7 | ||
GGXXACPR_Bridget_fS-2-Hitbox.png|Frames | GGXXACPR_Bridget_fS-2-Hitbox.png|Frames 8-9 | ||
GGXXACPR_Bridget_fS-3-Hitbox.png| | GGXXACPR_Bridget_fS-3-Hitbox.png|Frame 10 | ||
GGXXACPR_Bridget_fS-4-Hitbox.png|Frames 11-12 | GGXXACPR_Bridget_fS-4-Hitbox.png|Frames 11-12 | ||
</gallery> | </gallery> | ||
| Line 170: | Line 170: | ||
*Frequently gatling'd to 2D for short, sweet combos at moderate range. | *Frequently gatling'd to 2D for short, sweet combos at moderate range. | ||
*Combos into 6S against big bodies, or can be used to gatling into a yoyo set. | *Combos into 6S against big bodies, or can be used to gatling into a yoyo set. | ||
[[{{PAGENAME}}/Frame_Data#Gatling_Table|Gatling Options]]: {{clr|3|2S}}, {{clr|3|6S}}, {{clr|5|5D}}, {{clr|5|2D}} | |||
</div> | |||
</div> | |||
===<big>[[GGACR/Controls#Dust_Attack|{{clr|5|5D}}]]</big>=== | |||
<div class="attack-container"> | |||
<div class="attack-gallery"> | |||
<tabber> | |||
Images = | |||
<gallery widths="210px" heights="210px" mode="nolines"> | |||
GGAC_Bridget_5D.png|The prelude to shooting for the moon | |||
</gallery> | |||
|-| | |||
Hitboxes = | |||
<gallery widths="210px" heights="210px" mode="nolines"> | |||
GGXXACPR_Bridget_5D-1-Hitbox.png|Frames 30-32 | |||
GGXXACPR_Bridget_5D-2-Hitbox.png|Frames 33-35 | |||
</gallery> | |||
</tabber> | |||
</div> | |||
<div class="attack-info"> | |||
{| class="wikitable attack-data" | |||
{{CargoHeader-GGACR}} | |||
|- | |||
{{#cargo_query:tables=MoveData_GGACR | |||
|fields=damage,guard,startup,active,recovery,onBlock,invuln,level | |||
|where=chara="{{SUBPAGENAME}}" and input="5D" | |||
|format=template|template=CargoBody-GGACR|named args=yes|order by=_ID | |||
}} | |||
|} | |||
==== ==== | |||
One of the slowest {{clr|5|5D}}s in the game. Generally not worth the bother. | |||
*Really only useful with Roger coverage, but with Bridget's lack of air knockdowns you'll have to go for an ID with minimal damage. | |||
</div> | </div> | ||
</div> | </div> | ||
| Line 206: | Line 239: | ||
*Confirms into 6S for further air combos. | *Confirms into 6S for further air combos. | ||
*Avoid use as a poke, as the opening hitbox is almost strictly against the air. | *Avoid use as a poke, as the opening hitbox is almost strictly against the air. | ||
[[{{PAGENAME}}/Frame_Data#Gatling_Table|Gatling Options]]: {{clr|2|6K}}, {{clr|3|c.S}}, {{clr|3|f.S}}, {{clr|3|2S}}, {{clr|3|6S}}, {{clr|5|5D}}, {{clr|5|2D}} | |||
</div> | </div> | ||
</div> | </div> | ||
| Line 315: | Line 348: | ||
*Whiffs on crouching, don't throw it out haphazardly. | *Whiffs on crouching, don't throw it out haphazardly. | ||
*Can hit taller characters, such as Potemkin and Justice, from extremely far away. | *Can hit taller characters, such as Potemkin and Justice, from extremely far away. | ||
</div> | </div> | ||
</div> | </div> | ||
| Line 382: | Line 382: | ||
*Good range and low recovery making this great for pestering. | *Good range and low recovery making this great for pestering. | ||
*Excellent for burst baits. | *Excellent for burst baits. | ||
[[{{PAGENAME}}/Frame_Data#Gatling_Table|Gatling Options]]: {{clr|1|5P}}, {{clr|1|2P}}, {{clr|1|6P}}, {{clr|2|5K}}, {{clr|2|2K}}, {{clr|2|6K}}, {{clr|3|c.S}}, {{clr|3|f.S}}, {{clr|3|2S}}, {{clr|3|6S}}, {{clr|5|5D}}, {{clr|5|2D}} | |||
</div> | </div> | ||
</div> | </div> | ||
| Line 414: | Line 414: | ||
Short ranged, low profile 2K for opening upbackers or opponents expecting 6K. | Short ranged, low profile 2K for opening upbackers or opponents expecting 6K. | ||
*Low profiles ''immediately'' | *Low profiles ''immediately''. Can be useful for going under things on reaction (e.g. Bandit Bringer), and if properly spaced can bait some reversal options (e.g. Vapor Thrust). | ||
*Safe on block to offset the poor hitbox. | *Safe on block to offset the poor hitbox. | ||
[[{{PAGENAME}}/Frame_Data#Gatling_Table|Gatling Options]]: {{clr|1|2P}}, {{clr|1|6P}}, {{clr|2|6K}}, {{clr|3|c.S}}, {{clr|3|f.S}}, {{clr|3|2S}}, {{clr|5|5D}}, {{clr|5|2D}} | |||
</div> | </div> | ||
</div> | </div> | ||
| Line 456: | Line 456: | ||
*Jump cancellable for anybody you tag out of the air. | *Jump cancellable for anybody you tag out of the air. | ||
*Whiff cancelling into 2K is advised on block for building distance or pressure resets. | *Whiff cancelling into 2K is advised on block for building distance or pressure resets. | ||
[[{{PAGENAME}}/Frame_Data#Gatling_Table|Gatling Options]]: {{clr|2|2K}}, {{clr|3|6S}}, {{clr|5|5D}}, {{clr|5|2D}} | |||
</div> | </div> | ||
</div> | </div> | ||
| Line 525: | Line 525: | ||
Fairly decent air-to-air poke or for hitting anybody below you. | Fairly decent air-to-air poke or for hitting anybody below you. | ||
*Self cancellable for gaining height in air combos. | *Self cancellable for gaining height in air combos. | ||
[[{{PAGENAME}}/Frame_Data#Gatling_Table|Gatling Options]]: {{clr|1|j.P}}, {{clr|2|j.K}}, {{clr|3|j.S}}, {{clr|3|j.2S}}, {{clr|5|j.D}} | |||
</div> | </div> | ||
</div> | </div> | ||
| Line 561: | Line 561: | ||
*Unfortunately doesn't lead to {{clr|3|j.2S}}, you'll probably have to back gatling to {{clr|1|j.P}}. | *Unfortunately doesn't lead to {{clr|3|j.2S}}, you'll probably have to back gatling to {{clr|1|j.P}}. | ||
*Can sometimes crossup. | *Can sometimes crossup. | ||
[[{{PAGENAME}}/Frame_Data#Gatling_Table|Gatling Options]]: {{clr|1|j.P}}, {{clr|3|j.S}}, {{clr|5|j.D}} | |||
</div> | </div> | ||
</div> | </div> | ||
| Line 595: | Line 595: | ||
Great air-to-air button, even if on the slower side. | Great air-to-air button, even if on the slower side. | ||
*Useful in tandem with {{clr|3|j.2S}} for air combos. | *Useful in tandem with {{clr|3|j.2S}} for air combos. | ||
[[{{PAGENAME}}/Frame_Data#Gatling_Table|Gatling Options]]: {{clr|2|j.K}}, {{clr|3|j.2S}}, {{clr|5|j.D}} | |||
</div> | </div> | ||
</div> | </div> | ||
| Line 610: | Line 610: | ||
Hitboxes = | Hitboxes = | ||
<gallery widths="210px" heights="210px" mode="nolines"> | <gallery widths="210px" heights="210px" mode="nolines"> | ||
GGXXACPR_Bridget_j2S-1-Hitbox.png|Frames 10- | GGXXACPR_Bridget_j2S-1-Hitbox.png|Frames 10-11 | ||
GGXXACPR_Bridget_j2S-2-Hitbox.png|Frames | GGXXACPR_Bridget_j2S-2-Hitbox.png|Frames 12-13 | ||
GGXXACPR_Bridget_j2S-3-Hitbox.png|Frames | GGXXACPR_Bridget_j2S-3-Hitbox.png|Frames 14-15 | ||
</gallery> | </gallery> | ||
</tabber> | </tabber> | ||
| Line 667: | Line 666: | ||
*Launches and vacuums for air combo shenanigans. | *Launches and vacuums for air combo shenanigans. | ||
*Very low hitstop, making Roger setups particularly tricky. | *Very low hitstop, making Roger setups particularly tricky. | ||
*Can be special canceled into Starship. | *Can be special canceled into Starship or Force Breaks. | ||
</div> | </div> | ||
</div> | </div> | ||
| Line 707: | Line 706: | ||
<div class="attack-container"> | <div class="attack-container"> | ||
<div class="attack-gallery"> | <div class="attack-gallery"> | ||
<gallery widths="210px" heights="210px" mode="nolines"> | <gallery widths="210px" heights="210px" mode="nolines"> | ||
GGAC_Bridget_airThrow.png| | GGAC_Bridget_airThrow.png| | ||
</gallery> | </gallery> | ||
</div> | </div> | ||
<div class="attack-info"> | <div class="attack-info"> | ||
| Line 771: | Line 763: | ||
<div class="attack-container"> | <div class="attack-container"> | ||
<div class="attack-gallery"> | <div class="attack-gallery"> | ||
<gallery widths="210px" heights="210px" mode="nolines"> | <gallery widths="210px" heights="210px" mode="nolines"> | ||
GGAC_Bridget_GroundSet.png| | GGAC_Bridget_GroundSet.png| | ||
GGAC_Bridget_AirSet.png|You can use yo-yo related attacks even while it's still moving! | GGAC_Bridget_AirSet.png|You can use yo-yo related attacks even while it's still moving! | ||
</gallery> | </gallery> | ||
</div> | </div> | ||
<div class="attack-info"> | <div class="attack-info"> | ||
| Line 803: | Line 788: | ||
==== ==== | ==== ==== | ||
Bridget sets his yoyo. A directional input will change where he sets the yoyo. Refer to the image for which inputs provide which set. As this is considered a special move, you can cancel special cancelable normals into it allowing you to recover much faster from them than normal. | Bridget sets his yoyo. A directional input will change where he sets the yoyo. Refer to the image for which inputs provide which set. As this is considered a special move, you can cancel special cancelable normals into it allowing you to recover much faster from them than normal. Using a throw is a good way to set this up. | ||
</div> | </div> | ||
| Line 812: | Line 797: | ||
<div class="attack-container"> | <div class="attack-container"> | ||
<div class="attack-gallery"> | <div class="attack-gallery"> | ||
<gallery widths="210px" heights="210px" mode="nolines"> | <gallery widths="210px" heights="210px" mode="nolines"> | ||
GGAC_Bridget_KnockdownSet.png|Laugh in the face of okizeme | GGAC_Bridget_KnockdownSet.png|Laugh in the face of okizeme | ||
</gallery> | </gallery> | ||
</div> | </div> | ||
<div class="attack-info"> | <div class="attack-info"> | ||
| Line 984: | Line 962: | ||
*Can be special canceled into any air yo-yo set after the active frames end before Bridget hits the ground. | *Can be special canceled into any air yo-yo set after the active frames end before Bridget hits the ground. | ||
*Extremely fast and needs to be FD blocked in the air, lending it some utility as an anti-air. | *Extremely fast and needs to be FD blocked in the air, lending it some utility as an anti-air. | ||
*You can be air | *You can be air thrown if they block it so watch out. | ||
</div> | </div> | ||
</div> | </div> | ||
Revision as of 18:20, 28 May 2022
This can be for a variety of reasons including but not limited to: spelling mistakes, unnecessary information, poor formatting, and other metrics per common sense reasoning.
Consider helping rewrite it.
Overview
Bridget is known for his extensive air mobility and keepaway game, and he comes with some particularly strong high/low mixups and unblockable setups.
Bridget can fly well over the top of the screen with his universal air movement options, as well as quickly get in and go for very quick overheads in pressure. His Yo-yo attacks and setup replace the functions of his H button, allowing Bridget to place slow moving, lingering hitboxes in places that some characters can have a very difficult time getting through. Attacking in tandem with Roger allows for Bridget to maintain pressure, and using Roger defensively lets Bridget get out of harm's way.
In exchange, Bridget suffers from low health and poor damage output, as well as generally not being able to score knockdowns out of air combos. This combined with his unusual movement options makes for a character that can be difficult to pick up but rewards those who put in the effort with an unconventional hit-and-run playstyle.
If you can master Bridget's movement, then players who love filling the screen with hitboxes and playing a hardcore keepaway game will love what he brings to the table.
![]() Bridget
Bridget ![]() Bridget has great mobility and the game's best runaway, but also has very strong high/low and unblockable mixups.
Bridget has great mobility and the game's best runaway, but also has very strong high/low and unblockable mixups.
Pros
Cons
- Excellent runaway/keepaway potential: Unparalleled air mobility and meter gain even on retreat lets Bridget control the pace from far away. Up to four "jumps" lets Bridget escape from nearly anywhere.
- Strong reversal options: Starship is a grounded, FRC'able DP that can be difficult to punish, and Overdrives can come in clutch.
- Roger cover and tandems: Roger provides space control, aids defense, and works for unblockable setups and pressure, and more.
- Delayed wakeup: delayed get-up sets up yo-yo, and may mess up other characters oki.
- Auto OS'd throws with yo-yo active: HS not having any normals attached to it allows for free throw attempts when Roger is active.
- Awfully low health: low defense value, zero Guts, and being light weight can have Bridget being done the moment he's caught.
- Very limited pressure: lack over coverage tools and normals means Bridget is better suited to a hit-and-run style than fully pressing an advantage.
- Poor damage and limited confirms: Low damage and lacks means of scoring a knockdown out of air combos.
- Meter hungry: Good movement requires FD canceling Rolling Movement, meaning that you need meter.
- Low margin of error: Easily beaten buttons, less than airtight setups, and some very low health combine to make a character who can be notoriously difficult to manage.
- Limited throw OS: Since HS has no normals associated with it, Bridget cannot OS throws unless Roger is active, making failed throw attempts more dangerous.
 | |
| Damage Received Mod | |
| ×1.07 | |
| Guts Rating | |
| 0/5 | |
| Gravity Mod | |
| ×1.1 | |
| Stun Resistance | |
| 55 | |
| Prejump | |
| 3F | |
| Backdash | |
| 15F (1~8F Strike Invuln) | |
| Wakeup Timing | |
| 25F (Face Up)/ 23F (Face Down) | |
| Number of Jumps: | |
| 2 | |
| Number of Air Dashes: | |
| 1 | |
| Fastest Attack | |
| Reversals | |
Guilty Bits Character Intro
Normal Moves
5P


Simple, horizontal jab that makes for a clutch anti-air. Usually falls out of favor to 2P for mashing.
- Hits far above the ground, can be ducked under. Useful for "tick" throws.
- Comes with a unique recovery animation where Bridget drops and retracts the yo-yo, which can lead to odd setups against him in very specific scenarios.
Gatling Options: 5P, 2P, 6P, 5K, 2K, 6K, c.S, f.S, 2S, 6S, 5D, 2D
5K
Mainly for combos


Makes for a decent meaty with some okay range, but otherwise not spectacular.
- Mostly useful in relaunch combos into 6S.
Gatling Options: 6P, 6K, c.S, f.S, 2S, 6S, 5D, 2D
c.S

Bridget goes to the circus, Pt.I


1st Hit (Frames 7-8)

2nd Hit (Frames 19-20)


2-hit yo-yo pull trick mostly for combos.
- Can make for a good stopping point in pressure.
- Has a large gap between hits which might make second hit whiff on FD, but it can be special canceled at any point after the first hit which mitigates this problem.
- Combos to KSMH, but only on crouching hit or by canceling into KSMH before the second hit..
Gatling Options: 6P, f.S, 2S, 5D, 2D
f.S

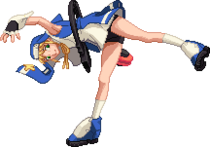
The pestering flip attack


Frame 7

Frames 8-9

Frame 10

Frames 11-12


Bridget's most frequent ranged poke. Hits a great distance away, but is easily low profiled, IAD'd over, or upper body invul'd through.
- Comes out pretty fast, but takes a while to fully extend afterwards.
- Frequently gatling'd to 2D for short, sweet combos at moderate range.
- Combos into 6S against big bodies, or can be used to gatling into a yoyo set.
Gatling Options: 2S, 6S, 5D, 2D
5D

The prelude to shooting for the moon


Frames 30-32

Frames 33-35


One of the slowest 5Ds in the game. Generally not worth the bother.
- Really only useful with Roger coverage, but with Bridget's lack of air knockdowns you'll have to go for an ID with minimal damage.
6P

Big anti-air but don't get caught in the deadzone


Frames 11-12

Frames 13-14

Frames 15-16


Pretty big Anti-Air swat.
- Confirms into 6S for further air combos.
- Avoid use as a poke, as the opening hitbox is almost strictly against the air.
Gatling Options: 6K, c.S, f.S, 2S, 6S, 5D, 2D
3P

What a pain in the ass


Frames 8-15

Frames 16-19


Buttslam. Forward moving, difficult to contest, big stagger on CH making it perfect for frametraps. One of Bridget's best normals.
- Has enough of a hop off the ground to go over low pokes/mash attempts
- Active for forever and a real pain for some characters to deal with.
- Cancel into Starship for some tacked on damage on normal hit if that's what you want.
- Will completely stuff a surprising number of normals thanks to it's rather disjointed hitbox. Anything Kickstart My Heart can beat, this can and more.
6K

"Unblockable"


Frames 23-25

Frames 26-28


Your main overhead tool for opening up. Despite the slower startup speed, it goes slightly airborne at the beginning and low profiles as it hits, meaning 2P mashers can eat it.
- Special cancellable except into yo-yo-specials for small conversions.
- Has an FRC right as it goes active to mitigate a miss, or make for better conversions.
- Works best in tandem with Roger coverage.
6S

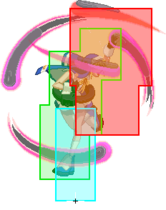
The hitbox Axl longs for

- GGXXACPR Bridget 6S-1-Hitbox.png
Frames 10-11
- GGXXACPR Bridget 6S-2-Hitbox.png
Frames 12-13
- GGXXACPR Bridget 6S-3-Hitbox.png
Frames 14-15
Big Anti-Air yo-yo haymaker. The pinnacle of Bridget's reach.
- Preemptively covers a lot of IAD attempts.
- Wallbounce on CH for a combo or setup.
- Whiffs on crouching, don't throw it out haphazardly.
- Can hit taller characters, such as Potemkin and Justice, from extremely far away.
2P

Pester Jester Pt.II


Frames 7-8

Frames 9-10


Amazingly plus 2P that trades some speed for the advantage.
- Good range and low recovery making this great for pestering.
- Excellent for burst baits.
Gatling Options: 5P, 2P, 6P, 5K, 2K, 6K, c.S, f.S, 2S, 6S, 5D, 2D
2K

The low poke. The usual


Short ranged, low profile 2K for opening upbackers or opponents expecting 6K.
- Low profiles immediately. Can be useful for going under things on reaction (e.g. Bandit Bringer), and if properly spaced can bait some reversal options (e.g. Vapor Thrust).
- Safe on block to offset the poor hitbox.
Gatling Options: 2P, 6P, 6K, c.S, f.S, 2S, 5D, 2D
2S

CH Fisher


Frames 10-11

Frames 12-13

Frames 14-15

Frames 16-17

Frames 18-19

Frames 20-21


Large, slow Anti-air and Frametrap button.
- Staggers and vacuums on counter hit for nice reward.
- Jump cancellable for anybody you tag out of the air.
- Whiff cancelling into 2K is advised on block for building distance or pressure resets.
Gatling Options: 2K, 6S, 5D, 2D
2D

The cleanest of sweeps


Frames 7-8

Frames 9-10


Hopping sweep with some low crush and a nice hitbox.
- Vital for knockdowns into yo-yo setups.
- FRC at the end of the active window for pressure resets on block or extended time for setups, particularly unblockables.
- Not unsafe enough to be particularly punishable at range.
- Horrid on whiff. Don't get carried away.
j.P

Standard air poke


Fairly decent air-to-air poke or for hitting anybody below you.
- Self cancellable for gaining height in air combos.
Gatling Options: j.P, j.K, j.S, j.2S, j.D
j.K

Kick like an Egyptian


Frames 6-9

Frames 10-13


Primarily air combo fodder.
- Pretty active for an air normal but the hurtbox means you'll probably get tagged a lot if used in neutral.
- Unfortunately doesn't lead to j.2S, you'll probably have to back gatling to j.P.
- Can sometimes crossup.
Gatling Options: j.P, j.S, j.D
j.S

The art of air wars


Frames 10-12

Frames 13-15


Great air-to-air button, even if on the slower side.
- Useful in tandem with j.2S for air combos.
Gatling Options: j.K, j.2S, j.D
j.2S

Primary jump-in and combo tool


Frames 10-11

Frames 12-13

Frames 14-15


Upwards swinging hit that covers in front of Bridget. Acts as a j.H in place of Bridget not having one.
- Makes for a decent jump-in, particularly with CH stagger.
- Jump cancellable for air-combo fodder.
j.D

Shine on you crazy child


1st Hit (Frames 15-17),
4th Hit (Frames 24-26)
2nd Hit (Frames 18-20),
5th Hit (Frames 27-29)
3rd Hit (Frames 21-23),
6th Hit (Frames 30-32)


Multi-hit aerial useful for crossups in conjunction with Roger setups.
- Launches and vacuums for air combo shenanigans.
- Very low hitstop, making Roger setups particularly tricky.
- Can be special canceled into Starship or Force Breaks.
Universal Mechanics
Ground Throw

Bridget throws his opponent over his shoulder in the opposite of the direction held, then lands on them with his butt. Iyaaaaah!
- Plenty of time for whichever yo-yo set you'd prefer to start your next setup with.
- You can use 2K 2P immediately after to OTG, at which point they can air tech. Particularly useful in the corner for airthrow resets or to force them to FD block 6S or 6P.
Air Throw

A rather average air throw, but one of the keys to Bridget.
- Bridget's only method of air knockdown outside of certain moves on counter-hit.
- As your throw button is the same as yo-yo set the punishment for whiffing this is much steeper than other characters if you do not either have Roger active in some way, or the yo-yo returning to you as a poor yo-yo set is timely to recover from and only rarely useful.
- You can throw your opponent into an active Roger for a combo, or for a reset into another potential air throw.
Dead Angle Attack
For just 50% meter, you can (possibly) get your opponent off of you!
Animation is the same as 6P. Best and only used when you're too lazy to block and have 50 meter. Because it's Bridget's 6P animation its one of the weaker dead angles in the game in terms of usefulness. However the good part about this move is if the yo-yo is out in a certain position, you can roll to the yo-yo and combo off this Dead Angle Attack.
Special Moves
Yoyo Placement


You can use yo-yo related attacks even while it's still moving!


Bridget sets his yoyo. A directional input will change where he sets the yoyo. Refer to the image for which inputs provide which set. As this is considered a special move, you can cancel special cancelable normals into it allowing you to recover much faster from them than normal. Using a throw is a good way to set this up.
Knockdown Yoyo Placement
[H] while knocked down

Laugh in the face of okizeme

Delays wakeup, potentially throwing off an opponent's oki timing. Only available when yoyo is not set.
- Great when used in conjunction with other reversals like throw or 623P.
- Since you're placing a Yo-yo out, that also grants access to wakeup 632146H.
Yoyo Recall
Yoyo Set -> H

You can delay the callback by holding H!

Bridget recalls his yoyo.
- Pressing H will trigger the startup animation, while holding H will delay the yoyo's actual movement for up to ~2.5 seconds.
- Pressing H again can cancel the callback, allowing you to move the yoyo closer without having to set it again.
- Can be used to extend combos or pressure, or as a zoning tool. Provides plenty enough time to confirm into a combo on hit.
- As this is considered a special move, you can cancel special cancelable normals into it allowing you to recover much faster from them than normal.
It's actually still possible for Bridget to use Rolling Movement while delaying a yoyo recall, but the input has to either be returned to neutral or TKed to avoid just Faultless Defending in place (in other words, the input becomes 2145K or 2147K).
Kick Start My Heart
236K

vroooom


Bridget uses his yo-yo's like roller blades and rides on them across the screen.
- The speed of the move can be increased or decreased by holding forward or back respectively at any point during the move. Holding forward from frame 1 will clear the entire screen, not holding anything moves roughly two thirds, and by holding back you move less than the distance of a forward yo-yo set.
- Can be canceled into Stop or Shoot at any point during the active frames even if it has already been blocked, giving it the potential to bait potential punishes with proper timing.
Stop
KSMH -> P


A follow up to KSMH. Bridget stops on his tracks.
- When used at maximum range it is extremely difficult for the majority of the cast to actually punish.
- Knocks down the opponent on hit so trades are generally in Bridget's favor, and gives time for a yo-yo set after knockdown.
Shoot
KSMH -> K

Yo-Yo wheels of pain


A follow up to KSMH. Bridget flings himself across the screen while swinging the yo-yos around. Stupidly high corner carry.
- Can be special canceled into any air yo-yo set after the active frames end before Bridget hits the ground.
- Extremely fast and needs to be FD blocked in the air, lending it some utility as an anti-air.
- You can be air thrown if they block it so watch out.
Starship
623P (Air OK)

We Built This City...


Ground
Air


A surprisingly incredible DP with a set of quirks setting it apart from others.
- Grounded, up to 4 hits, and nonstandard hitstop can make this very difficult to bait or even punish.
- Combos on hit or sets up a tech situation. Can knockdown if it CHs an extended hurtbox, eg. HOS's.
- Has an FRC right at the tail end of it, guaranteeing it stays perfectly safe.
- The hitbox of Starship does not extend to the floor, so some character's moves that keep them low to the floor will not be hit by it (Ky's Stun Dipper, Millia's roll, ABA's slide, etc).
- How to punish: FD the first few hits so Bridget gets pushed out and then hit him. It is also vulnerable throws for up to 4 frames before it goes active.
Additional Frame Data: Floats opponent on hit. Knocks down opponent on ground hit. Hitstop 6F. FRC timing 19~20F. Initial prorate 80%.
The air version is just as versatile as the grounded version. Used to end air combos or bait reversals.
- Can be used for knockdowns at low height, though this is more an edge case than anything.
- Surprisingly safe-ish at only -5, especially if tk'd at range.
- Has the same FRC as the grounded version.
- Completely vulnerable to air throws.
Additional Frame Data: Floats opponent on hit (untechable for 24F). Knocks down opponent on ground hit. Hitstop 6F. Listed Frame Adv is for fastest possible TK Air Starship (startup 16F). FRC timing 19-20F. Initial prorate 75%.
Roger Rush
Yoyo Set -> 236H (Air OK)

"Come at me bro"


Bridget summons Roger ready to punch people's faces.
- Roger will appear wherever the yo-yo is set and will make his way back to Bridget while punching.
- Roger Rush will end once either he or Bridget is hit, he makes it back to Bridget, the move's duration expires, or if hits to a max of 3 times.
- Staggers on hit usually long enough to run up and confirm into 5K, and is faster than Jagged Roger.
Additional Frame Data: Staggers on ground hit (max 49F). FRC timing 16~17F (ground version only).
Jagged Roger
Yoyo Set -> 214H (Air OK)

Bear go BRRRRR

- GGXXACPR Bridget 214H-Hitbox.png
Bridget summons Roger equipped with a saw around its body.
- Roger will appear wherever the yo-yo is set and make its way back to Bridget while the saw blade spins.
- As opposed to Roger Rush, Jagged Roger returns to Bridget at a slower speed and stays out even when Bridget is hit after 22F.
- Jagged Roger will end once 105 frames have passed, he makes it back to Bridget, or if it hits an opponent 3 times.
- Can use the number of hits it has remaining to instead nullify an equivalent number of hits of a projectile. These act on the total number of hits remaining the same as if it was hitting an opponent.
- Rather good at raising the opponent's guard bar if they don't FD.
Additional Frame Data: FRC timing 22~23F (ground version only).
Roger Hug
Yoyo Set -> 623H

Need a hug?


The Yo-Yo becomes a sort of mechanism and homes in on the the opponent for a set distance.
- Will stick with the opponent both on hit and block.
- The mechanism acts just like a set yo-yo (i.e. any yo-yo move will occur right where the opponent is).
- Roger Hug will end when 600F pass after sticking to opponent, Bridget is hit, or a yo-yo move other than Rolling Movement is done.
Roger Get
Yoyo Set -> 421H (Air OK)

Roger used "Body Slam"!


Bridget summons Roger who will then do a body slam and slide upon landing on the ground.
- The direction which Roger drops depends on what direction you were facing when you set the yo-yo (i.e. if you set the yo-yo while facing the right side, Roger will drop towards the right side no matter what).
- Depending on the height at which the yo-yo is placed, the move will have different properties.
Additional Frame Data: FRC timing 20~21F.
Rolling Movement
Yoyo Set -> 214K (Air OK)

So~re~~

Bridget rolls to his yoyo, wherever it is. Despite what you might at first think, this is the most important tool in Bridget's arsenal. Very strong mobility option. Canceling into it allows Bridget to extend pressure, confirm from situations he normally couldn't, and escape after a potentially unsafe poke.
- Allows for very quick and low overheads since this leaves Bridget in an aerial state.
- When immediately canceled into Faultless Defense, it provides a very fast "jump" that doesn't actually take up one of your aerial movement options when done in the air.
- It can also be immediately canceled into a normal, making it extremely useful for extending combos.
- Can be used as a pseudo-jump cancel on moves that aren't normally jump cancelable (such as f.S).
- Exceptions are: 6K, 2D and j.D.
Force Breaks
FB Roger Rush
Yoyo Set -> 236D (Air OK)
Roger will perform three punches in place. The first punch will stagger the opponent, the second knocks them airborne, and the third will wallstick them.
- Opens the way for some strong combos on hit, and for mixup opportunities on block.
- There's a window between the second and third punches where you can throw the opponent (or they can throw you), making the threat of a high/low/throw/no mixup mixup very real on block.
- You can also use this window to crossup the opponent, by jumping over them right after the second punch.
FB Jagged Roger
Yoyo Set -> 214D (Air OK)
This version of Jagged Roger will chase the opponent instead of returning to Bridget. Great option to throw out for 25% Tension. The opponent essentially has to respect it.
- Active for so long that it can (and often does) punish people who burst it.
- Will probably buy you a high/low mixup.
Overdrives
Loop the Loop
632146S

Strong reversal and combo ender. Good range and relatively high damage for Bridget.
- Converts to knockdown at range.
Additional Frame Data: 7th hit staggers opponent on hit (max 75F). 8th hit removes OTG state from opponent. FRC timing 42~45F.
Maintenance Disaster
4123641236S

Oops

Extremely fast Anti-Air/Reversal that can be difficult to safejump. Will catch them if they're in the line of fire, and weren't blocking before the superflash.
- The explosion is guaranteed to execute on input, meaning that trading this is very bad for the opponent.
- Every hit must be FD'd while airborne, making this a dangerous consideration for opponents approaching from the air.
- Bridget falls backwards and shrinks his hurtbox during recovery, making it awkward to punish.
- Can work as a high damage combo ender, though this is usually inoptimal.
Additional Frame Data: Bridget is airborne 5~13F. Opponent's inputs are frozen after the super flash until the 1st active frame. Floats opponent on hit (untechable for 30F).
Me and My Killing Machine
Yoyo Set -> 632146H or 412364H

Bridget and Roger's Grand Circus Performance

Long, obfuscating hitbox that tracks to Bridget, and is mainly used to cover him during mixups and approach. Very similar in function to Jagged Roger, but moves at speeds similar it's Force Break version.
- Does a boatload of hits and tacks on a lot of damage compared to Bridget's overall kit. On block it does rather good chip and quickly raises the guard bar.
- Stays active if Bridget is hit, discourages mashing or reversaling out.
- Actually useful as a reversal, particularly with a close yo-yo, as it can cover Bridget's recovery.
- Loses to throws, which will not only get Bridget hit, but will likely burn the rest of the move's active window.
Additional Frame Data: Knocks down opponent on hit (untechable for 60F). Attack is guaranteed to activate once the command has been input. Roger can pass through other projectiles.
The Delayed version moves more slowly, remaining more in place.
- Useful if the opponent is far away on a knockdown and you want to keep them still while you approach.
- Nonstandard hitstop allows for a bit of jank, but the fewer hits limits the time you have.
- Has no invincibility compared to the normal version. Be sure not to mix them up!
Additional Frame Data: Knocks down opponent on hit (untechable for 60F). Attack is guaranteed to activate once the command has been input. Roger can pass through other projectiles.
Instant Kill
Shoot the Moon
During IK Mode: 236236H


"Space, the final frontier."


Bridget wraps the opponent with his yoyos and throws them offscreen. They somehow end up on the moon. You don't even see Bridget's victory pose, not worth it.
Additional Frame Data: IK mode activation time 60F.
Colors

Default P

Default K

Default S

Default H

Default D

EX P

EX K

EX S

EX H

EX D

Slash P

Slash K

Slash S

Slash H

Slash D1

Reload P

Reload K

Reload S

Reload H

Reload D1


Gold2

Shadow2


To select your color, press the corresponding button while in the designated "color set". Color sets can be toggled through by hitting the Respect button.
- Only selectable on the Arcade and PC-Rollback versions of the game.
- Available on home ports, and are selected by pressing the Rec. Enemy button on the Slash or Reload color sets, respectively. Gold characters are powered up versions, Shadow characters have infinite tension. Both are banned from tournament play.
External References
To edit frame data, edit values in GGACR/Bridget/Data.
A.B.A
Anji
Axl
Baiken
Bridget
Chipp
Dizzy
Eddie
Faust
I-No
Jam
Johnny
Justice
Kliff
Ky
May
Millia
Order-Sol
Potemkin
Robo-Ky
Slayer
Sol
Testament
Venom
Zappa
Systems Pages