(Changing color to current formqat) |
No edit summary |
||
| Line 5: | Line 5: | ||
|overview= Majin Buu's kit is built entirely around mix-up and okizeme, to the point to where he's playing a totally different game to anyone else. While many other DBFZ characters thrive on two-touch situations or powerful assists, Majin Buu's damage is low with gimmicky assists and peculiar normals like a standing overhead, making him greedy and not all that helpful while he's in the back. This gives Majin Buu a reputation as very hard to play, one that requires lots of labbing and is easy to write off as "bad." | |overview= Majin Buu's kit is built entirely around mix-up and okizeme, to the point to where he's playing a totally different game to anyone else. While many other DBFZ characters thrive on two-touch situations or powerful assists, Majin Buu's damage is low with gimmicky assists and peculiar normals like a standing overhead, making him greedy and not all that helpful while he's in the back. This gives Majin Buu a reputation as very hard to play, one that requires lots of labbing and is easy to write off as "bad." | ||
However, getting used to Majin Buu's weirdness reaps huge rewards. Majin Buu doesn't play by DBFZ's rules, his tools allow him to bypass the tech RPS and block game entirely to go straight into a mixup after a combo, turning him into a reset train when optimized. Sure, his damage isn't great, but Majin Buu will be getting hits on opponents far more frequently than other characters. This is to say nothing of his surprisingly excellent neutral thanks to his great {{clr| | However, getting used to Majin Buu's weirdness reaps huge rewards. Majin Buu doesn't play by DBFZ's rules, his tools allow him to bypass the tech RPS and block game entirely to go straight into a mixup after a combo, turning him into a reset train when optimized. Sure, his damage isn't great, but Majin Buu will be getting hits on opponents far more frequently than other characters. This is to say nothing of his surprisingly excellent neutral thanks to his great {{clr|S|5S}} and gorilla air normals coupled with his EX moves doing it all; rushdown, anti-airing and mixup too. If you like constant barrages of mixups or just sitting on people and making them cry, Majin Buu is for you. | ||
|lore= Majin Buu is an ancient creature who brought the universe to its knees before being sealed away on Earth, only to be unleashed by the wicked wizard Babidi. While highly dangerous, Buu was also as innocent as a newborn baby, a fact that Mr. Satan used to help reform him and transform him into a protector of Earth who is friendly to all around him, especially if they come to him with gifts of candy. | |lore= Majin Buu is an ancient creature who brought the universe to its knees before being sealed away on Earth, only to be unleashed by the wicked wizard Babidi. While highly dangerous, Buu was also as innocent as a newborn baby, a fact that Mr. Satan used to help reform him and transform him into a protector of Earth who is friendly to all around him, especially if they come to him with gifts of candy. | ||
|quote= If you tease Mr. Satan, Buu punish you! | |quote= If you tease Mr. Satan, Buu punish you! | ||
| Line 11: | Line 11: | ||
|pros= | |pros= | ||
* '''[[DBFZ/Majin Buu#Fat Throw|Fat Throw:]]''' Majin Buu's defining tool, giving him amazing okizeme and mixup whether it's combo'd into or just used after SKD. Also a pressure reset. | * '''[[DBFZ/Majin Buu#Fat Throw|Fat Throw:]]''' Majin Buu's defining tool, giving him amazing okizeme and mixup whether it's combo'd into or just used after SKD. Also a pressure reset. | ||
* '''Amazing Mixups:''' Fat Throw aside, Majin Buu has a plethora of tools including a standing overhead ({{clr| | * '''Amazing Mixups:''' Fat Throw aside, Majin Buu has a plethora of tools including a standing overhead ({{clr|M|5M}}) that can be comboed from meterless. He can also fuzzy every character, including GT Goku. | ||
* '''Versatile:''' Friendly to various playstyles (zoning, pressure heavy, mixup heavy, etc.) and has great neutral to boot. Has a uniquely slow falling speed. | * '''Versatile:''' Friendly to various playstyles (zoning, pressure heavy, mixup heavy, etc.) and has great neutral to boot. Has a uniquely slow falling speed. | ||
* '''Space Control:''' Massive air normals, strong ki blasts and a variety of anti-air options allows Buu to keep opponents at a far range until he decides otherwise. | * '''Space Control:''' Massive air normals, strong ki blasts and a variety of anti-air options allows Buu to keep opponents at a far range until he decides otherwise. | ||
* '''Stagger Pressure:''' Almost all of his light/medium normals are safe on block, the only exception being {{clr| | * '''Stagger Pressure:''' Almost all of his light/medium normals are safe on block, the only exception being {{clr|M|2M}} which vacuums the opponent out of the corner. All of his specials are either incredibly safe or space you out far enough to where the opponent can't counter-attack (except for [[DBFZ/Majin Buu#Sweeping Breath|Sweeping Breath]], which jails into vanish). | ||
* '''Corner Loop Combo:''' has access to a powerful corner loop that makes up for his otherwise low damage and meter gain midscreen, and is relatively easy in comparison to other some other character's loops. | * '''Corner Loop Combo:''' has access to a powerful corner loop that makes up for his otherwise low damage and meter gain midscreen, and is relatively easy in comparison to other some other character's loops. | ||
|cons= | |cons= | ||
* '''Greedy:''' Needs both meter and assists for his {{clr| | * '''Greedy:''' Needs both meter and assists for his {{clr|H|236H}} mixups, while not building much meter himself outside of the corner. His assists also aren't bad, but they're hard to use traditionally and can be useless for some characters. | ||
* '''Unorthodox Character:''' normals have abnormal hitboxes and it's sometimes hard to work with them. Abnormal combo path, optimals require some extra execution. One of the most unorthodox characters in the game means a high learning curve, and some setups are frame perfect. | * '''Unorthodox Character:''' normals have abnormal hitboxes and it's sometimes hard to work with them. Abnormal combo path, optimals require some extra execution. One of the most unorthodox characters in the game means a high learning curve, and some setups are frame perfect. | ||
|difficulty_rating=1 | |difficulty_rating=1 | ||
| Line 24: | Line 23: | ||
==Normal Moves== | ==Normal Moves== | ||
===<big>{{clr| | ===<big>{{clr|L|5L}}</big>=== | ||
<div class="attack-container"> | <div class="attack-container"> | ||
<div class="attack-gallery"> | <div class="attack-gallery"> | ||
| Line 45: | Line 44: | ||
|} | |} | ||
==== ==== | ==== ==== | ||
;{{clr| | <!--Insert text below the =s and above the 2 /divs--> | ||
;{{clr|L|5L}} | |||
* Whiffs on smalls/crouchers at the very tip. | * Whiffs on smalls/crouchers at the very tip. | ||
* Catches anything after a blocked superdash. | * Catches anything after a blocked superdash. | ||
It's Bardock's jab but you can {{clr| | It's Bardock's jab but you can {{clr|L|4LL}} with it. It's that big. | ||
---- | ---- | ||
;{{clr| | ;{{clr|L|5LL}} | ||
* Hits low. | * Hits low. | ||
* M starter. | * M starter. | ||
A standing low that can be cancelled into {{clr| | A standing low that can be cancelled into {{clr|M|2M}} or {{clr|M|5M}}, making this a useful part of Buu's mixups. | ||
---- | ---- | ||
;{{clr| | ;{{clr|L|5LLL}} | ||
* Cancelling into {{clr| | * Cancelling into {{clr|L|5LLL}} from a blocked {{clr|L|5LL}} always leaves the opponent in too much blockstun for the throw to work. | ||
* Very poor starter. | * Very poor starter. | ||
* Always results in a Smash, should it connect. | * Always results in a Smash, should it connect. | ||
| Line 63: | Line 63: | ||
</div> | </div> | ||
===<big>{{clr| | ===<big>{{clr|M|5M}}</big>=== | ||
<div class="attack-container"> | <div class="attack-container"> | ||
<div class="attack-gallery"> | <div class="attack-gallery"> | ||
<gallery widths="210px" heights="210px" mode="nolines"> | <gallery widths="210px" heights="210px" mode="nolines"> | ||
DBFZ_MajinBuu_5M.png |{{clr| | DBFZ_MajinBuu_5M.png |{{clr|M|6M}} junior | ||
</gallery> | </gallery> | ||
</div> | </div> | ||
| Line 81: | Line 81: | ||
|} | |} | ||
==== ==== | ==== ==== | ||
<!--Insert text below the =s and above the 2 /divs--> | |||
* On hit, ground bounces airborne opponent. | * On hit, ground bounces airborne opponent. | ||
One of the only standing overheads in the game. Slow and heavily scaled starter, but the animation looks very similar to Majin Buu's idle animation and it gives a full confirm on hit. | One of the only standing overheads in the game. Slow and heavily scaled starter, but the animation looks very similar to Majin Buu's idle animation and it gives a full confirm on hit. | ||
| Line 86: | Line 87: | ||
</div> | </div> | ||
===<big>{{clr| | ===<big>{{clr|H|5H}}</big>=== | ||
<div class="attack-container"> | <div class="attack-container"> | ||
<div class="attack-gallery"> | <div class="attack-gallery"> | ||
| Line 104: | Line 105: | ||
|} | |} | ||
==== ==== | ==== ==== | ||
<!--Insert text below the =s and above the 2 /divs--> | |||
* Hits from roundstart position. | * Hits from roundstart position. | ||
Integral to Buu's corner loops and gives him good corner carry midscreen thanks to rejumps. | Integral to Buu's corner loops and gives him good corner carry midscreen thanks to rejumps. | ||
| Line 109: | Line 111: | ||
</div> | </div> | ||
===<big>{{clr| | ===<big>{{clr|S|5S}}</big>=== | ||
<div class="attack-container"> | <div class="attack-container"> | ||
<div class="attack-gallery"> | <div class="attack-gallery"> | ||
| Line 127: | Line 129: | ||
|} | |} | ||
==== ==== | ==== ==== | ||
<!--Insert text below the =s and above the 2 /divs--> | |||
* Can be repeated up to four times. | * Can be repeated up to four times. | ||
Faster than average {{clr| | Faster than average {{clr|S|5S}}, can be used to create near-unbeatable roundstarts. | ||
</div> | </div> | ||
</div> | </div> | ||
===<big>{{clr| | ===<big>{{clr|L|2L}}</big>=== | ||
<div class="attack-container"> | <div class="attack-container"> | ||
<div class="attack-gallery"> | <div class="attack-gallery"> | ||
| Line 150: | Line 153: | ||
|} | |} | ||
==== ==== | ==== ==== | ||
<!--Insert text below the =s and above the 2 /divs--> | |||
It's a fast low. Lets Majin Buu get high/low mixups with assists. Highly useful in both blockstrings and restand setups. | It's a fast low. Lets Majin Buu get high/low mixups with assists. Highly useful in both blockstrings and restand setups. | ||
</div> | </div> | ||
</div> | </div> | ||
===<big>{{clr| | ===<big>{{clr|M|2M}}</big>=== | ||
<div class="attack-container"> | <div class="attack-container"> | ||
<div class="attack-gallery"> | <div class="attack-gallery"> | ||
| Line 172: | Line 176: | ||
|} | |} | ||
==== ==== | ==== ==== | ||
<!--Insert text below the =s and above the 2 /divs--> | |||
* Vacuums on block and hit. | * Vacuums on block and hit. | ||
* Has enough hitstun to combo into {{clr| | * Has enough hitstun to combo into {{clr|M|5M}} and {{clr|M|6M}}. | ||
Absolutely obscene hitstun. Can be used for crossups in the corner such as {{clr| | Absolutely obscene hitstun. Can be used for crossups in the corner such as {{clr|M|2M}}-{{clr|M|236M}}, or regular old airdashes if you're willing to risk getting mashed out on an unsafe normal. | ||
</div> | </div> | ||
</div> | </div> | ||
===<big>{{clr| | ===<big>{{clr|H|2H}}</big>=== | ||
<div class="attack-container"> | <div class="attack-container"> | ||
<div class="attack-gallery"> | <div class="attack-gallery"> | ||
| Line 196: | Line 201: | ||
|} | |} | ||
==== ==== | ==== ==== | ||
<!--Insert text below the =s and above the 2 /divs--> | |||
* Standard anti-air button. | * Standard anti-air button. | ||
Not much to say here. Majin Buu also has a frame 1 anti-air with {{clr| | Not much to say here. Majin Buu also has a frame 1 anti-air with {{clr|H|214H}} should things get hairy. | ||
</div> | </div> | ||
</div> | </div> | ||
===<big>{{clr| | ===<big>{{clr|S|2S}}</big>=== | ||
<div class="attack-container"> | <div class="attack-container"> | ||
<div class="attack-gallery"> | <div class="attack-gallery"> | ||
| Line 219: | Line 225: | ||
|} | |} | ||
==== ==== | ==== ==== | ||
<!--Insert text below the =s and above the 2 /divs--> | |||
* An angled upward Ki Blast. | * An angled upward Ki Blast. | ||
* Very high hitstun similar to SS Goku {{clr| | * Very high hitstun similar to SS Goku {{clr|S|2S}}. | ||
Useful more in combos than neutral due to it's incredibly high hitstun. Something like {{clr| | Useful more in combos than neutral due to it's incredibly high hitstun. Something like {{clr|M|2M}} > {{clr|M|5M}} > {{clr|S|2S}} can link to {{clr|L|5L}} into the standard jump cancel combo. | ||
</div> | </div> | ||
</div> | </div> | ||
===<big>{{clr| | |||
===<big>{{clr|M|6M}}</big>=== | |||
<div class="attack-container"> | <div class="attack-container"> | ||
<div class="attack-gallery"> | <div class="attack-gallery"> | ||
| Line 242: | Line 250: | ||
|} | |} | ||
==== ==== | ==== ==== | ||
<!--Insert text below the =s and above the 2 /divs--> | |||
*Universal overhead but... | *Universal overhead but... | ||
*Can combo of {{clr| | *Can combo of {{clr|M|2M}} | ||
</div> | </div> | ||
</div> | </div> | ||
===<big>{{clr| | ===<big>{{clr|L|j.L}}</big>=== | ||
<div class="attack-container"> | <div class="attack-container"> | ||
<div class="attack-gallery"> | <div class="attack-gallery"> | ||
| Line 265: | Line 274: | ||
|} | |} | ||
==== ==== | ==== ==== | ||
<!--Insert text below the =s and above the 2 /divs--> | |||
* Good air-to-air jab. | * Good air-to-air jab. | ||
</div> | </div> | ||
</div> | </div> | ||
===<big>{{clr| | |||
===<big>{{clr|M|j.M}}</big>=== | |||
<div class="attack-container"> | <div class="attack-container"> | ||
<div class="attack-gallery"> | <div class="attack-gallery"> | ||
| Line 286: | Line 297: | ||
|} | |} | ||
==== ==== | ==== ==== | ||
<!--Insert text below the =s and above the 2 /divs--> | |||
* Good jump-in button due to how big it is. | * Good jump-in button due to how big it is. | ||
</div> | </div> | ||
</div> | </div> | ||
===<big>{{clr| | |||
===<big>{{clr|H|j.H}}</big>=== | |||
<div class="attack-container"> | <div class="attack-container"> | ||
<div class="attack-gallery"> | <div class="attack-gallery"> | ||
| Line 307: | Line 320: | ||
|} | |} | ||
==== ==== | ==== ==== | ||
A half screen overhead. This move and {{clr| | <!--Insert text below the =s and above the 2 /divs--> | ||
A half screen overhead. This move and {{clr|H|j.2H}} are the staples in Buu's moveset with gigantic hitboxes, allowing him to control the air very effectively. | |||
</div> | </div> | ||
</div> | </div> | ||
===<big>{{clr| | |||
===<big>{{clr|S|j.S}}</big>=== | |||
<div class="attack-container"> | <div class="attack-container"> | ||
<div class="attack-gallery"> | <div class="attack-gallery"> | ||
| Line 328: | Line 343: | ||
|} | |} | ||
==== ==== | ==== ==== | ||
<!--Insert text below the =s and above the 2 /divs--> | |||
* Can be repeated up to four times. Each have different angles. | * Can be repeated up to four times. Each have different angles. | ||
Good zoning tool thanks to the wide range the Ki Blasts can cover. | Good zoning tool thanks to the wide range the Ki Blasts can cover. | ||
| Line 333: | Line 349: | ||
</div> | </div> | ||
===<big>{{clr| | ===<big>{{clr|H|j.2H}}</big>=== | ||
<div class="attack-container"> | <div class="attack-container"> | ||
<div class="attack-gallery"> | <div class="attack-gallery"> | ||
| Line 351: | Line 367: | ||
|} | |} | ||
==== ==== | ==== ==== | ||
<!--Insert text below the =s and above the 2 /divs--> | |||
* Way more active than it looks, can easily beat superdash. | * Way more active than it looks, can easily beat superdash. | ||
Screen control punch that gives you an easy confirm with SD. Just spam this and {{clr| | Screen control punch that gives you an easy confirm with SD. Just spam this and {{clr|H|j.H}} really. | ||
</div> | </div> | ||
</div> | </div> | ||
| Line 358: | Line 375: | ||
==Special Moves== | ==Special Moves== | ||
===<big>Dive Bomb</big>=== | ===<big>Dive Bomb</big>=== | ||
<span class="input-badge">'''{{clr| | <span class="input-badge">'''{{clr|L|236L}}/{{clr|M|M}}/{{clr|H|H}} (Air OK)'''</span> | ||
<div class="attack-container"> | <div class="attack-container"> | ||
<div class="attack-gallery"> | <div class="attack-gallery"> | ||
| Line 377: | Line 394: | ||
|} | |} | ||
==== ==== | ==== ==== | ||
<!--Insert text below the =s and above the 2 /divs--> | |||
* Ground versions have a rising initial hit. | * Ground versions have a rising initial hit. | ||
* If the buttslam is blocked, the ground splash won't come out. | * If the buttslam is blocked, the ground splash won't come out. | ||
* Smash on the buttslam. D Smash causes sliding knockdown, non-Smash ground bounces. | * Smash on the buttslam. D Smash causes sliding knockdown, non-Smash ground bounces. | ||
---- | ---- | ||
* {{clr| | * {{clr|L|236L}} goes a short distance forward. | ||
Air version can be combo'd into in the corner using {{clr| | Air version can be combo'd into in the corner using {{clr|S|j.[S]}} > {{clr|L|j.236L}}, allowing for easy conversion into SKD. Can also create frame advantage on block if you TK it. | ||
---- | ---- | ||
* {{clr| | * {{clr|M|236M}} goes about half screen forward. | ||
Decent range for an overhead. Due to how far it travels, it can leap over the opponent and hit them with the backside ground splash as a crossup. | Decent range for an overhead. Due to how far it travels, it can leap over the opponent and hit them with the backside ground splash as a crossup. | ||
Don't use this to end corner combos, it will whiff. | Don't use this to end corner combos, it will whiff. | ||
While IAD {{clr| | While IAD {{clr|M|j.M}} > {{clr|L|j.L}} > {{clr|L|j.236L}} is a triple overhead, IAD {{clr|M|j.M}} > {{clr|M|j.236M}} will be a crossup. | ||
---- | ---- | ||
* {{clr| | * {{clr|H|236H}} tracks the opponent and travels almost fullscreen. | ||
* If the Fat Throw hasn't landed in the combo, Smash hit will automatically do Fat Throw. | * If the Fat Throw hasn't landed in the combo, Smash hit will automatically do Fat Throw. | ||
A fairly fast 3/4 screen tracking overhead. This move is good to throw out from time to time when your opponent isn't expecting it. It can also go over beams, so if you have the read, throw it out in neutral to get some damage + pressure. Can be {{clr| | A fairly fast 3/4 screen tracking overhead. This move is good to throw out from time to time when your opponent isn't expecting it. It can also go over beams, so if you have the read, throw it out in neutral to get some damage + pressure. Can be {{clr|H|2H}}'d if the opponent starts to guess you. | ||
Air version can be combo'd into everywhere on screen with {{clr| | Air version can be combo'd into everywhere on screen with {{clr|S|j.[S]}} > {{clr|H|j.236H}}. Allowing for a half bar Fat Throw reset. | ||
</div> | </div> | ||
</div> | </div> | ||
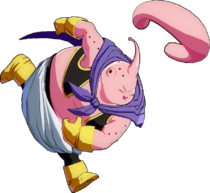
===<big>Cartwheel</big>=== | ===<big>Cartwheel</big>=== | ||
<span class="input-badge">'''{{clr| | <span class="input-badge">'''{{clr|L|214L}}/{{clr|M|M}}/{{clr|H|H}} (Air OK)'''</span> | ||
<div class="attack-container"> | <div class="attack-container"> | ||
<div class="attack-gallery"> | <div class="attack-gallery"> | ||
<gallery widths="210px" heights="210px" mode="nolines"> | <gallery widths="210px" heights="210px" mode="nolines"> | ||
DBFZ_MajinBuu_Cartwheel.png |The OTHER {{clr| | DBFZ_MajinBuu_Cartwheel.png |The OTHER {{clr|H|j.2H}} | ||
</gallery> | </gallery> | ||
</div> | </div> | ||
| Line 419: | Line 437: | ||
|} | |} | ||
==== ==== | ==== ==== | ||
<!--Insert text below the =s and above the 2 /divs--> | |||
* Flips backward and leaves Buu airborne. Only has hitbox in front of Buu. | * Flips backward and leaves Buu airborne. Only has hitbox in front of Buu. | ||
* Smash hit wall bounces. With varying amount of bounce depending on versions. | * Smash hit wall bounces. With varying amount of bounce depending on versions. | ||
---- | ---- | ||
* {{clr| | * {{clr|L|j.214L}} is a short flip with small wallbounce. | ||
Very useful in corner combos due to its high hitstun letting you easily link into {{clr| | Very useful in corner combos due to its high hitstun letting you easily link into {{clr|L|j.L}} and autocombo float back up, even after Smash has been used.<br> | ||
Good blockstring ender, frame data is deceptive as Buu spaces himself out too far to be punished. | Good blockstring ender, frame data is deceptive as Buu spaces himself out too far to be punished. | ||
---- | ---- | ||
* {{clr| | * {{clr|M|j.214M}} is a longer flip. Smash hit puts the opponent high up into a big wallbounce. | ||
* Smash hit in the corner sideswaps the opponent. | * Smash hit in the corner sideswaps the opponent. | ||
{{clr| | {{clr|M|j.214M}} is an alternative to {{clr|H|j.2H}} in midscreen combos, as you can SD after the wallbounce and get SKD from {{clr|H|j.H}} this way.<br> | ||
In a blockstring, {{clr| | In a blockstring, {{clr|M|214M}} will always leave a gap when canceled from other normals, useful for frame traps as the opponent cannot mash out of it.<br> | ||
Can also be used similar to Cell's Perfect Attack midscreen, as it gives a crazy wallbounce that Fat Buu can confirm off of and is an unscaled starter. Enjoy the TOD! | Can also be used similar to Cell's Perfect Attack midscreen, as it gives a crazy wallbounce that Fat Buu can confirm off of and is an unscaled starter. Enjoy the TOD! | ||
---- | ---- | ||
* {{clr| | * {{clr|H|j.214H}} is a long flip then bounces forward. | ||
* Ground Smash hit is a big wallbounce, air Smash hit is similar to {{clr| | * Ground Smash hit is a big wallbounce, air Smash hit is similar to {{clr|L|j.214L}} but with higher hitstun. | ||
* Ground version is useful for blockstring mixups or as a stronger anti-air than {{clr| | * Ground version is useful for blockstring mixups or as a stronger anti-air than {{clr|H|2H}}. | ||
In midscreen, IAD {{clr| | In midscreen, IAD {{clr|H|j.214H}} is a very fast crossup that allows for easy conversion with land {{clr|M|2M}}.<br> | ||
Speaking of Perfect Attack, this move starts up in 8f (6f in the air!) and is frame 1 air invuln. Also safe on block thanks to spacing, and can be cancelled into options after Fat Buu bounces back. Very much a "JUST DO IT" move. | Speaking of Perfect Attack, this move starts up in 8f (6f in the air!) and is frame 1 air invuln. Also safe on block thanks to spacing, and can be cancelled into options after Fat Buu bounces back. Very much a "JUST DO IT" move. | ||
</div> | </div> | ||
| Line 441: | Line 460: | ||
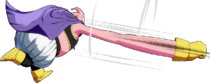
===<big>Sweeping Breath</big>=== | ===<big>Sweeping Breath</big>=== | ||
<span class="input-badge">'''{{clr| | <span class="input-badge">'''{{clr|S|236S}} (Air OK)'''</span> | ||
<div class="attack-container"> | <div class="attack-container"> | ||
<div class="attack-gallery"> | <div class="attack-gallery"> | ||
| Line 460: | Line 479: | ||
|} | |} | ||
==== ==== | ==== ==== | ||
<!--Insert text below the =s and above the 2 /divs--> | |||
* Covers about half the screen. | * Covers about half the screen. | ||
* Useful as an anti-superdash tool. | * Useful as an anti-superdash tool. | ||
| Line 467: | Line 487: | ||
===<big>Fat Throw</big>=== | ===<big>Fat Throw</big>=== | ||
<span class="input-badge">'''{{clr| | <span class="input-badge">'''{{clr|S|214S}}'''</span> | ||
<div class="attack-container"> | <div class="attack-container"> | ||
<div class="attack-gallery"> | <div class="attack-gallery"> | ||
| Line 485: | Line 505: | ||
|} | |} | ||
==== ==== | ==== ==== | ||
<!--Insert text below the =s and above the 2 /divs--> | |||
* Tracks the opponent but has maximum height it can go. Disappears mid throw if Buu gets hit. | * Tracks the opponent but has maximum height it can go. Disappears mid throw if Buu gets hit. | ||
* On hit, holds the opponent in a fat shell for a set amount of time while letting them fall to the ground. This shell can also be broken by hitting them out of it, and won't auto-break if Buu gets hit or tags out. | * On hit, holds the opponent in a fat shell for a set amount of time while letting them fall to the ground. This shell can also be broken by hitting them out of it, and won't auto-break if Buu gets hit or tags out. | ||
| Line 492: | Line 513: | ||
On a raw hit, Buu gets a braindead full combo confirm, plain and simple. You can also use it as a combo ender with j.DR to get SKD. But that's not why you're interested in this move. What truly makes this move special is its applications in reset mixups and okizeme. | On a raw hit, Buu gets a braindead full combo confirm, plain and simple. You can also use it as a combo ender with j.DR to get SKD. But that's not why you're interested in this move. What truly makes this move special is its applications in reset mixups and okizeme. | ||
You can combo into this after {{clr| | You can combo into this after {{clr|L|L}}/{{clr|M|M}} Dive Bomb + high hitstun assist, or from simply doing H Dive Bomb. Afterward, you wanna break the shell with something that leaves them standing while at the same time going for a high/low/left/right/tickthrow mixup, you name it. Buu has a lot of time for whatever setups he wants, and he doesn't have to deal with all the ground tech nonsense akin to a hard knockdown. Usually this is achieved by calling an assist like Yamcha A while Buu's doing his own thing. | ||
After a knockdown in the corner, immediately use {{clr| | After a knockdown in the corner, immediately use {{clr|S|214S}} to catch any and all wakeups besides downtech. There's nothing that can really be done to avoid it, Fat Buu is +15 if blocked, +16 if reflected, and recovers in time to block Sparking and other reversals. It'll also hit meaty, so forget about mashing or anything that isn't frame 1. Part of what helps Majin Buu cheat DBFZ's system and play his own game. If the opponent downtechs, you can easily react. | ||
</div> | </div> | ||
</div> | </div> | ||
| Line 518: | Line 539: | ||
|} | |} | ||
==== ==== | ==== ==== | ||
<!--Insert text below the =s and above the 2 /divs--> | |||
* Decent pop up assist. | * Decent pop up assist. | ||
Bog-standard assist. Nothing to write home about. | Bog-standard assist. Nothing to write home about. | ||
| Line 542: | Line 564: | ||
|} | |} | ||
==== ==== | ==== ==== | ||
<!--Insert text below the =s and above the 2 /divs--> | |||
* Shares the fat with the hungry, giving them resets. | * Shares the fat with the hungry, giving them resets. | ||
* Different than the point version that it doesn't restand the opponent. | * Different than the point version that it doesn't restand the opponent. | ||
| Line 568: | Line 591: | ||
|} | |} | ||
==== ==== | ==== ==== | ||
<!--Insert text below the =s and above the 2 /divs--> | |||
* Wins neutral. Drags the opponent all the way down. | * Wins neutral. Drags the opponent all the way down. | ||
* Tracks opponent fullscreen, even into the air. | * Tracks opponent fullscreen, even into the air. | ||
| Line 577: | Line 601: | ||
==Super Moves== | ==Super Moves== | ||
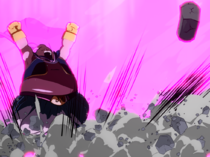
===<big>Now Buu really...hate you!</big>=== | ===<big>Now Buu really...hate you!</big>=== | ||
<span class="input-badge">'''{{clr| | <span class="input-badge">'''{{clr|L|236L}}+{{clr|M|M}} or {{clr|H|236H}}+{{clr|S|S}}'''</span> | ||
<div class="attack-container"> | <div class="attack-container"> | ||
<div class="attack-gallery"> | <div class="attack-gallery"> | ||
| Line 596: | Line 620: | ||
|} | |} | ||
==== ==== | ==== ==== | ||
<!--Insert text below the =s and above the 2 /divs--> | |||
* Hits the entire screen. | * Hits the entire screen. | ||
* Minimum damage: 42*19. | * Minimum damage: 42*19. | ||
| Line 601: | Line 626: | ||
</div> | </div> | ||
</div> | </div> | ||
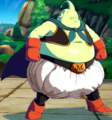
===<big>Turn into candy!</big>=== | ===<big>Turn into candy!</big>=== | ||
<span class="input-badge">'''{{clr| | <span class="input-badge">'''{{clr|L|214L}}+{{clr|M|M}} or {{clr|H|214H}}+{{clr|S|S}}'''</span> | ||
<div class="attack-container"> | <div class="attack-container"> | ||
<div class="attack-gallery"> | <div class="attack-gallery"> | ||
| Line 621: | Line 647: | ||
|} | |} | ||
==== ==== | ==== ==== | ||
<!--Insert text below the =s and above the 2 /divs--> | |||
* Heals to 1500 blue health on hit. | * Heals to 1500 blue health on hit. | ||
* Minimum damage: 1605. | * Minimum damage: 1605. | ||
Revision as of 00:13, 14 May 2022
You can help by editing it.
Normal Moves
5L


"Nice shins you got there."

"Gimme your candy!"


- 5L
- Whiffs on smalls/crouchers at the very tip.
- Catches anything after a blocked superdash.
It's Bardock's jab but you can 4LL with it. It's that big.
- 5LL
- Hits low.
- M starter.
A standing low that can be cancelled into 2M or 5M, making this a useful part of Buu's mixups.
- 5LLL
- Cancelling into 5LLL from a blocked 5LL always leaves the opponent in too much blockstun for the throw to work.
- Very poor starter.
- Always results in a Smash, should it connect.
Might as well have its own input with how often Buu can use it from restands.
5M

6M junior

- On hit, ground bounces airborne opponent.
One of the only standing overheads in the game. Slow and heavily scaled starter, but the animation looks very similar to Majin Buu's idle animation and it gives a full confirm on hit.
5H

Majin on Ice

- Hits from roundstart position.
Integral to Buu's corner loops and gives him good corner carry midscreen thanks to rejumps.
5S

- Can be repeated up to four times.
Faster than average 5S, can be used to create near-unbeatable roundstarts.
2L

It's a fast low. Lets Majin Buu get high/low mixups with assists. Highly useful in both blockstrings and restand setups.
2M

- Vacuums on block and hit.
- Has enough hitstun to combo into 5M and 6M.
Absolutely obscene hitstun. Can be used for crossups in the corner such as 2M-236M, or regular old airdashes if you're willing to risk getting mashed out on an unsafe normal.
2H

- Standard anti-air button.
Not much to say here. Majin Buu also has a frame 1 anti-air with 214H should things get hairy.
2S

- An angled upward Ki Blast.
- Very high hitstun similar to SS Goku 2S.
Useful more in combos than neutral due to it's incredibly high hitstun. Something like 2M > 5M > 2S can link to 5L into the standard jump cancel combo.
6M
- DBFZ MajinBuu 6M.png
He'll get that damn bug
- Universal overhead but...
- Can combo of 2M
j.L

- Good air-to-air jab.
j.M

CLAPPER

- Good jump-in button due to how big it is.
j.H
AND HERE COMES THE GIANT FIST

A half screen overhead. This move and j.2H are the staples in Buu's moveset with gigantic hitboxes, allowing him to control the air very effectively.
j.S

*various ape noises*

- Can be repeated up to four times. Each have different angles.
Good zoning tool thanks to the wide range the Ki Blasts can cover.
j.2H

Doriyah!

- Way more active than it looks, can easily beat superdash.
Screen control punch that gives you an easy confirm with SD. Just spam this and j.H really.
Special Moves
Dive Bomb
236L/M/H (Air OK)

This gets better the longer you think about it

- Ground versions have a rising initial hit.
- If the buttslam is blocked, the ground splash won't come out.
- Smash on the buttslam. D Smash causes sliding knockdown, non-Smash ground bounces.
- 236L goes a short distance forward.
Air version can be combo'd into in the corner using j.[S] > j.236L, allowing for easy conversion into SKD. Can also create frame advantage on block if you TK it.
- 236M goes about half screen forward.
Decent range for an overhead. Due to how far it travels, it can leap over the opponent and hit them with the backside ground splash as a crossup.
Don't use this to end corner combos, it will whiff.
While IAD j.M > j.L > j.236L is a triple overhead, IAD j.M > j.236M will be a crossup.
- 236H tracks the opponent and travels almost fullscreen.
- If the Fat Throw hasn't landed in the combo, Smash hit will automatically do Fat Throw.
A fairly fast 3/4 screen tracking overhead. This move is good to throw out from time to time when your opponent isn't expecting it. It can also go over beams, so if you have the read, throw it out in neutral to get some damage + pressure. Can be 2H'd if the opponent starts to guess you.
Air version can be combo'd into everywhere on screen with j.[S] > j.236H. Allowing for a half bar Fat Throw reset.
Cartwheel
214L/M/H (Air OK)

The OTHER j.2H

- Flips backward and leaves Buu airborne. Only has hitbox in front of Buu.
- Smash hit wall bounces. With varying amount of bounce depending on versions.
- j.214L is a short flip with small wallbounce.
Very useful in corner combos due to its high hitstun letting you easily link into j.L and autocombo float back up, even after Smash has been used.
Good blockstring ender, frame data is deceptive as Buu spaces himself out too far to be punished.
- j.214M is a longer flip. Smash hit puts the opponent high up into a big wallbounce.
- Smash hit in the corner sideswaps the opponent.
j.214M is an alternative to j.2H in midscreen combos, as you can SD after the wallbounce and get SKD from j.H this way.
In a blockstring, 214M will always leave a gap when canceled from other normals, useful for frame traps as the opponent cannot mash out of it.
Can also be used similar to Cell's Perfect Attack midscreen, as it gives a crazy wallbounce that Fat Buu can confirm off of and is an unscaled starter. Enjoy the TOD!
- j.214H is a long flip then bounces forward.
- Ground Smash hit is a big wallbounce, air Smash hit is similar to j.214L but with higher hitstun.
- Ground version is useful for blockstring mixups or as a stronger anti-air than 2H.
In midscreen, IAD j.214H is a very fast crossup that allows for easy conversion with land 2M.
Speaking of Perfect Attack, this move starts up in 8f (6f in the air!) and is frame 1 air invuln. Also safe on block thanks to spacing, and can be cancelled into options after Fat Buu bounces back. Very much a "JUST DO IT" move.
Sweeping Breath
236S (Air OK)

I'M UGLY AND I'M PROUD.

- Covers about half the screen.
- Useful as an anti-superdash tool.
- Jails into Vanish.
Fat Throw
214S
I hope you like guessing

- Tracks the opponent but has maximum height it can go. Disappears mid throw if Buu gets hit.
- On hit, holds the opponent in a fat shell for a set amount of time while letting them fall to the ground. This shell can also be broken by hitting them out of it, and won't auto-break if Buu gets hit or tags out.
- If the shell naturally breaks, the opponent is airborne and can air-tech nigh instantly. If the shell is hit, they stay grounded.
- The capture only works once per combo.
- As long as the opponent is still being caught, Buu can't do another Fat Throw.
On a raw hit, Buu gets a braindead full combo confirm, plain and simple. You can also use it as a combo ender with j.DR to get SKD. But that's not why you're interested in this move. What truly makes this move special is its applications in reset mixups and okizeme.
You can combo into this after L/M Dive Bomb + high hitstun assist, or from simply doing H Dive Bomb. Afterward, you wanna break the shell with something that leaves them standing while at the same time going for a high/low/left/right/tickthrow mixup, you name it. Buu has a lot of time for whatever setups he wants, and he doesn't have to deal with all the ground tech nonsense akin to a hard knockdown. Usually this is achieved by calling an assist like Yamcha A while Buu's doing his own thing.
After a knockdown in the corner, immediately use 214S to catch any and all wakeups besides downtech. There's nothing that can really be done to avoid it, Fat Buu is +15 if blocked, +16 if reflected, and recovers in time to block Sparking and other reversals. It'll also hit meaty, so forget about mashing or anything that isn't frame 1. Part of what helps Majin Buu cheat DBFZ's system and play his own game. If the opponent downtechs, you can easily react.
Z Assists
Assist A
Sweeping Breath
- Decent pop up assist.
Bog-standard assist. Nothing to write home about.
Assist B
Fat Throw
Communism
- Shares the fat with the hungry, giving them resets.
- Different than the point version that it doesn't restand the opponent.
Can still be used for mixups if you happened to never take the opponent off of the ground, which unfortunately isn't something most characters can reliably do without having too little scaling to truly create a mixup. Kid Buu can at least set up Arm Ball mixups.
Outside of mixups, it's mostly just a combo tool. Can still be used in neutral and will still give an insanely easy confirm if it hits the opponent, but its very slow startup can make it inconsistent.
Assist C
Cartwheel
GET THAT FAT ASS DOWN HERE
- Wins neutral. Drags the opponent all the way down.
- Tracks opponent fullscreen, even into the air.
- Has air invuln.
Very silly assist. Bad blockstun for a C assist, especially given the startup, but it's extremely hard to avoid and is a near guaranteed neutral win.
Super Moves
Now Buu really...hate you!
236L+M or 236H+S

Heated gaming moment
Boogie2988 gone nuclear


- Hits the entire screen.
- Minimum damage: 42*19.
Incredibly easy to DHC into, and just as easy to DHC out of. Does fairly standard damage for a level 1. Overall, this is a pretty good super.
Turn into candy!
214L+M or 214H+S


Me gonna eat you up!


- Heals to 1500 blue health on hit.
- Minimum damage: 1605.
Can be an unreliable reversal due to the small hitbox and slow travel time. The "beam" also only has hitbox at the tip.
Colors

Color 1

Color 2

Color 3

Color 4
Color 5

Color 6

Color 7

Color 8

Color 9
Color 10

Color 11

Color 12


Color 131

Color 141
Color 151

Color 161


