m (→Death Drop: Removed the coloring off the S in "FRIEZA'S" part of caption, probably got changed when inputs were being colored in mass is my guess) |
No edit summary |
||
| Line 45: | Line 45: | ||
|} | |} | ||
==== ==== | ==== ==== | ||
<!--Insert text below the =s and above the | <!--Insert text below the =s and above the {{CloseCard}}--> | ||
* {{clr|L|5L}} is Cooler's fastest normal, good for pressure and confirms. | * {{clr|L|5L}} is Cooler's fastest normal, good for pressure and confirms. | ||
* 6f jab. | * 6f jab. | ||
| Line 57: | Line 57: | ||
* Cooler is in the air on hit and grounded on block. | * Cooler is in the air on hit and grounded on block. | ||
* Safe on block. | * Safe on block. | ||
{{CloseCard}} | |||
===<big>{{clr|M|5M}}</big>=== | ===<big>{{clr|M|5M}}</big>=== | ||
| Line 78: | Line 77: | ||
|} | |} | ||
==== ==== | ==== ==== | ||
<!--Insert text below the =s and above the | <!--Insert text below the =s and above the {{CloseCard}}--> | ||
* Like most of his mediums, {{clr|M|5M}} is really long range. | * Like most of his mediums, {{clr|M|5M}} is really long range. | ||
* Moves Cooler forwards slightly, giving it even more range. | * Moves Cooler forwards slightly, giving it even more range. | ||
Because of pushback, {{clr|M|5M}} > {{clr|M|2M}} or {{clr|M|2M}} > {{clr|M|5M}} can result in the opponent not having enough range to challenge Cooler, while Cooler still has enough range to hit them. | Because of pushback, {{clr|M|5M}} > {{clr|M|2M}} or {{clr|M|2M}} > {{clr|M|5M}} can result in the opponent not having enough range to challenge Cooler, while Cooler still has enough range to hit them. | ||
{{CloseCard}} | |||
===<big>{{clr|H|5H}}</big>=== | ===<big>{{clr|H|5H}}</big>=== | ||
| Line 103: | Line 101: | ||
|} | |} | ||
==== ==== | ==== ==== | ||
<!--Insert text below the =s and above the | <!--Insert text below the =s and above the {{CloseCard}}--> | ||
* Carries the opponent to the current wall on Smash hit, making it a powerful corner carry tool. | * Carries the opponent to the current wall on Smash hit, making it a powerful corner carry tool. | ||
* Usable after a low {{clr|H|j.2H}} in the corner for optimal combo setups. | * Usable after a low {{clr|H|j.2H}} in the corner for optimal combo setups. | ||
Best used midscreen when you land a max range {{clr|M|2M}}. | Best used midscreen when you land a max range {{clr|M|2M}}. | ||
{{CloseCard}} | |||
===<big>{{clr|S|5S}}</big>=== | ===<big>{{clr|S|5S}}</big>=== | ||
| Line 128: | Line 125: | ||
|} | |} | ||
==== ==== | ==== ==== | ||
<!--Insert text below the =s and above the | <!--Insert text below the =s and above the {{CloseCard}}--> | ||
* Single-hit projectile that travels about half-screen. | * Single-hit projectile that travels about half-screen. | ||
* Integral to Cooler's pressure, but not really useful in neutral. | * Integral to Cooler's pressure, but not really useful in neutral. | ||
| Line 134: | Line 131: | ||
* Very high hitstun, allowing for Sparking loops and even Super Dash in the corner. | * Very high hitstun, allowing for Sparking loops and even Super Dash in the corner. | ||
Cooler's {{clr|S|5S}} seems like combo filler at first, but it's actually quite a good stagger tool. The opponent will be pushed decently back from Cooler, enabling several possible options to continue pressure and punish the opponent for getting impatient. | Cooler's {{clr|S|5S}} seems like combo filler at first, but it's actually quite a good stagger tool. The opponent will be pushed decently back from Cooler, enabling several possible options to continue pressure and punish the opponent for getting impatient. | ||
{{CloseCard}} | |||
===<big>{{clr|L|2L}}</big>=== | ===<big>{{clr|L|2L}}</big>=== | ||
| Line 155: | Line 151: | ||
|} | |} | ||
==== ==== | ==== ==== | ||
<!--Insert text below the =s and above the | <!--Insert text below the =s and above the {{CloseCard}}--> | ||
* Exchanges the low property for huge range. | * Exchanges the low property for huge range. | ||
* Good for staggers due to its fast startup and long range. | * Good for staggers due to its fast startup and long range. | ||
* Outranges {{clr|L|5L}} by a good margin. | * Outranges {{clr|L|5L}} by a good margin. | ||
Because {{clr|L|5L}} has bad range, you'll use this to mash out of pressure and for some blockstrings. | Because {{clr|L|5L}} has bad range, you'll use this to mash out of pressure and for some blockstrings. | ||
{{CloseCard}} | |||
===<big>{{clr|M|2M}}</big>=== | ===<big>{{clr|M|2M}}</big>=== | ||
| Line 181: | Line 176: | ||
|} | |} | ||
==== ==== | ==== ==== | ||
<!--Insert text below the =s and above the | <!--Insert text below the =s and above the {{CloseCard}}--> | ||
* Cooler's most ignorant normal. | * Cooler's most ignorant normal. | ||
* Can link into {{clr|H|5H}} or {{clr|H|6H}} at the start of the round for a decent corner carry setup. | * Can link into {{clr|H|5H}} or {{clr|H|6H}} at the start of the round for a decent corner carry setup. | ||
| Line 187: | Line 182: | ||
* Can connect {{clr|S|5S}} and {{clr|S|214S}} at max range after hit. | * Can connect {{clr|S|5S}} and {{clr|S|214S}} at max range after hit. | ||
Really dumb. {{clr|M|5M}} is able to link into the move at max range now, but can also still be cancelled into {{clr|S|5S}} or {{clr|H|5H}} instead. | Really dumb. {{clr|M|5M}} is able to link into the move at max range now, but can also still be cancelled into {{clr|S|5S}} or {{clr|H|5H}} instead. | ||
{{CloseCard}} | |||
===<big>{{clr|H|2H}}</big>=== | ===<big>{{clr|H|2H}}</big>=== | ||
| Line 208: | Line 202: | ||
|} | |} | ||
==== ==== | ==== ==== | ||
<!--Insert text below the =s and above the | <!--Insert text below the =s and above the {{CloseCard}}--> | ||
* Universal anti-air. | * Universal anti-air. | ||
* Decent upwards range. | * Decent upwards range. | ||
* Cooler doesn't have any safe cancel options on block. They can either be disrespected or punished if blocked. | * Cooler doesn't have any safe cancel options on block. They can either be disrespected or punished if blocked. | ||
{{CloseCard}} | |||
===<big>{{clr|M|6M}}</big>=== | ===<big>{{clr|M|6M}}</big>=== | ||
| Line 233: | Line 226: | ||
|} | |} | ||
==== ==== | ==== ==== | ||
<!--Insert text below the =s and above the | <!--Insert text below the =s and above the {{CloseCard}}--> | ||
* Universal overhead. | * Universal overhead. | ||
* Short range for a character with generally large range. | * Short range for a character with generally large range. | ||
{{CloseCard}} | |||
===<big>{{clr|H|6H}}</big>=== | ===<big>{{clr|H|6H}}</big>=== | ||
| Line 258: | Line 250: | ||
|} | |} | ||
==== ==== | ==== ==== | ||
<!--Insert text below the =s and above the | <!--Insert text below the =s and above the {{CloseCard}}--> | ||
* Scales like a light (thanks a lot, Cell). | * Scales like a light (thanks a lot, Cell). | ||
* You can perform {{clr|H|5H}} after {{clr|H|6H}} but not vice-versa, so be careful how you structure your pressure. | * You can perform {{clr|H|5H}} after {{clr|H|6H}} but not vice-versa, so be careful how you structure your pressure. | ||
* Confirms from {{clr|M|2M}} on hit but not {{clr|M|5M}}. | * Confirms from {{clr|M|2M}} on hit but not {{clr|M|5M}}. | ||
* Ground bounces on air hit. | * Ground bounces on air hit. | ||
{{CloseCard}} | |||
===<big>{{clr|H|3H}}</big>=== | ===<big>{{clr|H|3H}}</big>=== | ||
| Line 285: | Line 276: | ||
|} | |} | ||
==== ==== | ==== ==== | ||
<!--Insert text below the =s and above the | <!--Insert text below the =s and above the {{CloseCard}}--> | ||
* Tracks the opponent relative position, goes through non-Super projectiles. Projectile guard point starts at either 6f or 7f. | * Tracks the opponent relative position, goes through non-Super projectiles. Projectile guard point starts at either 6f or 7f. | ||
* Also has anti-air properties. | * Also has anti-air properties. | ||
| Line 291: | Line 282: | ||
* If the opponent blocks this high enough, {{clr|S|5S}} will make Cooler +1. | * If the opponent blocks this high enough, {{clr|S|5S}} will make Cooler +1. | ||
This move goes through a lot of stuff. Abuse it. | This move goes through a lot of stuff. Abuse it. | ||
{{CloseCard}} | |||
===<big>{{clr|L|j.L}}</big>=== | ===<big>{{clr|L|j.L}}</big>=== | ||
| Line 312: | Line 302: | ||
|} | |} | ||
==== ==== | ==== ==== | ||
<!--Insert text below the =s and above the | <!--Insert text below the =s and above the {{CloseCard}}--> | ||
* Has a tendency to whiff in air combos if used more than once before a double jump. | * Has a tendency to whiff in air combos if used more than once before a double jump. | ||
* Though it whiffs in certain air combos it's quite decent at stopping super dashes | * Though it whiffs in certain air combos it's quite decent at stopping super dashes | ||
{{CloseCard}} | |||
===<big>{{clr|M|j.M}}</big>=== | ===<big>{{clr|M|j.M}}</big>=== | ||
| Line 336: | Line 325: | ||
|} | |} | ||
==== ==== | ==== ==== | ||
<!--Insert text below the =s and above the | <!--Insert text below the =s and above the {{CloseCard}}--> | ||
* Long range, great air-to-air normal. | * Long range, great air-to-air normal. | ||
Effectively {{clr|M|2M}} in the air, incredibly ignorant and a good anti-Super Dash. You can nearly always confirm into {{clr|H|j.2H}}. | Effectively {{clr|M|2M}} in the air, incredibly ignorant and a good anti-Super Dash. You can nearly always confirm into {{clr|H|j.2H}}. | ||
{{CloseCard}} | |||
===<big>{{clr|H|j.H}}</big>=== | ===<big>{{clr|H|j.H}}</big>=== | ||
| Line 360: | Line 348: | ||
|} | |} | ||
==== ==== | ==== ==== | ||
<!--Insert text below the =s and above the | <!--Insert text below the =s and above the {{CloseCard}}--> | ||
* Only really used as a jump-in, {{clr|L|214L}} is a much better combo ender. | * Only really used as a jump-in, {{clr|L|214L}} is a much better combo ender. | ||
* Gives the most frame advantage out of all Cooler's air normals. | * Gives the most frame advantage out of all Cooler's air normals. | ||
{{CloseCard}} | |||
===<big>{{clr|S|j.S}}</big>=== | ===<big>{{clr|S|j.S}}</big>=== | ||
| Line 384: | Line 371: | ||
|} | |} | ||
==== ==== | ==== ==== | ||
<!--Insert text below the =s and above the | <!--Insert text below the =s and above the {{CloseCard}}--> | ||
* Has more use than its grounded counterpart due to being the only way to confirm air strings into j.214X and {{clr|L|j.236L}}/{{clr|H|H}}. | * Has more use than its grounded counterpart due to being the only way to confirm air strings into j.214X and {{clr|L|j.236L}}/{{clr|H|H}}. | ||
* Does not have enough hitstun on its own to combo into {{clr|M|j.236M}}. | * Does not have enough hitstun on its own to combo into {{clr|M|j.236M}}. | ||
* Can be linked after {{clr|H|j.2H}} in the corner to squeeze a little extra damage out of combos. | * Can be linked after {{clr|H|j.2H}} in the corner to squeeze a little extra damage out of combos. | ||
Used a lot like SS Goku's {{clr|S|j.S}} in neutral, in that you'll primarily use it to snipe opponents trying to stop you. Cooler gets extra mileage off of it due to smarter opponents watching for his divekicks. | Used a lot like SS Goku's {{clr|S|j.S}} in neutral, in that you'll primarily use it to snipe opponents trying to stop you. Cooler gets extra mileage off of it due to smarter opponents watching for his divekicks. | ||
{{CloseCard}} | |||
===<big>{{clr|H|j.2H}}</big>=== | ===<big>{{clr|H|j.2H}}</big>=== | ||
| Line 410: | Line 396: | ||
|} | |} | ||
==== ==== | ==== ==== | ||
<!--Insert text below the =s and above the | <!--Insert text below the =s and above the {{CloseCard}}--> | ||
* Launches the opponent sideways (even though he's clearly kicking upwards), much like Cell's {{clr|H|j.2H}}. | * Launches the opponent sideways (even though he's clearly kicking upwards), much like Cell's {{clr|H|j.2H}}. | ||
* If used close to the ground in the corner, it also allows for grounded follow-ups (including Dragon Rush). | * If used close to the ground in the corner, it also allows for grounded follow-ups (including Dragon Rush). | ||
If you're close enough to the corner it can combo into {{clr|M|236M}} or {{clr|M|214M}}, which is useful for securing knockdowns when you hit the opponent with a raw Super Dash. | If you're close enough to the corner it can combo into {{clr|M|236M}} or {{clr|M|214M}}, which is useful for securing knockdowns when you hit the opponent with a raw Super Dash. | ||
{{CloseCard}} | |||
==Special Moves== | ==Special Moves== | ||
| Line 438: | Line 423: | ||
|} | |} | ||
==== ==== | ==== ==== | ||
<!--Insert text below the =s and above the | <!--Insert text below the =s and above the {{CloseCard}}--> | ||
* Damage: Raw / Non-Smash / Smash | * Damage: Raw / Non-Smash / Smash | ||
* L and M versions make Cooler bounce back on hit, while H versions keep him grounded. | * L and M versions make Cooler bounce back on hit, while H versions keep him grounded. | ||
| Line 456: | Line 441: | ||
* Also plus on block. | * Also plus on block. | ||
{{clr|H|236H}} is useful in both pressure and combos. If you still want {{clr|L|236L}}'s corner carry while not having to deal with a weaker knockdown, use this. | {{clr|H|236H}} is useful in both pressure and combos. If you still want {{clr|L|236L}}'s corner carry while not having to deal with a weaker knockdown, use this. | ||
{{CloseCard}} | |||
===<big>Death Breaker</big>=== | ===<big>Death Breaker</big>=== | ||
| Line 479: | Line 463: | ||
|} | |} | ||
==== ==== | ==== ==== | ||
<!--Insert text below the =s and above the | <!--Insert text below the =s and above the {{CloseCard}}--> | ||
* Has anti-air property. | * Has anti-air property. | ||
* Scales less than the other versions. | * Scales less than the other versions. | ||
| Line 491: | Line 475: | ||
* Powers up the H followup. | * Powers up the H followup. | ||
{{clr|H|214H}} is usually used along with the H followup to get as much damage as possible. | {{clr|H|214H}} is usually used along with the H followup to get as much damage as possible. | ||
{{CloseCard}} | |||
===<big>Death Breaker Follow-up</big>=== | ===<big>Death Breaker Follow-up</big>=== | ||
| Line 514: | Line 497: | ||
|} | |} | ||
==== ==== | ==== ==== | ||
<!--Insert text below the =s and above the | <!--Insert text below the =s and above the {{CloseCard}}--> | ||
* L switches sides. | * L switches sides. | ||
* Smash hit causes a short sliding knockdown. | * Smash hit causes a short sliding knockdown. | ||
| Line 525: | Line 508: | ||
* Smash hit causes a sliding knockdown. | * Smash hit causes a sliding knockdown. | ||
* Leaves Cooler next to the opponent like H Death Chaser. However unlike that move, non-Smash hit cannot be extended with Supers. | * Leaves Cooler next to the opponent like H Death Chaser. However unlike that move, non-Smash hit cannot be extended with Supers. | ||
{{CloseCard}} | |||
===<big>Death Flash</big>=== | ===<big>Death Flash</big>=== | ||
| Line 548: | Line 530: | ||
|} | |} | ||
==== ==== | ==== ==== | ||
<!--Insert text below the =s and above the | <!--Insert text below the =s and above the {{CloseCard}}--> | ||
* Multi-hitting beam with very slow startup, don't use this in blockstrings unless you wanna get stuffed. | * Multi-hitting beam with very slow startup, don't use this in blockstrings unless you wanna get stuffed. | ||
* Confirms into Death Crasher from full screen. | * Confirms into Death Crasher from full screen. | ||
| Line 554: | Line 536: | ||
Slower than average beam but better height, it'll more reliably beat people trying to shoot you from the air. | Slower than average beam but better height, it'll more reliably beat people trying to shoot you from the air. | ||
Probably only going to use this after M DP knockdown that isn't in the corner. | Probably only going to use this after M DP knockdown that isn't in the corner. | ||
{{CloseCard}} | |||
===<big>Death Shaker</big>=== | ===<big>Death Shaker</big>=== | ||
| Line 576: | Line 557: | ||
|} | |} | ||
==== ==== | ==== ==== | ||
<!--Insert text below the =s and above the | <!--Insert text below the =s and above the {{CloseCard}}--> | ||
* Fullscreen low, can confirm into his level 1 or Vanish. | * Fullscreen low, can confirm into his level 1 or Vanish. | ||
* Use with a good assist for some mix-up potential. | * Use with a good assist for some mix-up potential. | ||
Mainly used for frame traps in blockstrings. | Mainly used for frame traps in blockstrings. | ||
{{CloseCard}} | |||
==Z Assists== | ==Z Assists== | ||
| Line 603: | Line 583: | ||
|} | |} | ||
==== ==== | ==== ==== | ||
<!--Insert text below the =s and above the | <!--Insert text below the =s and above the {{CloseCard}}--> | ||
* Larger hitbox than other DP assists, which can make it a slightly more useful tool for getting out of pressure. | * Larger hitbox than other DP assists, which can make it a slightly more useful tool for getting out of pressure. | ||
* Invincible from frame 10 onwards. | * Invincible from frame 10 onwards. | ||
* Takes up a huge portion of the screen and is confirmable on hit with Super Dash or superjump. | * Takes up a huge portion of the screen and is confirmable on hit with Super Dash or superjump. | ||
{{CloseCard}} | |||
===<big>Assist B</big>=== | ===<big>Assist B</big>=== | ||
| Line 629: | Line 608: | ||
|} | |} | ||
==== ==== | ==== ==== | ||
<!--Insert text below the =s and above the | <!--Insert text below the =s and above the {{CloseCard}}--> | ||
* His {{clr|H|3H}}. | * His {{clr|H|3H}}. | ||
Goes through all non-super projectiles, assists and has anti-air property BUT is vulnerable at the very start. Great for dealing with zoning and has better blockstun than A assist, but not particularly useful otherwise. Can be used to combo from but timing can be tricky. | Goes through all non-super projectiles, assists and has anti-air property BUT is vulnerable at the very start. Great for dealing with zoning and has better blockstun than A assist, but not particularly useful otherwise. Can be used to combo from but timing can be tricky. | ||
{{CloseCard}} | |||
===<big>Assist C</big>=== | ===<big>Assist C</big>=== | ||
| Line 654: | Line 632: | ||
|} | |} | ||
==== ==== | ==== ==== | ||
<!--Insert text below the =s and above the | <!--Insert text below the =s and above the {{CloseCard}}--> | ||
* yyyyyYYYEEEEEAaaAAAH | * yyyyyYYYEEEEEAaaAAAH | ||
Cooler performs his {{clr|S|236S}}, and on hit he appears behind the opponent and follows up with a dunk. Easily the best of this kind of assist because of the beam voiceline. | Cooler performs his {{clr|S|236S}}, and on hit he appears behind the opponent and follows up with a dunk. Easily the best of this kind of assist because of the beam voiceline. | ||
{{CloseCard}} | |||
==Super Moves== | ==Super Moves== | ||
| Line 681: | Line 658: | ||
|} | |} | ||
==== ==== | ==== ==== | ||
<!--Insert text below the =s and above the | <!--Insert text below the =s and above the {{CloseCard}}--> | ||
* Switches sides, you'll lose corner pressure if used in the corner. | * Switches sides, you'll lose corner pressure if used in the corner. | ||
* Not invincible until after startup. | * Not invincible until after startup. | ||
| Line 688: | Line 665: | ||
* Minimum Damage: 908 (360 + 150*2 + 248) | * Minimum Damage: 908 (360 + 150*2 + 248) | ||
Not a bad level 1, as it can easily connect from most of Cooler's tools, most notably from a full screen {{clr|S|214S}}. The side switch is a bit of a hindrance. However, with the right team compositions, you can use this to get right back into the corner (most notably, Super Saiyan Goku's level 3 will give Goku hard knockdown in the corner, due to how his level 3 works). | Not a bad level 1, as it can easily connect from most of Cooler's tools, most notably from a full screen {{clr|S|214S}}. The side switch is a bit of a hindrance. However, with the right team compositions, you can use this to get right back into the corner (most notably, Super Saiyan Goku's level 3 will give Goku hard knockdown in the corner, due to how his level 3 works). | ||
{{CloseCard}} | |||
===<big>Death Drop</big>=== | ===<big>Death Drop</big>=== | ||
| Line 710: | Line 686: | ||
|} | |} | ||
==== ==== | ==== ==== | ||
<!--Insert text below the =s and above the | <!--Insert text below the =s and above the {{CloseCard}}--> | ||
* Easily confirms off of the M and H versions of Death Chaser and any version of Death Breaker. | * Easily confirms off of the M and H versions of Death Chaser and any version of Death Breaker. | ||
* The only one of Cooler's supers that doesn't switch sides, making it the best option for keeping the opponent cornered after a combo. | * The only one of Cooler's supers that doesn't switch sides, making it the best option for keeping the opponent cornered after a combo. | ||
| Line 716: | Line 692: | ||
* Vulnerable to anti-airs similar to Vegito's Omega Finishing Blow. | * Vulnerable to anti-airs similar to Vegito's Omega Finishing Blow. | ||
* Minimum Damage: 800 (320 + 480) | * Minimum Damage: 800 (320 + 480) | ||
{{CloseCard}} | |||
===<big>Atomic Supernova</big>=== | ===<big>Atomic Supernova</big>=== | ||
| Line 761: | Line 736: | ||
|} | |} | ||
==== ==== | ==== ==== | ||
<!--Insert text below the =s and above the | <!--Insert text below the =s and above the {{CloseCard}}--> | ||
* On the ground, Cooler uses up 3 Ki gauges and enters a stance. He will only attack if he is hit during this stance. | * On the ground, Cooler uses up 3 Ki gauges and enters a stance. He will only attack if he is hit during this stance. | ||
* Has guard point against everything but grabs. However its downfall comes from the fact that: | * Has guard point against everything but grabs. However its downfall comes from the fact that: | ||
| Line 775: | Line 750: | ||
* This is also Cooler's DHC. | * This is also Cooler's DHC. | ||
The same as his grounded level 3, only without the counter. Can be comboed into with {{clr|S|j.S}} -> {{clr|L|236L}}/{{clr|H|H}} or {{clr|S|j.S}} {{clr|L|214L}}/{{clr|M|M}}/{{clr|H|H}} + H. | The same as his grounded level 3, only without the counter. Can be comboed into with {{clr|S|j.S}} -> {{clr|L|236L}}/{{clr|H|H}} or {{clr|S|j.S}} {{clr|L|214L}}/{{clr|M|M}}/{{clr|H|H}} + H. | ||
{{CloseCard}} | |||
==Colors== | ==Colors== | ||
Revision as of 23:58, 19 June 2022
Please feel free to make edits, but include edit summaries and sources where applicable.
Normal Moves
5L


- 5L is Cooler's fastest normal, good for pressure and confirms.
- 6f jab.
- Combo and blockstring filler.
- Like most characters, this is Cooler's best starter.
- Connects after a Vanish with microdash 5L whiff.
5LL has huge range and moves Cooler forward a lot. Unsafe on block, but due to Cooler generally having great pressure you might be able to get away with staggering this.
- 5LLL switches sides on hit.
- Cooler is in the air on hit and grounded on block.
- Safe on block.
5M

- Like most of his mediums, 5M is really long range.
- Moves Cooler forwards slightly, giving it even more range.
Because of pushback, 5M > 2M or 2M > 5M can result in the opponent not having enough range to challenge Cooler, while Cooler still has enough range to hit them.
5H

Take a ride on the pain train

- Carries the opponent to the current wall on Smash hit, making it a powerful corner carry tool.
- Usable after a low j.2H in the corner for optimal combo setups.
Best used midscreen when you land a max range 2M.
5S

IT WAS THEM, OFFICER

- Single-hit projectile that travels about half-screen.
- Integral to Cooler's pressure, but not really useful in neutral.
- Typically used after 6H in both pressure and combos, allowing Cooler to cancel into 5H, 2H, 3H or any specials.
- Very high hitstun, allowing for Sparking loops and even Super Dash in the corner.
Cooler's 5S seems like combo filler at first, but it's actually quite a good stagger tool. The opponent will be pushed decently back from Cooler, enabling several possible options to continue pressure and punish the opponent for getting impatient.
2L

- Exchanges the low property for huge range.
- Good for staggers due to its fast startup and long range.
- Outranges 5L by a good margin.
Because 5L has bad range, you'll use this to mash out of pressure and for some blockstrings.
2M

*whipcrack*

- Cooler's most ignorant normal.
- Can link into 5H or 6H at the start of the round for a decent corner carry setup.
- Has a hefty hurtbox befitting of its range, so make sure it doesn't whiff.
- Can connect 5S and 214S at max range after hit.
Really dumb. 5M is able to link into the move at max range now, but can also still be cancelled into 5S or 5H instead.
2H

- Universal anti-air.
- Decent upwards range.
- Cooler doesn't have any safe cancel options on block. They can either be disrespected or punished if blocked.
6M
- DBFZ Cooler 6M.png
- Universal overhead.
- Short range for a character with generally large range.
6H
Crushing Stomp

- Scales like a light (thanks a lot, Cell).
- You can perform 5H after 6H but not vice-versa, so be careful how you structure your pressure.
- Confirms from 2M on hit but not 5M.
- Ground bounces on air hit.
3H
Genocidal Uppercut

Neutral is an abstract term for Cooler

- Tracks the opponent relative position, goes through non-Super projectiles. Projectile guard point starts at either 6f or 7f.
- Also has anti-air properties.
- Able to combo into Super Dash on hit. Can gatling into 5S on block to make it safe.
- If the opponent blocks this high enough, 5S will make Cooler +1.
This move goes through a lot of stuff. Abuse it.
j.L

That's a nice superdash you got, would be a shame if someone did something about it...

- Has a tendency to whiff in air combos if used more than once before a double jump.
- Though it whiffs in certain air combos it's quite decent at stopping super dashes
j.M

It keeps the skies clean

- Long range, great air-to-air normal.
Effectively 2M in the air, incredibly ignorant and a good anti-Super Dash. You can nearly always confirm into j.2H.
j.H

- Only really used as a jump-in, 214L is a much better combo ender.
- Gives the most frame advantage out of all Cooler's air normals.
j.S

ACTUALLY IT WAS THEM, OFFICER

- Has more use than its grounded counterpart due to being the only way to confirm air strings into j.214X and j.236L/H.
- Does not have enough hitstun on its own to combo into j.236M.
- Can be linked after j.2H in the corner to squeeze a little extra damage out of combos.
Used a lot like SS Goku's j.S in neutral, in that you'll primarily use it to snipe opponents trying to stop you. Cooler gets extra mileage off of it due to smarter opponents watching for his divekicks.
j.2H

This kick looks really uncomfortable...

- Launches the opponent sideways (even though he's clearly kicking upwards), much like Cell's j.2H.
- If used close to the ground in the corner, it also allows for grounded follow-ups (including Dragon Rush).
If you're close enough to the corner it can combo into 236M or 214M, which is useful for securing knockdowns when you hit the opponent with a raw Super Dash.
Special Moves
Death Chaser
236L/M/H (Air OK)

The footdive we deserve, but not the one we need right now

- Damage: Raw / Non-Smash / Smash
- L and M versions make Cooler bounce back on hit, while H versions keep him grounded.
- During the bounce back, Cooler can perform actions before he hits the ground. If you've saved air actions during the combo, this allows for an easy airdash safejump in the corner, or tech chase, mixups, etc.
- H versions' lack of bounce back has a slight advantage: Since his ground level 1 does more damage than his aerial one, this is one of the few ways he can combo into this ground Super.
236L causes soft knockdown that can still be extended with Supers. The opponent recovers quite fast after this which can be useful for instant overheads, or cheeky lows for when they're anticipating the overhead.
- Smash hit gives sliding knockdown, but its slow startup means it cannot easily be comboed into without the help of an assist or Smash j.2H.
- Non Smash only hits twice, soft knockdown like the L version.
- Plus on block.
236M is mostly used as a pressure reset, since 236L and 236H are better in every other way.
- Smash hit gives even better sliding knockdown than the M version, combined with the L version's speed, making it an ideal combo ender for both pressure and damage.
- Non Smash only hits twice, soft knockdown like L version.
- Also plus on block.
236H is useful in both pressure and combos. If you still want 236L's corner carry while not having to deal with a weaker knockdown, use this.
Death Breaker
214L/M/H (Air OK)

"I'll crush you!"

- Has anti-air property.
- Scales less than the other versions.
- Can still call assists on block or whiff.
Primarily used to hit Super Dash or to end corner combos at high scaling.
- Fully invincible from the 1st frame.
A DP with a great hitbox and lots of range. Some opponents might not be able to punish Cooler on whiff thanks to how far he goes.
- 214M invul with 214L's speed.
- Powers up the H followup.
214H is usually used along with the H followup to get as much damage as possible.
Death Breaker Follow-up
Death Breaker > L/M/H on hit

"So how does it FEEL?"

- L switches sides.
- Smash hit causes a short sliding knockdown.
- M is the ender of choice due to not switching sides.
- Smash hit causes a short sliding knockdown.
- If used after H Death Breaker, gains an extra hit.
- Switches sides.
- Smash hit causes a sliding knockdown.
- Leaves Cooler next to the opponent like H Death Chaser. However unlike that move, non-Smash hit cannot be extended with Supers.
Death Flash
236S (Air OK)
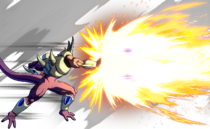
"yyYYYEAAAAHHHH!!!"

- Multi-hitting beam with very slow startup, don't use this in blockstrings unless you wanna get stuffed.
- Confirms into Death Crasher from full screen.
- Second best voice line in the game, only beaten by Nappa.
Slower than average beam but better height, it'll more reliably beat people trying to shoot you from the air. Probably only going to use this after M DP knockdown that isn't in the corner.
Death Shaker
214S

Fullscreen low considered ground breaking discovery

- Fullscreen low, can confirm into his level 1 or Vanish.
- Use with a good assist for some mix-up potential.
Mainly used for frame traps in blockstrings.
Z Assists
Assist A
Death Breaker
Faux Psyblade
- Larger hitbox than other DP assists, which can make it a slightly more useful tool for getting out of pressure.
- Invincible from frame 10 onwards.
- Takes up a huge portion of the screen and is confirmable on hit with Super Dash or superjump.
Assist B
Genocidal Uppercut
No projectiles allowed
- His 3H.
Goes through all non-super projectiles, assists and has anti-air property BUT is vulnerable at the very start. Great for dealing with zoning and has better blockstun than A assist, but not particularly useful otherwise. Can be used to combo from but timing can be tricky.
Assist C
Death Crasher
YYYEAAAAHHHHs your neutral
- yyyyyYYYEEEEEAaaAAAH
Cooler performs his 236S, and on hit he appears behind the opponent and follows up with a dunk. Easily the best of this kind of assist because of the beam voiceline.
Super Moves
Death Crasher
236L+M or 236H+S

"RRRRAAAAAAAAAHHH!"

"Imma plant me a dumbass tree!"


- Switches sides, you'll lose corner pressure if used in the corner.
- Not invincible until after startup.
- Cinematic super, so other projectiles will whiff when Cooler's is used.
- DHC-ing immediately won't trigger the side switch while not sacrificing too much damage.
- Minimum Damage: 908 (360 + 150*2 + 248)
Not a bad level 1, as it can easily connect from most of Cooler's tools, most notably from a full screen 214S. The side switch is a bit of a hindrance. However, with the right team compositions, you can use this to get right back into the corner (most notably, Super Saiyan Goku's level 3 will give Goku hard knockdown in the corner, due to how his level 3 works).
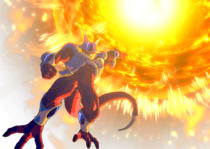
Death Drop
j.236L+M or j.236H+S

THIS ISN'T FRIEZA'S LEVEL 3 I SWEAR

- Easily confirms off of the M and H versions of Death Chaser and any version of Death Breaker.
- The only one of Cooler's supers that doesn't switch sides, making it the best option for keeping the opponent cornered after a combo.
- Input 2369L+M/H+S to use this super after a grounded combo if you want to avoid Death Crasher's side switch.
- Vulnerable to anti-airs similar to Vegito's Omega Finishing Blow.
- Minimum Damage: 800 (320 + 480)
Atomic Supernova
214L+M (Air OK) or 214H+S (Air OK)

"Thought you could just press buttons, didn't you?"
"Of course mine is bigger than my brother's."


| Version | Damage | GuardHow this attack can be guarded. | SmashWhich type of cinematic this attack can trigger. | StartupShows how many frame that the corresponding move needs to go through in order to reach its active frames. | ActiveShows how many frames where there is an attackbox, AKA the hitbox where if the opponent touches it, they will take damage. Occurs after Startup. | RecoveryShows how many frames that the character must go through after its active frames to automatically go back to a neutral stance. | Frame Adv.The difference between the attacker's recovery and the period that the opponent is in blockstun. This Frame Advantage value is based off the fact that the very first active frame touches the opponent. Throws list the amount of Frame Advantage upon successfully throwing the opponent. | Invul. |
|---|---|---|---|---|---|---|---|---|
| Ground Counter | Total 71 | 1-42 Strike, Projectiles Guard | ||||||
| Counterattack | 4020 | Throw | UDV | 13 | 1 | 29 | 1-19 All | |
| Ground | 4770 | Throw | UDV | 10+3 | 1-23 All | |||
| Air | 4770 | Throw | UDV | 10+3 | Until L | 1-23 All |
- On the ground, Cooler uses up 3 Ki gauges and enters a stance. He will only attack if he is hit during this stance.
- Has guard point against everything but grabs. However its downfall comes from the fact that:
- It will only stun the opponent on guarding physical attacks.
- The actual attack is a throw that will whiff on crouching, low profile attacks, or even characters falling down.
- All of these combined means a lot of projectile attacks will get away scot-free, e.g. shooting Ki blasts and spamming 2H, Vanish on reaction to the grab.
- However, it can do a few things other level 3s cannot, notably countering safejumps.
This super is better than how it seems. Cooler loses corner, but has more than enough frame advantage to go for a left-right mix-up, as well as a meaty 2M. Combined with the rest of Cooler's options and it can be surprisingly scary to block.
- Has frame 1 invulnerability like typical level 3 but is vulnerable to anti-airs.
- Minimum damage: 1779.
- Whiffs on crouchers, but will hit anyone in the air.
- This is also Cooler's DHC.
The same as his grounded level 3, only without the counter. Can be comboed into with j.S -> 236L/H or j.S 214L/M/H + H.
Colors
- DBFZ Cooler color1.png
Color 1
- DBFZ Cooler color2.png
Color 2
- DBFZ Cooler color3.png
Color 3
- DBFZ Cooler color4.png
Color 4
- DBFZ Cooler color5.png
Color 5
- DBFZ Cooler color6.png
Color 6
- DBFZ Cooler color7.png
Color 7
- DBFZ Cooler color8.png
Color 8
- DBFZ Cooler color9.png
Color 9
- DBFZ Cooler color10.png
Color 10
- DBFZ Cooler color11.png
Color 11
- DBFZ Cooler color12.png
Color 12
- DBFZ Cooler color13.png
Color 131
- DBFZ Cooler color14.png
Color 141
- DBFZ Cooler color15.png
Color 151
- DBFZ Cooler color16.png
Color 161