m (→Riot Javelin) |
(Some info and caption cleanup as requested by the admins) |
||
| Line 28: | Line 28: | ||
<gallery widths="210px" heights="210px" mode="nolines"> | <gallery widths="210px" heights="210px" mode="nolines"> | ||
DBFZ_Bardock_5L.png | | DBFZ_Bardock_5L.png | | ||
DBFZ_Bardock_5LL.png | | DBFZ_Bardock_5LL.png | | ||
DBFZ_Bardock_5LLL.png |Certified eSports | DBFZ_Bardock_5LLL.png |Certified eSports | ||
</gallery> | </gallery> | ||
| Line 86: | Line 86: | ||
<div class="attack-gallery"> | <div class="attack-gallery"> | ||
<gallery widths="210px" heights="210px" mode="nolines"> | <gallery widths="210px" heights="210px" mode="nolines"> | ||
DBFZ_Bardock_5H.png | | DBFZ_Bardock_5H.png | | ||
</gallery> | </gallery> | ||
</div> | </div> | ||
| Line 107: | Line 107: | ||
<div class="attack-gallery"> | <div class="attack-gallery"> | ||
<gallery widths="210px" heights="210px" mode="nolines"> | <gallery widths="210px" heights="210px" mode="nolines"> | ||
DBFZ_Bardock_5S.png |Waiting for Ex | DBFZ_Bardock_5S.png |Waiting for Ex Lariat confirm | ||
</gallery> | </gallery> | ||
</div> | </div> | ||
| Line 148: | Line 148: | ||
<div class="attack-gallery"> | <div class="attack-gallery"> | ||
<gallery widths="210px" heights="210px" mode="nolines"> | <gallery widths="210px" heights="210px" mode="nolines"> | ||
DBFZ_Bardock_2M.png | | DBFZ_Bardock_2M.png | | ||
</gallery> | </gallery> | ||
</div> | </div> | ||
| Line 170: | Line 170: | ||
<div class="attack-gallery"> | <div class="attack-gallery"> | ||
<gallery widths="210px" heights="210px" mode="nolines"> | <gallery widths="210px" heights="210px" mode="nolines"> | ||
DBFZ_Bardock_2H.png | | DBFZ_Bardock_2H.png | | ||
</gallery> | </gallery> | ||
</div> | </div> | ||
| Line 202: | Line 202: | ||
* Universal overhead. | * Universal overhead. | ||
* If blocked, 4LL 236M/H clash beats nearly anything that isn't invincible, making Bardock's 6M uncontestable for a lot of characters | |||
Bardock's privileged jab having medium hitstun and blockstun makes him more of a threat after 6M than usual in the corner. He's usually +3 after a trade and will beat the higher hitstun 7f normals clean. | Bardock's privileged jab having medium hitstun and blockstun makes him more of a threat after 6M than usual in the corner. He's usually +3 after a trade and will beat the higher hitstun 7f normals clean. | ||
</div> | </div> | ||
| Line 231: | Line 232: | ||
<div class="attack-gallery"> | <div class="attack-gallery"> | ||
<gallery widths="210px" heights="210px" mode="nolines"> | <gallery widths="210px" heights="210px" mode="nolines"> | ||
DBFZ_Bardock_jM.png | | DBFZ_Bardock_jM.png | | ||
</gallery> | </gallery> | ||
</div> | </div> | ||
| Line 254: | Line 255: | ||
<div class="attack-gallery"> | <div class="attack-gallery"> | ||
<gallery widths="210px" heights="210px" mode="nolines"> | <gallery widths="210px" heights="210px" mode="nolines"> | ||
DBFZ_Bardock_jH.png | | DBFZ_Bardock_jH.png | | ||
</gallery> | </gallery> | ||
</div> | </div> | ||
| Line 278: | Line 279: | ||
<div class="attack-gallery"> | <div class="attack-gallery"> | ||
<gallery widths="210px" heights="210px" mode="nolines"> | <gallery widths="210px" heights="210px" mode="nolines"> | ||
DBFZ_Bardock_jS.png | | DBFZ_Bardock_jS.png |If you can't lariat them, you're probably using this instead. | ||
</gallery> | </gallery> | ||
</div> | </div> | ||
| Line 350: | Line 351: | ||
* Attacks straight ahead. | * Attacks straight ahead. | ||
* Keeps the opponent in place on grounded hit. Sends opponent flying horizontally on air hit. | * Keeps the opponent in place on grounded hit. Sends opponent flying horizontally on air hit. | ||
Bardock's iconic Rebellion Spear, often called his "lariat" by the DBFZ community - a nickname which spread to other advancing moves in the game. Travels incredibly far and incredibly fast, allowing it to be used as an ability to dominate neutral. When combined with an assist, can be used to instantly start pressure and turn the blocked attack into his favor, if it hits, Bardock can get a full combo afterwards. | |||
Due to its extreme speed and threat, opponents will generally refuse to be in a horizontal line from Bardock, or will constantly be attempting to sniff it out and punish with a backwards IAD. | |||
---- | ---- | ||
;236M | ;236M | ||
* Damage depends on distance. | * Damage depends on distance. | ||
* Aerial version ground bounces on Smash hit, spiking the opponent back up. | * Aerial version ground bounces on Smash hit, spiking the opponent back up. | ||
* Grounded version has Bardock recover airborne, leaving him in SJ Install and allowing for some left-right mixups. | |||
Ground version is a very fast anti-air but with low reward in mid-screen. While relatively minor, its speed is one of the reasons why Bardock's stagger is so strong: after a blocked 6M and forcing a clash sequence (against characters with a 6f button), he can do 5L > 4L > 236M and there's next to no offensive answer against this string. | Ground version is a very fast anti-air but with low reward in mid-screen. While relatively minor, its speed is one of the reasons why Bardock's stagger is so strong: after a blocked 6M and forcing a clash sequence (against characters with a 6f button), he can do 5L > 4L > 236M and there's next to no offensive answer against this string. | ||
| Line 367: | Line 369: | ||
* Moves straight ahead, crosses up on hit or block. | * Moves straight ahead, crosses up on hit or block. | ||
* On hit, can followup with an additional attack by pressing L/M/H. This attack is identical to 236M/j.236M and doesn't cost Ki. | * On hit, can followup with an additional attack by pressing L/M/H. This attack is identical to 236M/j.236M and doesn't cost Ki. | ||
Mostly handy as a potential full-screen conversion off of 5S. | Six frame startup, goes even further, hits twice and will blow through a lot. If 236L wasn't enough to get in, this is a great use of meter. Mostly handy as a potential full-screen conversion off of 5S. | ||
Tk.236H + assist can setup for a high/low/crossup in the corner. | Tk.236H + assist can setup for a high/low/crossup in the corner. | ||
| Line 378: | Line 380: | ||
<div class="attack-gallery"> | <div class="attack-gallery"> | ||
<gallery widths="210px" heights="210px" mode="nolines"> | <gallery widths="210px" heights="210px" mode="nolines"> | ||
DBFZ_Bardock_RagingMeteor.png | | DBFZ_Bardock_RagingMeteor.png |Standard air knockdown tool | ||
</gallery> | </gallery> | ||
</div> | </div> | ||
| Line 406: | Line 408: | ||
* Smash effect occurs on the last hit. | * Smash effect occurs on the last hit. | ||
* Every version's last hit is an overhead. | * Every version's last hit is an overhead. | ||
Don't use any version as a mixup, the multihitting properties of the move make it extremely easy to react to. | |||
---- | ---- | ||
;214L | ;214L | ||
| Line 416: | Line 419: | ||
Some players also prefer ending combos with ground 214M over j.214L due to having better oki, though at the cost of damage and meter. Ground 214M also sets up an assist-regenerating safejump with '''214M > 5M (whiff) > IAD j.M.''' If it hits, you can convert with 236M. | Some players also prefer ending combos with ground 214M over j.214L due to having better oki, though at the cost of damage and meter. Ground 214M also sets up an assist-regenerating safejump with '''214M > 5M (whiff) > IAD j.M.''' If it hits, you can convert with 236M. | ||
This is also your ideal blockstring ender thanks to its corner carry, speed and safety but it can be a bit weak against some guard cancel options. | |||
---- | ---- | ||
;214H | ;214H | ||
| Line 430: | Line 435: | ||
<div class="attack-gallery"> | <div class="attack-gallery"> | ||
<gallery widths="210px" heights="210px" mode="nolines"> | <gallery widths="210px" heights="210px" mode="nolines"> | ||
DBFZ_Bardock_TyrantLancer1.png | | DBFZ_Bardock_TyrantLancer1.png | | ||
DBFZ_Bardock_TyrantLancer2.png | | DBFZ_Bardock_TyrantLancer2.png |You know this will hurt when it makes the screen shake on block | ||
</gallery> | </gallery> | ||
</div> | </div> | ||
| Line 448: | Line 453: | ||
* Wall bounces, can only followup without resources in the corner. | * Wall bounces, can only followup without resources in the corner. | ||
* Jails into Vanish. | * Jails into Vanish. | ||
Bardock's best combo starter in the corner and is commonly used as a reset tool in blockstrings as it's plus on block, however, cancelling from any normals will leave a big mashable gap. | Bardock's best combo starter in the corner and is commonly used as a reset tool in blockstrings as it's plus on block, however, cancelling from any normals will leave a big mashable gap. However, opponents attempting to beat this on reaction will get hit more often than not. Mixing this in with superdash + assist is a great way to horrify opponents into either mashing preemptively or respecting way more than they should. | ||
---- | ---- | ||
;236[S] | ;236[S] | ||
| Line 462: | Line 467: | ||
<div class="attack-gallery"> | <div class="attack-gallery"> | ||
<gallery widths="210px" heights="210px" mode="nolines"> | <gallery widths="210px" heights="210px" mode="nolines"> | ||
DBFZ_Bardock_RebellionSpear-L.png | | DBFZ_Bardock_RebellionSpear-L.png |The quick and versatile one | ||
</gallery> | </gallery> | ||
</div> | </div> | ||
| Line 483: | Line 488: | ||
<div class="attack-gallery"> | <div class="attack-gallery"> | ||
<gallery widths="210px" heights="210px" mode="nolines"> | <gallery widths="210px" heights="210px" mode="nolines"> | ||
DBFZ_Bardock_TyrantLancer1.png | | DBFZ_Bardock_TyrantLancer1.png |The huge hit & blockstun one | ||
</gallery> | </gallery> | ||
</div> | </div> | ||
| Line 505: | Line 510: | ||
<div class="attack-gallery"> | <div class="attack-gallery"> | ||
<gallery widths="210px" heights="210px" mode="nolines"> | <gallery widths="210px" heights="210px" mode="nolines"> | ||
DBFZ_Bardock_RebellionSpear-AirM.png | | DBFZ_Bardock_RebellionSpear-AirM.png |The just okay aerial one? | ||
</gallery> | </gallery> | ||
</div> | </div> | ||
| Line 529: | Line 534: | ||
<div class="attack-gallery"> | <div class="attack-gallery"> | ||
<gallery widths="210px" heights="210px" mode="nolines"> | <gallery widths="210px" heights="210px" mode="nolines"> | ||
DBFZ_Bardock_RiotJavelin.png |"This will change ''everything''!" | DBFZ_Bardock_RiotJavelin.png | | ||
DBFZ_Bardock_RiotJavelin2.png |"This will change ''everything''!" | |||
</gallery> | </gallery> | ||
</div> | </div> | ||
| Line 557: | Line 562: | ||
<div class="attack-gallery"> | <div class="attack-gallery"> | ||
<gallery widths="210px" heights="210px" mode="nolines"> | <gallery widths="210px" heights="210px" mode="nolines"> | ||
DBFZ_Bardock_SaiyanSpirit.png | | DBFZ_Bardock_SaiyanSpirit.png | | ||
DBFZ_Bardock_SaiyanSpirit2.png | | DBFZ_Bardock_SaiyanSpirit2.png |Looks cool, but only really used for the level 2 extension | ||
</gallery> | </gallery> | ||
</div> | </div> | ||
| Line 588: | Line 593: | ||
<div class="attack-gallery"> | <div class="attack-gallery"> | ||
<gallery widths="210px" heights="210px" mode="nolines"> | <gallery widths="210px" heights="210px" mode="nolines"> | ||
DBFZ_Bardock_RevengerAssault.png | | DBFZ_Bardock_RevengerAssault.png | | ||
DBFZ_Bardock_RevengerAssault2.png |'''''"YOU'RE THE ONE WHO'S GONNA DIE!"''''' | DBFZ_Bardock_RevengerAssault2.png |'''''"YOU'RE THE ONE WHO'S GONNA DIE!"''''' | ||
</gallery> | </gallery> | ||
Revision as of 16:25, 29 August 2021
Normal Moves
5L


Certified eSports


- 5L
- High range for a jab.
This button is utterly amazing. It's the only medium blockstun 6 frame jab in the entire game, which gives it some unique properties. It makes his tick DR about 4 frames slower because it has more blockstun, but Bardock doesn't have a voice line when he starts his Dragon Rush so this is only a slight inconvenience. Its massive range lets him re-assert easily after spacing himself out, and being a higher level than most jabs, it will leave you at advantage on trades. You also have more time to delay a 2L and keep the string true, making it even easier to space yourself out. Its speed and range also makes it a good check to superdash if you happen to catch a raw tag.
- 5LL
- Vacuums the opponent down for a ground bounce on hit.
Infamously large hitbox and its ability to bring down airborne opponents along with the ground bounce property gives Bardock a very easy conversion. He can "unga bunga" mash in scrambles to great effect, and to great reward being an unscaled starter. Its only real downside is how slow it is at 11 frames, meaning you'll be relying on 4L in clashes instead of this button.
This is also a very important enabler for Bardock's more complex combos like Sparking! and Sparkless loops as well as for optimal corner routes.
- 5LLL
- Stays grounded.
Just like the other two attacks in his auto combo, this move also has a massive hitbox that can snipe airborne opponents. Though the reward from this isn't as severe. The pushback combined with the frame advantage means you can whiff punish people who try to take their turn back if their jabs are a bit on the smaller side.
5M

- Great frame advantage.
- 2L > 5M is Bardock's main antireflect string, but it only works up close.
Mostly combo filler and a way to get Bardock close to the opponent, as it will almost always leave him point-blank if used in a blockstring. Bardock can space himself out quite easily, and a fully spaced 5M can be -1 on block. This lends itself very nicely as a pressure tool to stagger back into 5L.
5H

- Disjointed hitbox swing.
- Mostly blockstring filler.
Useful in corner combos and can be linked off of if it hits meaty. Can be used midscreen as Bardock has a force SKD tool, but not recommended due to how little frame advantage he has afterwards.
5S
Waiting for Ex Lariat confirm

- Launches on hit.
- Great frame advantage when even slightly spaced out.
One of the stronger 5S in the game when used in pressure, and in neutral can confirm into 236H at any range. 5S > 236H can frame-trap from full screen while converting into a combo with an assist. Even if he doesn't have multi Ki Blasts, it's still a great Ki Blast in its own right.
2L

- Hits low.
Integral part of Bardock's pressure/mixup in conjunction with 5L since it can stagger into itself and gatling into other normals.
2M

- Bardock's party starter.
Another surprisingly good stagger tool. Doesn't advance Bardock forwards very much, which can set up threatening spacings after 2L.
Will whiff after 5L>LL at max range so be careful not to autopilot your strings when spaced out.
2H

- Go to anti-air.
Privileged hitbox, can sometimes even anti air a vanish regardless of the opponent's vanish placing themselves behind Bardock.
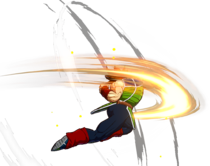
6M
- DBFZ Bardock 6M.png
Honest mixup tool for an honest character
- Universal overhead.
- If blocked, 4LL 236M/H clash beats nearly anything that isn't invincible, making Bardock's 6M uncontestable for a lot of characters
Bardock's privileged jab having medium hitstun and blockstun makes him more of a threat after 6M than usual in the corner. He's usually +3 after a trade and will beat the higher hitstun 7f normals clean.
j.L

The last thing you see before j.S

- Low horizontal range, and nerfed vertical range.
- Does not gatling into itself.
Hits very low thus can be used for IAD overheads and cross-ups. Easy to confirm with j.LL, but the hitbox is lacking nowadays. Usually tacked on after a j.M connects for a second overhead.
j.M

- Hits twice, both are overheads.
- Chains backwards into j.L.
- Faster than usual, but also higher commitment.
- Can crossup, but only at the base of the kick.
Arguably one of Bardock's stronger air buttons. Fast and has disjointed hitbox at the tip of the kick.
j.H

- 5LLLLLLL Smash hit can wall bounce.
- j.H Smash hit causes a sliding knockdown.
Prime jump-in overhead. Mostly safejump material due to the high hitbox and chunky blockstun, although it cannot be converted out of if it hits an airborne opponent.
j.S

If you can't lariat them, you're probably using this instead.

- Pauses his air momentum during the shot.
Great neutral tool and combo bridge for Bardock, but the angle leaves a lot to be desired. Great for converting out of j.L, as IAD j.LS is a combo on hit and around +17 on block. Can true string or frame trap into a grounded 236H depending on the spacing.
j.2H

- Pushes Bardock up and forwards.
Combo filler. Useful midscreen as it enables his best knockdown with j.H, but 214X is much more useful in the corner. Can be used to setup mixups on oki with a beam assist in a similar fashion to Base Vegeta.
Special Moves
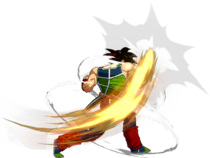
Rebellion Spear
236L/M/H (Air OK)

Ground
Air


- 236L
- Attacks straight ahead.
- Keeps the opponent in place on grounded hit. Sends opponent flying horizontally on air hit.
Bardock's iconic Rebellion Spear, often called his "lariat" by the DBFZ community - a nickname which spread to other advancing moves in the game. Travels incredibly far and incredibly fast, allowing it to be used as an ability to dominate neutral. When combined with an assist, can be used to instantly start pressure and turn the blocked attack into his favor, if it hits, Bardock can get a full combo afterwards.
Due to its extreme speed and threat, opponents will generally refuse to be in a horizontal line from Bardock, or will constantly be attempting to sniff it out and punish with a backwards IAD.
- 236M
- Damage depends on distance.
- Aerial version ground bounces on Smash hit, spiking the opponent back up.
- Grounded version has Bardock recover airborne, leaving him in SJ Install and allowing for some left-right mixups.
Ground version is a very fast anti-air but with low reward in mid-screen. While relatively minor, its speed is one of the reasons why Bardock's stagger is so strong: after a blocked 6M and forcing a clash sequence (against characters with a 6f button), he can do 5L > 4L > 236M and there's next to no offensive answer against this string.
Both ground and air versions are the cornerstones of Bardock's corner combos.
Additionally, Ground version can combo into DR in the corner.
- 236H
- Damage depends on distance: midscreen → midscreen to almost fullscreen → exactly fullscreen.
- Moves straight ahead, crosses up on hit or block.
- On hit, can followup with an additional attack by pressing L/M/H. This attack is identical to 236M/j.236M and doesn't cost Ki.
Six frame startup, goes even further, hits twice and will blow through a lot. If 236L wasn't enough to get in, this is a great use of meter. Mostly handy as a potential full-screen conversion off of 5S.
Tk.236H + assist can setup for a high/low/crossup in the corner.
Raging Meteor
214L/M/H (Air OK)

Standard air knockdown tool

- Smash effect occurs on the last hit.
- Every version's last hit is an overhead.
Don't use any version as a mixup, the multihitting properties of the move make it extremely easy to react to.
- 214L
- Smash hit causes a very short sliding knockdown.
Grants next to no oki from midscreen, but is a decent combo ender in the corner. Gives a superjump IAD safejump in said corner.
- 214M
- Smash hit causes a ground bounce SKD.
j.S > j.214M is Bardock's preferred corner combo ender at low hitstun decay, as the ground bounce gives lots of time for easy assist extensions, supers, or simply better oki.
Some players also prefer ending combos with ground 214M over j.214L due to having better oki, though at the cost of damage and meter. Ground 214M also sets up an assist-regenerating safejump with 214M > 5M (whiff) > IAD j.M. If it hits, you can convert with 236M.
This is also your ideal blockstring ender thanks to its corner carry, speed and safety but it can be a bit weak against some guard cancel options.
- 214H
- Smash hit causes a ground bounce SKD.
j.S > j.214H works from midsceen with all the pros of corner j.214M.
Aside from being a combo ender, it's a great air-to-air option with very fast start-up and relatively little recovery. As well as this, Bardock can score a triple overhead with it after an IAD jump-in, but requires resources to get any more damage off of it afterwards.
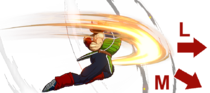
Tyrant Lancer
236S

You know this will hurt when it makes the screen shake on block


- 236S
- Wall bounces, can only followup without resources in the corner.
- Jails into Vanish.
Bardock's best combo starter in the corner and is commonly used as a reset tool in blockstrings as it's plus on block, however, cancelling from any normals will leave a big mashable gap. However, opponents attempting to beat this on reaction will get hit more often than not. Mixing this in with superdash + assist is a great way to horrify opponents into either mashing preemptively or respecting way more than they should.
- 236[S]
- Big wallbounce that can be followed up anywhere.
Even higher reward on hit, commonly used after popping Spark for midscreen Sparking combos. In blockstrings, can be used to scare them from Reflecting uncharged 236S.
Z Assists
Assist A
Rebellion Spear
The quick and versatile one

- Same deal as his point 236L.
Bardock A is very solid, and is always a good choice if you're looking for something that can quickly get a hit in during the mid range. It's pretty good in blockstrings as well due to its speed, as you can throw it into a blockstring very easily without fear of it being reflected or wake-up DP'd. You can't go wrong with this option, even with how good assist B is, so really just pick based on what your team/playstyle is looking for.
Assist B
Tyrant Lancer
The huge hit & blockstun one
- Somewhat slow, but very high blockstun and hitstun.
While you're giving up the fast, strong tool of A assist, the benefits that B offers is titanic, as it grants plenty of time to start a combo on hit, and automatically enables mix-up pressure on block.
Assist C
Rebellion Combination

The just okay aerial one?

- Teleports to the opponent and performs a two-hit combo. Causes groundbounce sliding knockdown on hit.
- Tracks anywhere on the screen
Not really worth it. While Assist C can be good in it's own right for many characters, Bardock's other two options are just much too good to really give up. It does track anywhere on the screen - even in the air, so it does have some utility there, but even then it's hard to give up the options of assist A's fast reach and versatility, or assist B's incredibly high blockstun and easy confirms on hit. Your other characters probably have better Assist C options than Bardock does, anyway. It's not a bad option in any means - his other assists are just much better. If you absolutely want to run a C assist and you like the potential that Bardock's teleporting C assist brings, it's not a bad call, but you're giving up a lot in comparison to his other assists.
Super Moves
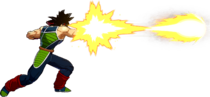
Riot Javelin
236L+M (Air OK)

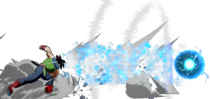
"This will change everything!"


- Hold up or down to aim the ground version upwards, and air version downwards. Downward version causes a ground bounce.
- Normal version has minimum damage of 814, downward is 748.
- As Saiyan Spirit follow-up, only does half the damage.
- If you Ultimate Z-Change into this move in the corner, Bardock will be pushed out of the corner, seemingly to allow you to aim it easily.
Saiyan Spirit
236H+S (Air OK)


Looks cool, but only really used for the level 2 extension


- Minimum damage: 395, 318.
- Goes just over half screen, only does 1590 if hits at the tip.
- Can be followed up with Riot Javelin by pressing L/M/H/S on hit. This version can also be directed up or down.
Although invincible on start-up, opponents can Vanish on reaction to the super flash, making it a near-useless reversal against normals. The forward movement does make vanishes whiff, so it's more of a get-out-of-jail-free card as opposed to a damaging reversal.
Also to note that if this super is used midscreen, 2nd hit > lvl2 still does less damage than his other level 1.
Revenge Assault
214L+M or 214H+S (Air OK)

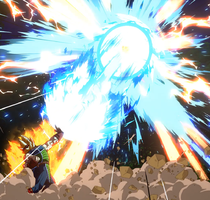
"YOU'RE THE ONE WHO'S GONNA DIE!"


- Charges straight forward.
- On hit in midscreen, Bardock is left a full screen away from the opponent.
- Minimum damage: 1718.
Easy Super for solo combos or to DHC into. +39 and almost fullscreen on hit, only allowing for a j.H safejump. A far cry of what it used to be, but a good super nonetheless.