No edit summary |
|||
| Line 19: | Line 19: | ||
|cons= | |cons= | ||
* '''Potential Unleashed:''' His level 1 Super has very low damage at the start, and the short range can make it whiff on some DHCs. | * '''Potential Unleashed:''' His level 1 Super has very low damage at the start, and the short range can make it whiff on some DHCs. | ||
* '''Flawed Mix-up:''' Gohan's {{clr| | * '''Flawed Mix-up:''' Gohan's {{clr|H|j.236H}} mix-up can be [[DBFZ/Defense#Guard_Cancel|Guard Canceled]] on reaction. | ||
* '''Micro Management:''' Players need to be cognizant if Adult Gohan is currently powered-up or not, or else risk dropping a combo with the wrong route. | * '''Micro Management:''' Players need to be cognizant if Adult Gohan is currently powered-up or not, or else risk dropping a combo with the wrong route. | ||
* '''The Need to Level-up:''' Although unlikely, if Adult Gohan somehow cannot level-up during the entire game, he misses out on a lot of tools. | * '''The Need to Level-up:''' Although unlikely, if Adult Gohan somehow cannot level-up during the entire game, he misses out on a lot of tools. | ||
| Line 50: | Line 50: | ||
==Normal Moves== | ==Normal Moves== | ||
===<big>{{clr| | ===<big>{{clr|L|5L}}</big>=== | ||
<span class="input-badge">'''Level 0'''</span> | <span class="input-badge">'''Level 0'''</span> | ||
<div class="attack-container"> | <div class="attack-container"> | ||
| Line 72: | Line 72: | ||
|} | |} | ||
==== ==== | ==== ==== | ||
;{{clr| | <!--Insert text below the =s and above the 2 /divs--> | ||
;{{clr|L|5L}} | |||
* Really short range. | * Really short range. | ||
* First hit has a small hitbox coming from Gohan's foot. | * First hit has a small hitbox coming from Gohan's foot. | ||
| Line 79: | Line 80: | ||
Everyone has been hit by this move. | Everyone has been hit by this move. | ||
---- | ---- | ||
;{{clr| | ;{{clr|L|5LL}} | ||
* Mostly combo filler. | * Mostly combo filler. | ||
Can be a good meaty against a delay tech. After a safe jump off a sliding knockdown, continuing to mash light ({{clr| | Can be a good meaty against a delay tech. After a safe jump off a sliding knockdown, continuing to mash light ({{clr|L|5LL}}) can catch mashing or put them on block. | ||
---- | ---- | ||
;{{clr| | ;{{clr|L|5LLL}} | ||
* Counts as grounded. | * Counts as grounded. | ||
* Smash hit can link to {{clr| | * Smash hit can link to {{clr|L|j.L}}. | ||
Rarely used, but still has a decent hitbox. | Rarely used, but still has a decent hitbox. | ||
</div> | </div> | ||
</div> | </div> | ||
===<big>{{clr| | ===<big>{{clr|L|5L}}</big>=== | ||
<span class="input-badge">'''Level 1+'''</span> | <span class="input-badge">'''Level 1+'''</span> | ||
<div class="attack-container"> | <div class="attack-container"> | ||
| Line 114: | Line 115: | ||
|} | |} | ||
==== ==== | ==== ==== | ||
* {{clr| | <!--Insert text below the =s and above the 2 /divs--> | ||
** Level 5: If {{clr| | * {{clr|L|5LL}} is equivalent to {{clr|M|5M}}. | ||
** Level 5: If {{clr|M|5M}} has already been used in a string, autocombo reverts back to level 0 version. | |||
Does less damage and has worse scaling than the move it copies. | Does less damage and has worse scaling than the move it copies. | ||
* {{clr| | * {{clr|L|5LLL}} is equivalent to {{clr|H|3H}}, though doesn't have Head invul. | ||
** Launches on hit. | ** Launches on hit. | ||
** Level 5: If {{clr| | ** Level 5: If {{clr|H|3H}} has already been used in a string, this attack will not come out and the autocombo ends at {{clr|L|5LL}}. If {{clr|L|5LLL}} has been used, {{clr|H|3H}} cannot be used in the same string. | ||
** Can be used to reset pressure due to it having the same frame advantage as {{clr| | ** Can be used to reset pressure due to it having the same frame advantage as {{clr|L|2L}}. | ||
Unlike other autocombo normals, {{clr| | Unlike other autocombo normals, {{clr|L|5LLLL}} and {{clr|L|2L}} can be used in the same string, giving him fantastic pressure capabilities. | ||
* {{clr| | * {{clr|L|5LLLLL}} launches higher than Level 0 {{clr|L|5LLL}}. | ||
</div> | </div> | ||
</div> | </div> | ||
===<big>{{clr| | ===<big>{{clr|M|5M}}</big>=== | ||
<div class="attack-container"> | <div class="attack-container"> | ||
<div class="attack-gallery"> | <div class="attack-gallery"> | ||
| Line 144: | Line 146: | ||
|} | |} | ||
==== ==== | ==== ==== | ||
<!--Insert text below the =s and above the 2 /divs--> | |||
* Fantastic range. | * Fantastic range. | ||
Large normal that covers an extraordinary amount of space relative to how fast the startup is, and is an amazing whiff-punish. The range can also be a downside as it's pretty punishable if Adult Gohan whiffs himself. | Large normal that covers an extraordinary amount of space relative to how fast the startup is, and is an amazing whiff-punish. The range can also be a downside as it's pretty punishable if Adult Gohan whiffs himself. | ||
Unlike most of the cast who preserve their {{clr| | Unlike most of the cast who preserve their {{clr|M|5M}} to allow jump cancels from {{clr|M|2M}}, you can use this {{clr|M|5M}} much more liberally as {{clr|H|3H}} is also a jump cancellable combo launcher. | ||
</div> | </div> | ||
</div> | </div> | ||
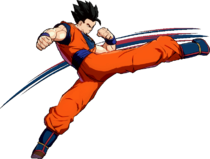
===<big>{{clr| | ===<big>{{clr|H|5H}}</big>=== | ||
<div class="attack-container"> | <div class="attack-container"> | ||
<div class="attack-gallery"> | <div class="attack-gallery"> | ||
| Line 169: | Line 172: | ||
|} | |} | ||
==== ==== | ==== ==== | ||
<!--Insert text below the =s and above the 2 /divs--> | |||
* Great horizontal range, will hit at round start distance. | * Great horizontal range, will hit at round start distance. | ||
* Wall bounces on Smash hit. | * Wall bounces on Smash hit. | ||
The fastest {{clr| | The fastest {{clr|H|5H}} in the game. | ||
</div> | </div> | ||
</div> | </div> | ||
===<big>{{clr| | ===<big>{{clr|S|5S}}</big>=== | ||
<div class="attack-container"> | <div class="attack-container"> | ||
<div class="attack-gallery"> | <div class="attack-gallery"> | ||
| Line 193: | Line 197: | ||
|} | |} | ||
==== ==== | ==== ==== | ||
<!--Insert text below the =s and above the 2 /divs--> | |||
* Covers about 90% of the screen. Launches on hit. | * Covers about 90% of the screen. Launches on hit. | ||
* Whiffs against crouching opponents. | * Whiffs against crouching opponents. | ||
| Line 201: | Line 206: | ||
</div> | </div> | ||
===<big>{{clr| | ===<big>{{clr|L|2L}}</big>=== | ||
<div class="attack-container"> | <div class="attack-container"> | ||
<div class="attack-gallery"> | <div class="attack-gallery"> | ||
| Line 219: | Line 224: | ||
|} | |} | ||
==== ==== | ==== ==== | ||
<!--Insert text below the =s and above the 2 /divs--> | |||
* Fairly disjointed hitbox. | * Fairly disjointed hitbox. | ||
Far reaching and being +0 encourages strong stagger pressure. | Far reaching and being +0 encourages strong stagger pressure. | ||
| Line 226: | Line 232: | ||
</div> | </div> | ||
===<big>{{clr| | ===<big>{{clr|M|2M}}</big>=== | ||
<div class="attack-container"> | <div class="attack-container"> | ||
<div class="attack-gallery"> | <div class="attack-gallery"> | ||
| Line 244: | Line 250: | ||
|} | |} | ||
==== ==== | ==== ==== | ||
<!--Insert text below the =s and above the 2 /divs--> | |||
* Slides forward about half-screen. | * Slides forward about half-screen. | ||
* Launches on hit. | * Launches on hit. | ||
Can punish backdash and link into {{clr| | Can punish backdash and link into {{clr|M|5M}} or {{clr|H|3H}}. Will often put you right back on the opponent after being reflected. | ||
</div> | </div> | ||
</div> | </div> | ||
===<big>{{clr| | ===<big>{{clr|H|2H}}</big>=== | ||
<div class="attack-container"> | <div class="attack-container"> | ||
<div class="attack-gallery"> | <div class="attack-gallery"> | ||
| Line 268: | Line 275: | ||
|} | |} | ||
==== ==== | ==== ==== | ||
<!--Insert text below the =s and above the 2 /divs--> | |||
* Smash hit launches higher with more hitstun. | * Smash hit launches higher with more hitstun. | ||
* Puts Adult Gohan in the air, true blockstring into j.236X. | * Puts Adult Gohan in the air, true blockstring into j.236X. | ||
| Line 274: | Line 282: | ||
</div> | </div> | ||
===<big>{{clr| | ===<big>{{clr|S|2S}}</big>=== | ||
<div class="attack-container"> | <div class="attack-container"> | ||
<div class="attack-gallery"> | <div class="attack-gallery"> | ||
| Line 292: | Line 300: | ||
|} | |} | ||
==== ==== | ==== ==== | ||
<!--Insert text below the =s and above the 2 /divs--> | |||
* Pulls back and fires a Ki blast. | * Pulls back and fires a Ki blast. | ||
Useful to disengage and return to neutral, although locks Adult Gohan in place for a while and can lose bad to an instant Super Dash. Use it only when your opponent won't anticipate it. | Useful to disengage and return to neutral, although locks Adult Gohan in place for a while and can lose bad to an instant Super Dash. Use it only when your opponent won't anticipate it. | ||
| Line 299: | Line 308: | ||
</div> | </div> | ||
===<big>{{clr| | ===<big>{{clr|M|6M}}</big>=== | ||
<div class="attack-container"> | <div class="attack-container"> | ||
<div class="attack-gallery"> | <div class="attack-gallery"> | ||
| Line 317: | Line 326: | ||
|} | |} | ||
==== ==== | ==== ==== | ||
<!--Insert text below the =s and above the 2 /divs--> | |||
* Universal overhead. | * Universal overhead. | ||
* Uses the same animation and hitbox/hurtbox as {{clr| | * Uses the same animation and hitbox/hurtbox as {{clr|H|j.H}}. | ||
Can be made plus by delaying Level 1 autocombo. | Can be made plus by delaying Level 1 autocombo. | ||
</div> | </div> | ||
</div> | </div> | ||
===<big>{{clr| | ===<big>{{clr|L|3L}}</big>=== | ||
<span class="input-badge">'''Machine Gun Punch'''</span> | <span class="input-badge">'''Machine Gun Punch'''</span> | ||
<div class="attack-container"> | <div class="attack-container"> | ||
| Line 343: | Line 353: | ||
|} | |} | ||
==== ==== | ==== ==== | ||
<!--Insert text below the =s and above the 2 /divs--> | |||
* Available at Level 1 Potential Unleashed. | * Available at Level 1 Potential Unleashed. | ||
* Holding L adds extra hits. | * Holding L adds extra hits. | ||
| Line 351: | Line 362: | ||
</div> | </div> | ||
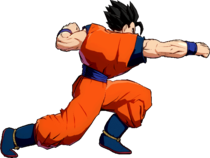
===<big>{{clr| | ===<big>{{clr|H|3H}}</big>=== | ||
<span class="input-badge">'''Ultimate High Kick'''</span> | <span class="input-badge">'''Ultimate High Kick'''</span> | ||
<div class="attack-container"> | <div class="attack-container"> | ||
| Line 370: | Line 381: | ||
|} | |} | ||
==== ==== | ==== ==== | ||
<!--Insert text below the =s and above the 2 /divs--> | |||
* Launches on hit. | * Launches on hit. | ||
* Jump cancellable on hit. | * Jump cancellable on hit. | ||
Extremely handy combo filler while possessing an abnormally high angle. Decent hitstun and jump cancellable means this is basically a second, better {{clr| | Extremely handy combo filler while possessing an abnormally high angle. Decent hitstun and jump cancellable means this is basically a second, better {{clr|M|5M}} for combo purposes. This is also an anti-air, and can be used in the place of {{clr|H|2H}}, but must be ready to combo after landing it immediately, as there isn't ample time to hit-confirm before the opponent techs out. | ||
</div> | </div> | ||
</div> | </div> | ||
===<big>{{clr| | ===<big>{{clr|L|j.L}}</big>=== | ||
<div class="attack-container"> | <div class="attack-container"> | ||
<div class="attack-gallery"> | <div class="attack-gallery"> | ||
| Line 394: | Line 406: | ||
|} | |} | ||
==== ==== | ==== ==== | ||
<!--Insert text below the =s and above the 2 /divs--> | |||
* Bad horizontal range but great vertical range. | * Bad horizontal range but great vertical range. | ||
Go-to overhead normal. Will whiff after a {{clr| | Go-to overhead normal. Will whiff after a {{clr|M|j.M}} if it didn't hit near the body. | ||
</div> | </div> | ||
</div> | </div> | ||
===<big>{{clr| | ===<big>{{clr|M|j.M}}</big>=== | ||
<div class="attack-container"> | <div class="attack-container"> | ||
<div class="attack-gallery"> | <div class="attack-gallery"> | ||
<gallery widths="210px" heights="210px" mode="nolines"> | <gallery widths="210px" heights="210px" mode="nolines"> | ||
DBFZ_AdultGohan_jM.png |eSports {{clr| | DBFZ_AdultGohan_jM.png |eSports {{clr|M|j.M}} | ||
</gallery> | </gallery> | ||
</div> | </div> | ||
| Line 417: | Line 430: | ||
|} | |} | ||
==== ==== | ==== ==== | ||
<!--Insert text below the =s and above the 2 /divs--> | |||
* Great air-to-air normal. | * Great air-to-air normal. | ||
</div> | </div> | ||
</div> | </div> | ||
===<big>{{clr|H|j.H}}</big>=== | |||
===<big>{{clr| | |||
<div class="attack-container"> | <div class="attack-container"> | ||
<div class="attack-gallery"> | <div class="attack-gallery"> | ||
| Line 431: | Line 444: | ||
<div class="attack-info"> | <div class="attack-info"> | ||
{| class="wikitable attack-data" | {| class="wikitable attack-data" | ||
{{FrameDataHeader-DBFZ | {{FrameDataHeader-DBFZ}} | ||
}} | |||
|- | |- | ||
{{#cargo_query:tables=MoveData_DBFZ | {{#cargo_query:tables=MoveData_DBFZ | ||
|fields=damage,guard,smash,startup,active,recovery,onBlock,invuln | |fields=damage,guard,smash,startup,active,recovery,onBlock,invuln | ||
| Line 448: | Line 453: | ||
|} | |} | ||
==== ==== | ==== ==== | ||
* {{clr| | <!--Insert text below the =s and above the 2 /divs--> | ||
* {{clr| | * {{clr|L|5LLLLLLL}} Dynamic hit can wall bounce. | ||
* Can be cancelled into {{clr| | * {{clr|H|j.H}} causes a sliding knockdown on Smash hit. | ||
While sending the enemy down, it can combo into {{clr| | * Can be cancelled into {{clr|S|j.2S}} fastfall on hit, giving extra time to set-up. | ||
While sending the enemy down, it can combo into {{clr|L|j.236L}} with the right positioning. This is the core idea of his leg loops. | |||
Like {{clr| | Like {{clr|M|j.M}}, can be used for cross-ups on smaller characters due to it's fast startup and long range. | ||
</div> | </div> | ||
</div> | </div> | ||
===<big>{{clr| | ===<big>{{clr|S|j.S}}</big>=== | ||
<div class="attack-container"> | <div class="attack-container"> | ||
<div class="attack-gallery"> | <div class="attack-gallery"> | ||
| Line 475: | Line 481: | ||
|} | |} | ||
==== ==== | ==== ==== | ||
* Air {{clr| | <!--Insert text below the =s and above the 2 /divs--> | ||
* Air {{clr|S|2S}}. | |||
Similar to the ground version, it can also combo into SD and Ultimate Back Attack. | Similar to the ground version, it can also combo into SD and Ultimate Back Attack. | ||
</div> | </div> | ||
</div> | </div> | ||
===<big>{{clr| | ===<big>{{clr|H|j.2H}}</big>=== | ||
<div class="attack-container"> | <div class="attack-container"> | ||
<div class="attack-gallery"> | <div class="attack-gallery"> | ||
| Line 498: | Line 505: | ||
|} | |} | ||
==== ==== | ==== ==== | ||
<!--Insert text below the =s and above the 2 /divs--> | |||
* Smash hit launches higher with more hitstun. | * Smash hit launches higher with more hitstun. | ||
* One of the fastest j.2Hs in the game, allowing your combos to be just a hair longer due to less hitstun decay. | * One of the fastest j.2Hs in the game, allowing your combos to be just a hair longer due to less hitstun decay. | ||
Can be linked into off of Level 1 {{clr| | Can be linked into off of Level 1 {{clr|M|j.236M}} in BnBs, allowing for a sliding knockdowns with Level 1 {{clr|L|j.214L}}/{{clr|H|H}}. | ||
</div> | </div> | ||
</div> | </div> | ||
===<big>{{clr| | ===<big>{{clr|S|j.2S}}</big>=== | ||
<div class="attack-container"> | <div class="attack-container"> | ||
<div class="attack-gallery"> | <div class="attack-gallery"> | ||
| Line 522: | Line 530: | ||
|} | |} | ||
==== ==== | ==== ==== | ||
<!--Insert text below the =s and above the 2 /divs--> | |||
* Falls straight to the ground. | * Falls straight to the ground. | ||
* Cancellable to {{clr| | * Cancellable to {{clr|S|2S}}. | ||
* [https://youtu.be/YgYamDqHVA4?t=2014 Mix-up potential with resources.] | * [https://youtu.be/YgYamDqHVA4?t=2014 Mix-up potential with resources.] | ||
Can be used after {{clr| | Can be used after {{clr|H|j.H}} in the corner for a tiny bit more oki time, and also help with assist extensions on the ground like with beams post {{clr|H|j.H}}. Not too strong as a standalone mix-up tool since it's reactable, but it gives another layer to Adult Gohan's already strong pressure, especially if your opponent is respecting said pressure. You can also DP right after if you know your opponent wont react instantly/mash. | ||
</div> | </div> | ||
</div> | </div> | ||
| Line 531: | Line 540: | ||
==Special Moves== | ==Special Moves== | ||
===<big>Jet Uppercut</big>=== | ===<big>Jet Uppercut</big>=== | ||
<span class="input-badge">'''{{clr| | <span class="input-badge">'''{{clr|L|236L}}/{{clr|M|M}}/{{clr|H|H}}'''</span> | ||
<div class="attack-container"> | <div class="attack-container"> | ||
<div class="attack-gallery"> | <div class="attack-gallery"> | ||
| Line 550: | Line 559: | ||
|} | |} | ||
==== ==== | ==== ==== | ||
<!--Insert text below the =s and above the 2 /divs--> | |||
* All values in [] are for level 1+ versions. | * All values in [] are for level 1+ versions. | ||
;{{clr| | ;{{clr|L|236L}} | ||
* Anti-air DP. | * Anti-air DP. | ||
* Unscaled starter. | * Unscaled starter. | ||
Common TOD confirm. Can punish an imperfect safejump, like most 9-frame DPs. | Common TOD confirm. Can punish an imperfect safejump, like most 9-frame DPs. | ||
---- | ---- | ||
;{{clr| | ;{{clr|M|236M}} | ||
* Smash on first hit. Potential Unleashed extra hits only apply if the first hit connects. | * Smash on first hit. Potential Unleashed extra hits only apply if the first hit connects. | ||
* Level 0 takes a tiny step forward. | * Level 0 takes a tiny step forward. | ||
* Level 1+ slides half screen forward. Moves far enough to catch backdash. | * Level 1+ slides half screen forward. Moves far enough to catch backdash. | ||
* Each level adds an additional hit, up to 3 extra hits for level 3+. | * Each level adds an additional hit, up to 3 extra hits for level 3+. | ||
Used for his Level 7 loops, {{clr| | Used for his Level 7 loops, {{clr|H|5H}} > {{clr|S|236S}} > {{clr|M|236M}} scales almost nothing. | ||
---- | ---- | ||
;{{clr| | ;{{clr|H|236H}} | ||
* Almost identical to M version with slightly more damage, startup, and range. | * Almost identical to M version with slightly more damage, startup, and range. | ||
* Can link into any super after landing. | * Can link into any super after landing. | ||
| Line 571: | Line 581: | ||
===<big>Machine Gun Kick</big>=== | ===<big>Machine Gun Kick</big>=== | ||
<span class="input-badge">'''{{clr| | <span class="input-badge">'''{{clr|L|j.236L}}/{{clr|M|M}}/{{clr|H|H}}'''</span> | ||
<div class="attack-container"> | <div class="attack-container"> | ||
<div class="attack-gallery"> | <div class="attack-gallery"> | ||
| Line 590: | Line 600: | ||
|} | |} | ||
==== ==== | ==== ==== | ||
<!--Insert text below the =s and above the 2 /divs--> | |||
* All values in [] are for level 1+ versions. | * All values in [] are for level 1+ versions. | ||
** Essentially, Gohan kicks faster in level 1+ versions. | ** Essentially, Gohan kicks faster in level 1+ versions. | ||
;{{clr| | ;{{clr|L|j.236L}} | ||
* Upon using, Adult Gohan immediately starts falling down. | * Upon using, Adult Gohan immediately starts falling down. | ||
* Hold L/{{clr| | * Hold L/{{clr|M|M}}/{{clr|H|H}} to kick indefinitely until landing. Minimum 3 kicks. | ||
* Carries all and any momentum. | * Carries all and any momentum. | ||
* Keeps grounded opponent standing. | * Keeps grounded opponent standing. | ||
Is the "leg" in leg loops. | Is the "leg" in leg loops. | ||
---- | ---- | ||
;{{clr| | ;{{clr|M|j.236M}} | ||
* Upon using, Adult Gohan stalls a bit before falling down. | * Upon using, Adult Gohan stalls a bit before falling down. | ||
* Hold L/{{clr| | * Hold L/{{clr|M|M}}/{{clr|H|H}} to kick indefinitely until landing. Minimum 3 kicks. | ||
* Always moves Adult Gohan forward, holding 4 and 6 can shorten or lengthen the distance respectively. | * Always moves Adult Gohan forward, holding 4 and 6 can shorten or lengthen the distance respectively. | ||
* Launches on hit. | * Launches on hit. | ||
Primarily used to manually side-switch in the air after leveling up, and adds a tiny bit more damage/meter in bnb combos. | Primarily used to manually side-switch in the air after leveling up, and adds a tiny bit more damage/meter in bnb combos. | ||
---- | ---- | ||
;{{clr| | ;{{clr|H|j.236H}} | ||
* Upon using, Adult Gohan jumps up a bit before falling down, leading into further combo extensions. | * Upon using, Adult Gohan jumps up a bit before falling down, leading into further combo extensions. | ||
* Always moves Adult Gohan forward, holding {4} and {6} can shorten/lengthen the distance respectively. | * Always moves Adult Gohan forward, holding {4} and {6} can shorten/lengthen the distance respectively. | ||
* Performs 10 (19) kicks until he touches the opponent, at which point he will do it again, ensuring that the damage is always the same. | * Performs 10 (19) kicks until he touches the opponent, at which point he will do it again, ensuring that the damage is always the same. | ||
* Smash on the last hit, and causes a wall bounce. | * Smash on the last hit, and causes a wall bounce. | ||
Extremely active, spectacular against Super Dash and Raw Tag. Eating a raw {{clr| | Extremely active, spectacular against Super Dash and Raw Tag. Eating a raw {{clr|H|j.236H}} equals to losing 40% HP with a standard post-{{clr|H|j.236H}} combo. On block, Adult Gohan stays airborne, and can sneak in a {{clr|L|j.L}} that is susceptible to anti-airs, but can be countered alternatively with an OS reflect. | ||
</div> | </div> | ||
</div> | </div> | ||
===<big>Ultimate Back Attack</big>=== | ===<big>Ultimate Back Attack</big>=== | ||
<span class="input-badge">'''{{clr| | <span class="input-badge">'''{{clr|L|214L}}/{{clr|M|M}}/{{clr|H|H}} (Air OK)'''</span> | ||
<div class="attack-container"> | <div class="attack-container"> | ||
<div class="attack-gallery"> | <div class="attack-gallery"> | ||
| Line 635: | Line 646: | ||
|} | |} | ||
==== ==== | ==== ==== | ||
<!--Insert text below the =s and above the 2 /divs--> | |||
* All values in [] are for level 1+ versions. | * All values in [] are for level 1+ versions. | ||
* '''Level 0:''' Hops almost half screen. Ground version never crosses-up, air versions cross up if Adult Gohan leaps over the opponent. | * '''Level 0:''' Hops almost half screen. Ground version never crosses-up, air versions cross up if Adult Gohan leaps over the opponent. | ||
| Line 640: | Line 652: | ||
* Can't steal the corner. | * Can't steal the corner. | ||
---- | ---- | ||
;{{clr| | ;{{clr|L|214L}} | ||
* Smash hit causes a sliding knockdown. | * Smash hit causes a sliding knockdown. | ||
'''Level 0:''' {{clr| | '''Level 0:''' {{clr|S|j.S}} > {{clr|L|j.214L}} in the corner is the primary way of utilizing this in combos. | ||
'''Level 1:''' {{clr| | '''Level 1:''' {{clr|H|j.2H}} > {{clr|L|j.214L}} gets Adult Gohan a sliding knockdown anywhere. | ||
---- | ---- | ||
;{{clr| | ;{{clr|M|214M}} | ||
* Smash hit causes a sliding knockdown. | * Smash hit causes a sliding knockdown. | ||
* Switches sides anywhere outside of the corner. | * Switches sides anywhere outside of the corner. | ||
Grants more okizeme than the light version but is trickier to combo into, and requires the combo to not to be too high up. | Grants more okizeme than the light version but is trickier to combo into, and requires the combo to not to be too high up. | ||
---- | ---- | ||
;{{clr| | ;{{clr|H|214H}} | ||
* Smash hit causes a ground-bounce sliding knockdown. | * Smash hit causes a ground-bounce sliding knockdown. | ||
* Switches sides anywhere outside of the corner. | * Switches sides anywhere outside of the corner. | ||
'''Level 0:''' {{clr| | '''Level 0:''' {{clr|S|j.S}} > {{clr|H|j.214H}} allows the ability for Potential Unleashed to hit and consequently level up anywhere on the screen from Level 0. | ||
'''Level 1:''' Allows him to extend into advanced combos by inputting {{clr| | '''Level 1:''' Allows him to extend into advanced combos by inputting {{clr|M|j.M}}/{{clr|L|j.L}} right before landing, virtually becoming an extreme form of a rejump combo. | ||
</div> | </div> | ||
</div> | </div> | ||
===<big>Masenko</big>=== | ===<big>Masenko</big>=== | ||
<span class="input-badge">'''{{clr| | <span class="input-badge">'''{{clr|S|236S}}'''</span> | ||
<div class="attack-container"> | <div class="attack-container"> | ||
<div class="attack-gallery"> | <div class="attack-gallery"> | ||
| Line 680: | Line 692: | ||
|} | |} | ||
==== ==== | ==== ==== | ||
<!--Insert text below the =s and above the 2 /divs--> | |||
* Standard beam at Level 0, but becomes the highest damage beam at Level 1+. | * Standard beam at Level 0, but becomes the highest damage beam at Level 1+. | ||
* Even at Level 1+, it will still clash with typical 5-hit beams. | * Even at Level 1+, it will still clash with typical 5-hit beams. | ||
| Line 706: | Line 719: | ||
|} | |} | ||
==== ==== | ==== ==== | ||
<!--Insert text below the =s and above the 2 /divs--> | |||
* Receives the damage buff from Potential Unleashed. | * Receives the damage buff from Potential Unleashed. | ||
* Head invulnerable. | * Head invulnerable. | ||
| Line 732: | Line 746: | ||
|} | |} | ||
==== ==== | ==== ==== | ||
<!--Insert text below the =s and above the 2 /divs--> | |||
* Decent startup. | * Decent startup. | ||
* High blockstun. | * High blockstun. | ||
| Line 759: | Line 774: | ||
|} | |} | ||
==== ==== | ==== ==== | ||
<!--Insert text below the =s and above the 2 /divs--> | |||
It's a beam assist. Go wild. | It's a beam assist. Go wild. | ||
</div> | </div> | ||
</div> | </div> | ||
==Super Moves== | ==Super Moves== | ||
===<big>Potential Unleashed</big>=== | ===<big>Potential Unleashed</big>=== | ||
<span class="input-badge">'''{{clr| | <span class="input-badge">'''{{clr|L|236L}}+{{clr|M|M}} or {{clr|H|236H}}+{{clr|S|S}}'''</span> | ||
<div class="attack-container"> | <div class="attack-container"> | ||
<div class="attack-gallery"> | <div class="attack-gallery"> | ||
| Line 785: | Line 800: | ||
|} | |} | ||
==== ==== | ==== ==== | ||
* H+{{clr| | <!--Insert text below the =s and above the 2 /divs--> | ||
* {{clr|H|H}}+{{clr|S|S}} version can be held to stack up to 7 Ki Gauges, but {{clr|L|L}}+{{clr|M|M}} version only ever consumes 1 Ki Gauge, meaning you can't DHC into him and dump bars. | |||
* Damage bonus from Potential Unleashed is applied to this super during the freeze as Adult Gohan reaches the next level(s). | * Damage bonus from Potential Unleashed is applied to this super during the freeze as Adult Gohan reaches the next level(s). | ||
* Each bar adds 250 more to the base damage. | * Each bar adds 250 more to the base damage. | ||
| Line 794: | Line 810: | ||
===<big>Bros. Kamehameha</big>=== | ===<big>Bros. Kamehameha</big>=== | ||
<span class="input-badge">'''{{clr| | <span class="input-badge">'''{{clr|L|214L}}+{{clr|M|M}} or {{clr|H|214H}}+{{clr|S|S}}'''</span> | ||
<div class="attack-container"> | <div class="attack-container"> | ||
<div class="attack-gallery"> | <div class="attack-gallery"> | ||
| Line 813: | Line 829: | ||
|} | |} | ||
==== ==== | ==== ==== | ||
<!--Insert text below the =s and above the 2 /divs--> | |||
* Minimum damage: 70*24 (1680). | * Minimum damage: 70*24 (1680). | ||
* Hitbox can increase/decrease depending on who is on the team, but damage stays the same. | * Hitbox can increase/decrease depending on who is on the team, but damage stays the same. | ||
Revision as of 22:54, 13 May 2022
Every time Potential Unleashed is used, Adult Gohan will level up, improving his abilities and damage. He begins every match at Level 0, and can gain up to 7 levels. Potential Unleashed bonuses remain for the rest of the match.
Level 1 Moveset Changes
- Ground L Super Combo is modified.
- New move: Machine Gun Punch.
- Jet Uppercut: Medium and Heavy versions travel further horizontally for the first hit.
- Machine Gun Kick:
- Attacks more rapidly
- Medium and Heavy versions travel further when forward input is held.
- Heavy version is active for twice as long and deals twice as many hits after hitting the opponent.
- Ultimate Back Attack: Teleports on startup, tracks opponent anywhere on screen.
- Masenko: Gains 2 additional hits.
Additional Changes
- Medium Jet Uppercut gains 1 additional hit per level from Level 1 to 3.
- Heavy Jet Uppercut gains 1 additional hit per level from Level 1 to 7.
- All attack's damage is increased by 2% per level from Level 2 to 6. Total damage increased is 10% at Level 6.
- At Level 3, Gohan gains a second airdash. This allows him to jump and airdash twice, or double jump and then airdash, but he cannot airdash and then double jump.
- At Level 5, Gohan can cancel any normals into any other normals that hasn't been used in the string ("Reverse Beat").
- At Level 7, Gohan can cancel his specials into other specials.
Normal Moves
5L
Level 0


- 5L
- Really short range.
- First hit has a small hitbox coming from Gohan's foot.
One of the best 5Ls in the game due to it's fast startup and non-suspecting low-hit property.
Everyone has been hit by this move.
- 5LL
- Mostly combo filler.
Can be a good meaty against a delay tech. After a safe jump off a sliding knockdown, continuing to mash light (5LL) can catch mashing or put them on block.
- 5LLL
- Counts as grounded.
- Smash hit can link to j.L.
Rarely used, but still has a decent hitbox.
5L
Level 1+


Nice jawline you got there

Your entire blockstring


- 5LL is equivalent to 5M.
- Level 5: If 5M has already been used in a string, autocombo reverts back to level 0 version.
Does less damage and has worse scaling than the move it copies.
- 5LLL is equivalent to 3H, though doesn't have Head invul.
- Launches on hit.
- Level 5: If 3H has already been used in a string, this attack will not come out and the autocombo ends at 5LL. If 5LLL has been used, 3H cannot be used in the same string.
- Can be used to reset pressure due to it having the same frame advantage as 2L.
Unlike other autocombo normals, 5LLLL and 2L can be used in the same string, giving him fantastic pressure capabilities.
- 5LLLLL launches higher than Level 0 5LLL.
5M
- Fantastic range.
Large normal that covers an extraordinary amount of space relative to how fast the startup is, and is an amazing whiff-punish. The range can also be a downside as it's pretty punishable if Adult Gohan whiffs himself.
Unlike most of the cast who preserve their 5M to allow jump cancels from 2M, you can use this 5M much more liberally as 3H is also a jump cancellable combo launcher.
5H

- Great horizontal range, will hit at round start distance.
- Wall bounces on Smash hit.
The fastest 5H in the game.
5S

"Talk to the hand."

- Covers about 90% of the screen. Launches on hit.
- Whiffs against crouching opponents.
- Hits crouching opponents up close.
- Doesn't have Ki blast property.
Hits a lot higher than you'd expect. Used in corner combos and to start Leg Loops.
2L
"I hope you're not mashing."
- Fairly disjointed hitbox.
Far reaching and being +0 encourages strong stagger pressure.
Along with the fair pushback, it has the ability to potentially make his mediums frametrap for big punishes.
2M

The original slide

- Slides forward about half-screen.
- Launches on hit.
Can punish backdash and link into 5M or 3H. Will often put you right back on the opponent after being reflected.
2H

- Smash hit launches higher with more hitstun.
- Puts Adult Gohan in the air, true blockstring into j.236X.
Great anti-air and offensive tool on block compared to other 2Hs, as it leads into pressure with j.236X.
2S

- Pulls back and fires a Ki blast.
Useful to disengage and return to neutral, although locks Adult Gohan in place for a while and can lose bad to an instant Super Dash. Use it only when your opponent won't anticipate it.
Has enough hitstun to combo into SD in the corner for the universal Leg Loops version.
6M
- DBFZ AdultGohan 6M.png
- Universal overhead.
- Uses the same animation and hitbox/hurtbox as j.H.
Can be made plus by delaying Level 1 autocombo.
3L
Machine Gun Punch

Dudley's Machins Gun Blow
- Available at Level 1 Potential Unleashed.
- Holding L adds extra hits.
Good blockstring filler, great stagger/pressure reset tool with being -2 on block and can be shortened/extended. Is also a good meaty against a delay tech.
Scales subsequent damage pretty bad after a light starter because of its many hits, and some combos would do more omitting it entirely.
3H
Ultimate High Kick
For when you really need vertical reach
- Launches on hit.
- Jump cancellable on hit.
Extremely handy combo filler while possessing an abnormally high angle. Decent hitstun and jump cancellable means this is basically a second, better 5M for combo purposes. This is also an anti-air, and can be used in the place of 2H, but must be ready to combo after landing it immediately, as there isn't ample time to hit-confirm before the opponent techs out.
j.L

- Bad horizontal range but great vertical range.
Go-to overhead normal. Will whiff after a j.M if it didn't hit near the body.
j.M

eSports j.M

- Great air-to-air normal.
j.H

- 5LLLLLLL Dynamic hit can wall bounce.
- j.H causes a sliding knockdown on Smash hit.
- Can be cancelled into j.2S fastfall on hit, giving extra time to set-up.
While sending the enemy down, it can combo into j.236L with the right positioning. This is the core idea of his leg loops.
Like j.M, can be used for cross-ups on smaller characters due to it's fast startup and long range.
j.S
- DBFZ AdultGohan jS.png
- Air 2S.
Similar to the ground version, it can also combo into SD and Ultimate Back Attack.
j.2H
- DBFZ AdultGohan j2H.png
- Smash hit launches higher with more hitstun.
- One of the fastest j.2Hs in the game, allowing your combos to be just a hair longer due to less hitstun decay.
Can be linked into off of Level 1 j.236M in BnBs, allowing for a sliding knockdowns with Level 1 j.214L/H.
j.2S

"reactable"

- Falls straight to the ground.
- Cancellable to 2S.
- Mix-up potential with resources.
Can be used after j.H in the corner for a tiny bit more oki time, and also help with assist extensions on the ground like with beams post j.H. Not too strong as a standalone mix-up tool since it's reactable, but it gives another layer to Adult Gohan's already strong pressure, especially if your opponent is respecting said pressure. You can also DP right after if you know your opponent wont react instantly/mash.
Special Moves
Jet Uppercut
236L/M/H

Halfscreen DP

- All values in [] are for level 1+ versions.
- 236L
- Anti-air DP.
- Unscaled starter.
Common TOD confirm. Can punish an imperfect safejump, like most 9-frame DPs.
- 236M
- Smash on first hit. Potential Unleashed extra hits only apply if the first hit connects.
- Level 0 takes a tiny step forward.
- Level 1+ slides half screen forward. Moves far enough to catch backdash.
- Each level adds an additional hit, up to 3 extra hits for level 3+.
Used for his Level 7 loops, 5H > 236S > 236M scales almost nothing.
- 236H
- Almost identical to M version with slightly more damage, startup, and range.
- Can link into any super after landing.
- Each level adds an additional hit, up to 7 extra hits for level 7.
Machine Gun Kick
j.236L/M/H

The original lööps

- All values in [] are for level 1+ versions.
- Essentially, Gohan kicks faster in level 1+ versions.
- j.236L
- Upon using, Adult Gohan immediately starts falling down.
- Hold L/M/H to kick indefinitely until landing. Minimum 3 kicks.
- Carries all and any momentum.
- Keeps grounded opponent standing.
Is the "leg" in leg loops.
- j.236M
- Upon using, Adult Gohan stalls a bit before falling down.
- Hold L/M/H to kick indefinitely until landing. Minimum 3 kicks.
- Always moves Adult Gohan forward, holding 4 and 6 can shorten or lengthen the distance respectively.
- Launches on hit.
Primarily used to manually side-switch in the air after leveling up, and adds a tiny bit more damage/meter in bnb combos.
- j.236H
- Upon using, Adult Gohan jumps up a bit before falling down, leading into further combo extensions.
- Always moves Adult Gohan forward, holding {4} and {6} can shorten/lengthen the distance respectively.
- Performs 10 (19) kicks until he touches the opponent, at which point he will do it again, ensuring that the damage is always the same.
- Smash on the last hit, and causes a wall bounce.
Extremely active, spectacular against Super Dash and Raw Tag. Eating a raw j.236H equals to losing 40% HP with a standard post-j.236H combo. On block, Adult Gohan stays airborne, and can sneak in a j.L that is susceptible to anti-airs, but can be countered alternatively with an OS reflect.
Ultimate Back Attack
214L/M/H (Air OK)

BONK

- All values in [] are for level 1+ versions.
- Level 0: Hops almost half screen. Ground version never crosses-up, air versions cross up if Adult Gohan leaps over the opponent.
- Level 1: Teleports to the opponent.
- Can't steal the corner.
- 214L
- Smash hit causes a sliding knockdown.
Level 0: j.S > j.214L in the corner is the primary way of utilizing this in combos.
Level 1: j.2H > j.214L gets Adult Gohan a sliding knockdown anywhere.
- 214M
- Smash hit causes a sliding knockdown.
- Switches sides anywhere outside of the corner.
Grants more okizeme than the light version but is trickier to combo into, and requires the combo to not to be too high up.
- 214H
- Smash hit causes a ground-bounce sliding knockdown.
- Switches sides anywhere outside of the corner.
Level 0: j.S > j.214H allows the ability for Potential Unleashed to hit and consequently level up anywhere on the screen from Level 0.
Level 1: Allows him to extend into advanced combos by inputting j.M/j.L right before landing, virtually becoming an extreme form of a rejump combo.
Masenko
236S

Why doesn't Piccolo have this beam again?

- Standard beam at Level 0, but becomes the highest damage beam at Level 1+.
- Even at Level 1+, it will still clash with typical 5-hit beams.
Mostly used after DR ender in the corner. Not having an air version hurts its spacing potential quite badly.
Z Assists
Assist A
Jet Uppercut
- DBFZ AdultGohan AssistJetUpper.png
The most nerfed assist in the game
- Receives the damage buff from Potential Unleashed.
- Head invulnerable.
- Tied with Krillin's A assist for the fastest assist in the game.
The prototypical DP assist.
Assist B
Machine Gun Punch
- DBFZ AdultGohan 3L.png
- Decent startup.
- High blockstun.
Good blockstring assist, simple to hit confirm.
Hits a little higher than it seems.
Assist C
Masenko
They really did it.
It's a beam assist. Go wild.
Super Moves
Potential Unleashed
236L+M or 236H+S

ESSENCE OF A SUPER SAIYAN

- H+S version can be held to stack up to 7 Ki Gauges, but L+M version only ever consumes 1 Ki Gauge, meaning you can't DHC into him and dump bars.
- Damage bonus from Potential Unleashed is applied to this super during the freeze as Adult Gohan reaches the next level(s).
- Each bar adds 250 more to the base damage.
- Minimum damage: 40%. Is not affected by the damage buff per level.
Because of the short recovery, Adult Gohan can possibly combo post-Super, or even set up solid post-Super oki with help. More notably, it can be used to DHC into from other supers that are still active. For example, Potential Unleashed lets Adult Gohan recover fast enough to set up for safejump 50/50s if he DHCs in during an ongoing level 1, like Kid Buu's Pearl Flash, Vegeta's Galick Gun, or Jiren's Colossal Slash. Important note, he must DHC in right at the moment when the other character's super had just been activated to enable the okizeme.
Bros. Kamehameha
214L+M or 214H+S

"You came to the wrong neighborhood

fool"


- Minimum damage: 70*24 (1680).
- Hitbox can increase/decrease depending on who is on the team, but damage stays the same.
Leaving Adult Gohan pretty close to the opponent and being around +40 after hit, you can go for Superjump > IAD > High/Low for a relatively ambiguous 50/50 mix.
(Mostly Cosmetic): If Gotenks is on his team, Adult Gohan will perform it solo. If Gotenks is not on his team, Goten will come out to help. If Gotenks is not on his team, and SS Goku is on his team and is not on screen from an assist or Ultimate Z Change, Goku will come out to help. If Adult Gohan swaps bodies with Ginyu, he will only ever do the solo version.
Colors
- DBFZ Adult Gohan color1.png
Color 1
- DBFZ Adult Gohan color2.png
Color 2
- DBFZ Adult Gohan color3.png
Color 3
- DBFZ Adult Gohan color4.png
Color 4
- DBFZ Adult Gohan color5.png
Color 5
- DBFZ Adult Gohan color6.png
Color 6
- DBFZ Adult Gohan color7.png
Color 7
- DBFZ Adult Gohan color8.png
Color 8
- DBFZ Adult Gohan color9.png
Color 9
- DBFZ Adult Gohan color10.png
Color 10
- DBFZ Adult Gohan color11.png
Color 11
- DBFZ Adult Gohan color12.png
Color 12
- DBFZ Adult Gohan color13.png
Color 131
- DBFZ Adult Gohan color14.png
Color 141
- DBFZ Adult Gohan color15.png
Color 151
- DBFZ Adult Gohan color16.png
Color 161