P4U2R/Miscellaneous

From Dustloop Wiki

Training Mode Shortcuts

Direction + Reset
Left + Reset to reset both characters to the left corner (P1 in the corner)
Right + Reset to reset both characters to the right corner (P2 in the corner)
Down + Reset to reset both characters to round start position
Up + Reset to swap character positions (P1 will be in P2's positions and vice versa)
Play+Record = Reset
Pressing both Play and Record at the same time is the same as pressing the Reset button.

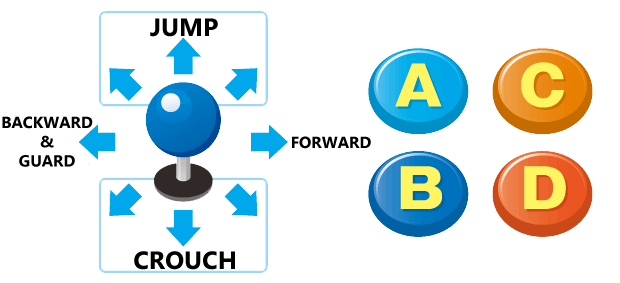
Arcade Layout

P4ArenaControls.png

The taunt button does not have a defined location, but is generally to the upper right of the other buttons. You don't have to enforce this layout when playing at home; any layout that is comfort to you is good.

Boss Mode

Game modes with Boss Mode:

  • Versus (activated during Character select)
  • Online (Requires the "Boss Mode Enabled" room settings)
  • Score Attack (Score Attack Characters with a Gold Outline are their Boss Version)
  • Golden Arena (activated by the skill "Fury of Yasogami").

All characters get Increased Health, Damage and Meter gain.
These Bonuses vary between characters. For example  Adachi and  Naoto have noticeably more meter gain compared to other boss characters and  Kanji 's "Burn To A Crisp!!" 214214C/D and "This'll Hurt!" 214C/D (Command grabs) do extra damage on top of the universal boss mode damage buffs.
Shadow Boss Characters get the same changes as Normal types.

Changes:

  • Cancel specials into specials
    • Exceptions are: Lightning Flash (236236A/B), Cross Slash (214214C/D), and B Heroic Bravery
  • Zio (236C/236D) inflicts shock
    • Zio projectile hits twice and has projectile superiority
    • SB Zio (236CD) acts like a projectile with a speed increase and tracks to the enemy's position.
  • Reduced Recovery during Ziodyne.
    • Allows Yu to run up and perform a high/low mix during the super, without the use of OMC.

Changes:

  • Sukukaja is now permanent.
  • Yosuke has an infinite amount of air actions.
    • This means he can indefinitely string together air specials.
  • "Whoo" (Shippu - Nagareboshi) (214214C) is now "free" and the Skill Boost version is 25 SP.

  • Strategies:

    • Use Shadow Yosuke.
      • This is because despite Regular Yosuke also having infinite Sukukaja, he isn't actually able to use "Whoo" until reaching Awakening (at 35% or less health).
      • It's hard to get into awakening at all considering that many boss characters can deal enough damage to Yosuke where he doesn't even get a chance to awaken denying one of his main strengths.
      • Fun fact ~ Before he "awakens", Regular Yosuke's Sukukaja autocombo will now end in Garudyne (with 50 SP or more) and not Shippu - Nagareboshi due to the aforementioned reasons.
    • Infinite air actions allows Yosuke to indefinitely air stall, useful in situations like timer scam and stalling out Boss Teddie's SB Circus Bear
    • Free "Whoos" gives Yosuke a free wakeup option.
    • Infinite Sukukaja is both a boon and a bane, as Yosuke loses access to his strongest combo extender, so "Whoo" will be your main damage source.

    Changes:

  • Permanent Power Charge level 3.
  • Reduced recovery from Dragon Kick (236C/D).
  • Reduced recovery from God's Hand (236236C/D).
  • Successful DPs can be special cancelled.
  • Changes:

  • Permanent Fire Level 9.
  • Fire Break is always active.
    • When used, comes back almost instantly.
  • B Normals throw triple fan blasts that bounce off walls/floors:
    • 5B,2B,j.B
  • Strategies:

    • If the opponent jump blocks your array of 5B fans, you can lock them in the air indefinitely.
      • Pair this with the unblockable Pheonix Flame Swirl (214214A/B) for confirmed damage.
      • Useful for timing out the opponent.
      • In addition, Shadow Yukiko (or Yukiko in awakening) can use D or SB Maragidyne in the middle of her 5B spam for more guaranteed damage.

    Changes:

  • Command Grab damage buffed around the board.
  • Instant recovery from Air Dive (j.214A/j.214B/j.214AB)
  • Primal Force ([4]6C) speed and distance increased.
  • Sweep (2A+B) speed and distance increased.
    • Sweep Recovery is still bad.
  • All command grabs work on grounded blockstunned opponents.
  • Strategies:

    • "Sweep Loops" are possible on Fatal Counter hit.
    • FC 2AB>2A>2AB>2AB>2A>2AB etc.
      • The 2A is used to prop them up in the air if the wallbounce was close. otherwise, just use sweep to catch the far wallbounces.
    • Boss Kanji can use Sweep's projectile invulnerability to try and approach and counter hit usually unapproachable boss characters like boss Yukiko and Yukari.
    • After 236236AB mid-screen, Kanji's C Tackle (Primal Force [4]6C) is fast enough to connect meterless after the final wallbounce. Great for putting them in the corner.

    Changes:

  • D normals (5D and j.D) now throw 2 items.
    • 2D is unchanged, however.
  • Nihil Hand (214214A/B) instantly teleports being the opponent for a cross up.
  • Circus Bear 214214C rolls left right left while the D version rolls right left right.
    • SB version will roll 3 times in each direction making it incredibly hard to avoid without good timing and some form of air stalling.
  • Strategies:

    • Step One: Use Boss Shadow Teddie
    • Step Two: Get one hit in or get hit once to get at least 1 SP
    • Step Three: Raw SB Circus Bear (214214C+D)
    • Step Four: You win (against most people). However, if the opponent dodges or you don't have S.frenzy available...
      • Spam Items using 5D and j.D to gain meter, cause confusion and build up to another raw SB Circus Bear.

    Changes:

  • Each hit counts down the Fate counter (sorta, there are some exceptions):
    • Most of Naoto's persona normals don't count down Fate: 5D, j.D, 5C, j.C.
    • Additionally, 2 of her specials: Snipe, excluding SB Shots, the 5th shot and 6D (A/B/C/D during Aim Stance) & Blight (236C/D) don't add to the fate counter
    • Anti-S SP Pistol (236236A/B), Hamaon (236236C) and Mudoon (236236D) don't remove fate.
    • Raid's (214214A/B) shots act the same way: A shots don't remove fate, B shots do.
    • However Critical Shot (C or D after Raid) does remove fate.
  • Like Adachi, her SP gain is noticeably higher compared to most other boss characters.
  • Naoto's bullets regenerate incredibly fast.
  • 5A & j.A now place D Hair-Trigger Megido.
  • C Hair-Trigger Megido (214C) is now unblockable.
  • SB Hair-Trigger Megido (214C+D) now appears directly on the opponent's location.
  • Strategies:

      • Boss Naoto's main game plan is to kill the opponent using her fate mechanic and Instant Kills rather than the traditional means.
    • All hits of "All-Out Rush" and the launchers (Hold/Mash A or B after All Out Attack) count down the fate counter.
      • This means that Naoto can remove all of an opponent's fate in one AoA, provided she gets enough hits (which is essentially guaranteed if you hold down A or B).
      • Don't use AoA too often against Human foes (they can and will block it) and primarily use it to call out mashing.
      • However against CPUs: use AoA every chance you get.
    • SB Hair-Trigger Megido is a great anti zoning tool.
      • SB Hair-Trgger Megido also has an unblockable Hamaon setup with Shadow Naoto, if you force your opponent to block Hamaon and then activate Shadow frenzy with at least 1 SP remaining you can use SB Hair Trigger Megido (which is unblockable) forcing the opponent to instantly die if they are at 0 fate
      • Note: This setup can be avoided with a Guard cancel roll if the opponent has at least 50SP
    • This goes without saying, but you basically never want to 214D as 5A/j.A are effectively better versions of it now.

    Changes:

  • Scan is always active.
  • Tetrakarn/Makarakarn are active at round start and will regenerate quickly after use.
  • Strategies:

    • Probably one of the worst boss characters:
      • Currently no known loops.
      • Worse damage than almost all other boss characters
      • Infinite Tetrakarn/Makarakarn is useful but only works when Rise is blocking meaning that she is still vulnerable to attacks if she herself is attacking, if she's crossed up/mixed up or wasn't blocking to begin with.

    Changes:

  • All arrow attacks have a boomerang property when they go off screen.
    • Essentially, they act like they've been fired through off-screen Garu orbs.
  • B normals are always fully charged:
    • 5B, 2B, j.B, j.2B
  • Strategies:

    • Boss Yukari gets very strong screen control due to her new arrow properties.
      • Just landing one her B normals gives her great screen control and the same applies to Feather☆Arrow (236A/B).
      • If you land one of her B normals you can do respectable damage by just pressing 5B repeatably for a free combo.
    • There really isn't much to say that to use Yukari's B normals and rush in and mix them up when you see an opportunity (like when the opponent gets bored of your interactive gameplay).

    Changes:

  • Starts with 9 runs and full bases.
  • B Normals shoot fireballs:
    • 5B, 2B, j.B
    • Fireballs count towards a base on hit or block.
  • Super Inferno Homer potentially launches 2 fireballs instead of 1.
  • Buffed Victory Cry Health and SP Gain.
  • Easier Clean Hits.
  • DP can cancel into any other move on block (including DP).
  • Strategies:

    • Abusing the hell out B normals is important when playing Boss Junpei.
      • Fireballs are fast, deal chip damage and, as was previously mentioned, count towards a base on hit or block (this effectively punishes playing defensively against Boss Junpei)
      • Spamming j.B, 5B and mixing in Deathbound (214C/D) is an effective way to build up "runs" quickly, improve Victory Cry's effects and do decent damage along the way.
      • Additionally, VC's Passive HP and SP Gain has been buffed, encouraging this sort of play style.
    • All of this combined turns Junpei's gameplan to a more of a keepway style, while still be able to go into high damage combos due to having what is essentially instant Victory Cry.

    Changes:

  • Any sword hit applies Freeze and Charm.
    • Including Throw, Throw break, AOA, and Guard Cancels.
  • 5B and 2B can gattling backwards into 5A to 2A.
  • B Coup Droit ([4]6B) now crosses up.
    • SB Coup Droit ([4]6AB) speed increased and distance.
  • Changes:

  • Permanent Thunder Fists (236236C/D).
  • Permanent Level 5 Cyclone.
  • Killrush (236A/B) can be cancelled in and out of all other rekka moves.
  • DP (B+D) can be cancelled into specials.
  • Cyclone Uppercut (236236A/B) damage increased.
  • 5D stays on screen MUCH LONGER and the vacuum effect is stronger.
  • Changes:

  • Permanent Extreme Orgia Mode.
  • 999 Bullets.
  • Passive HP regeneration.
  • All D Normals have the persona's counterattack happen immediately.
    • 5D,2D,j.D,j.2D.
  • Boost up to 4 times in the air.
  • Boost out of DP recovery.
  • Medigo Fire (236C/D) can be cancelled into itself with a damage increase.
  • Multi Mounted Machine Gun Orion / Air Grab super (j.236236A/B) has increased damage.
  • Strategies:

    • Land 236[B] (7th Gen Gatling Blast) once and hold down the B button and watch and or maniacally laugh as your opponent's health slowly dissolves.
      • You can land 236[B] either by combing into, using as a hard callout to mashing or punishing long recovery moves like Furious Actions/DP.
      • One way to combo into 236[B] is by doing 2A+B > 66 > j.B > 2A > 5C > j.C > j.236CD > 236[B] (Works anywhere, even round start).
      • Another way to combo into your win button is by doing FC 214C > 66 > 5C > 236[B] (Corner Only Combo).

    Changes:

  • Koromaru is invincible, unlimited HP, and never leaves the screen.
  • Koromaru can attack at any point.
    • This includes Burst, DP, and Thunder Reign Super.
  • Gigantic Impact (A/B after Charge Thrust) inflicts shock.
  • Mediarama (214A/B/AB) is buffed.
    • It now heals Ken for a decent amount of health.
  • Changes:

  • Massively increased health (like her sister, Margaret) compared to most other boss characters (approx. 25,000).
  • Increased movement speed.
  • Elizabeth now has an additional air action.
    • In other words, she can now triple jump and air dash/backdash out out of a double jump or use two air dashes/backdashes in midair.
  • Her "Invigorate" passive has been massively buffed meaning that she can get full SP in mere seconds.
  • Immunity to all Status Ailments excluding freeze.
  • The hitboxes of her 5D and j.D have been enlarged significantly.
    • This means that 5D is able to grab characters out of the air and j.D is able to grab grounded characters.
  • Debilitate ([2]8A/B) will now always trigger regardless of counter.
  • Mahamaon (236236C) will always Instantly Kill the opponent.
    • Before it would only IK (Insta-Kill) in the last 10 seconds of a round.
    • it's startup frames are increased slightly.
  • Mamudoon (236236D/CD) always Instantly Kills the opponent.
    • Before it would only IK (Insta-Kill) in the last 10 seconds of a round.
    • In addition, Mamudoon has decreased start up frames.
  • Diarahan (214214A/B) now fully heals Elizabeth (at least it's consistent with the games now... great).
  • Ghastly Wail (Liz's Command Grab Super) (214214C/D) now appears in 3 different spot dependent on version used:
    • C version ~ Thanatos appears as normally.
    • D version ~ Thanatos appears in front of the opponent on the ground.
    • SB version ~ Thanatos appears in front of the opponent regardless of position, including airborne opponents.
  • Finally Elizabeth's universal IK, Megidolaon (222C+D), now only requires one hit to activate rather than 3.
    • Not sure why you would use this when you have Mahamaon is right there but the option is there.
  • Strategies:

    • I'm barely over exaggerating when I say you can just 5AAAA > 236236C to win every round if you have at least 75 SP.
      • On a more serious note, any confirm into 214A+B can lead into Hama 236236C thus winning you the round.
      • 214A+B > 236236C is a true instant killing combo. :)
    • If you haven't already won the round by the time you get 50 SP, use 236236A > 214214A to instantly receive awakening buffed speicals, full meter and increased defense from awakening.
      • Note - SB Mabufufyne (214A+B) goes fullscreen when Liz is awakening, making the aforementioned "Liz TOD" even more dangerous.

    Changes:

  • Permanent Red Axe level.
  • 5B, 2B and DP (B+D) are faster and unblockable.
  • Strategies:

    • Just raw 236236D lol
      • This kills all characters except Boss Liz, Marg, Akihiko and Kanji.

    Changes:

  • Asterius (her persona) acts faster and deals more damage.
    • This allows for quicker canceling between moves as well.
  • Changes:

  • Any sword attack inflicts Rage, Panic, and Charm.
    • This includes Throw, Throw Escape, AOA, and Guard Cancel.
  • Faster recovery on most moves, including DP (Air and Ground versions), Soaring Fang, and Moon Smasher.
  • Changes:

  • Any sword attack inflicts Silence, Fear, and Poison.
    • This includes Throw, Throw Escape, AOA, and Guard Cancel.
    • This means that Boss Minazuki gets unburstable combos, extra damage from posion and fatal counters and also untechable throws but due to the improvements to his Command Grab his universal throw is rendered fairly obsolete.
  • Faster recovery on most moves, including DP (Air and Ground versions)
  • A and B Dagger Throw sends 2 daggers at once instead of the usual 1.
    • SB Dagger Throw sends 4 instead of the usual 2.
  • Drain (214C/D, his command grab) can be combo'd into as it now can grab opponents in hitstun, blockstun, and even midair .
  • C Wings of Purgatory (236236C) is unblockable.
    • It's still a projectile however so it can be comfortably rolled through.
  • Dream Fog (214214C/D) will now always trigger regardless of counter.
  • Changes:

  • Adachi starts with the Magastu Mandala Buff. Magatsu Mandala Buffs reminder:
    • Adachi's Persona will apply different status ailments on all Persona-related normals, specials and supers. When active, a purple icon of Magatsu Izanagi appears above Adachi's meter.
      • Poison: 5C, 2C, j.C, j.2C, Heat Riser.
      • Shock: 5D, 2D, j.2D, Megidola.
      • Panic: Atom Smasher, Magatsu Mandala.
      • Silence: Ghastly Wail, Magatsu Mandala.
      • Fear: 5C (ground stomp), 2C (ground slam), j.2C (ground slam), Atom Smasher, Heat Riser, Ghastly Wail.
  • Heat Riser buffs Adachi's damage by far more than just 10%. Current amount unknown.
  • Like Naoto, his SP gain is noticeably higher compared to most other boss characters.
  • Ghastly Wail (214214C/D) does extra damage.
  • Strategies:

    • Hit a jump in j.C, do 5AA > 5B > 5C > Heat Riser (236236A/B) > 5B > Tennis (2C > Hop (2A+C) > j.C) > 5B > 2B > 2C and you will kill any character instantly minus Boss Marg and Liz.

    Changes:

  • Weather buffs are increased.
    • Sunny: Non-Awakening SP skills deal more damage
    • Cloudy: Summoning the Cloud present creates 2 instead of 1 and DP/Throw inflict Shock.
    • Rainy: Passive HP gain.
    • Snowy: Passive SP gain.
  • 5AA is an Overhead.
  • Shining Arrows (214214C/D (Air OK)) sends out way more projectiles and stays active much longer.
  • Chocolate box (It's All Yours > A) does more hits and inflicts Fear on hit.
  • Igor (It's All Yours > C) now inflicts Mute and Rage on hit.
  • Changes:

  • Massively Increased Health (like her sister, Elizabeth) compared to most other boss characters (approx. 25,000)
  • Increased Movement speed.
  • Able to cancel any move into any other move.
  • Margaret now has an additional air action.
    • In other words, she can now triple jump and air dash/backdash out out of a double jump or use two air dashes/backdashes in midair.
  • All hits of 5A now go fullscreen on top of having a larger hitbox.
  • 5B moves and comes out faster as well as causing wall bounce on hit.
  • Sweep (2A+B) is unblockable.
  • Margaret's Furious Action / DP (B+D) changes:
    • Vacuums the opponent in.
    • Can't be teched unlike her vanilla DP.
    • Can be combo'd into fairly easily.
    • Activates through blockstun.
    • Always does 6980 damage regardless of combo scaling or any defensive buffs like Adachi's Heat Riser or the Awakening Defense buff.
  • j.D and j.2D now fire 2 volleys of 3 projectiles ("It's like a Touhou Game").
  • Mediarahan (214214C/D) now fully recovers Health and has armor.
  • Hassou Tobi (214214A/B) is unblockable and also has increased damage.
  • Margaret's Instant Kill, Morning Star (222C+D), now comes out faster, hits fullscreen and is unblockable.
    • It is possible to evade this attack with a well-timed Evasive Action (A+C) and some Furious Actions (B+D).
    • Note: Evasive Action (Roll) is the preferred (and usually safer) way of avoiding this IK.
    • Although, if you're in midair or in recovery, you're screwed.
  • Strategies:

    • Land DP twice lol.
      • (unless you're are playing against Boss Marg and Liz or some higher HP Boss Shadow Type characters)
    • Boss Margaret's DP (Ultra Suplex) is one of if not her strongest move in boss mode, it's so good that most of Boss Marg's gameplan is spent trying to hit it due to it's immense reward and ridiculously strong vacuuming effect.
      • If you land j.2D, you can run up to the frozen opponent (if you are close enough) and use DP on them.
      • In the corner you can use j.2D and if the opponent blocks you can "jail" them and follow up with DP whilst they are stuck in blockstun
      • You can also just use the good old fashioned wakeup DP, which punishes opponents for trying to resume pressure on Boss Marg.
    • If DP is used while you're in the corner after it finishes you can j.2D to "jail" neutral tech, delay tech, forward/back tech options.
      • However, they can tech upwards and get out of that situation entirely.
    • Use full screen 5A to check people, if it hits finish the auto combo but you do not need spend the meter.
      • If 5A is blocked full screen, use 2A+B (Sweep) to unblockable them. After doing so this allows you to close the gap.
      • If not full screen and they block 5A, attempt 5B or use 214B then immediately apon contact on block DP.
    • When you win a round, you gain access to Morning Star (222C+D), Marg's Instant Kill, due to being unblockable and hitting fullscreen it's very match practical. Use this Instant Kill when:
      • Your opponent is in the air.
      • Your opponent has just used an easily punishable move, i.e A Super or a DP.
      • Your opponent has no idea that you can roll the Instant Kill.

    Community Information

    Netplay Conventions

    There are a couple common conventions that are advised when it comes to playing P4U2 online, to ensure the smoothest netplay experience possible for both players.

    Netplay Stages

    The community agreed-upon netplay stages for P4U2 include:

    • Yasogami High School Gate - Night
      • Make sure you are selecting just the NIGHT version, not the DARK HOUR version!
    • Altar (NO Crystal)
    • Music Room (aka "Piano Room")

    Here are their images on the Stage Select screen (in the order mentioned), if you are not familiar with them:
    P4U2 Netplay Stages.png

    Additionally, when you and your opponent first load into a match, you should allow the stage/character intros to play out instead of skipping them. This allows the game some time to sync both players' games, so the beginning gameplay of a match isn't so laggy.

    Finally, the most important of all: Please save all of our souls by plugging in an ethernet cable if you can!

    P4U2.5 Ethernet.png

    Finding content on Twitter

    With the ease of posting videos and discussion to Twitter, it can be helpful to know how to track this information down. Each character in the game has a specific hashtag which people should aim to use when posting tweets for ease of searching. The current list of these hashtags is as follows:
    Aigis #P4U_AG
    Akihiko Sanada #P4U_AK
    Chie Satonaka #P4U_CH
    Elizabeth #P4U_LZ
    Junpei Iori #P4U_JU
    Kanji Tatsumi #P4U_KA
    Ken Amada #P4U_KE
    Labrys #P4U_LB
    Margaret #P4U_MG
    Marie #P4U_MA
    Minazuki #P4U_MZ
    Mitsuru Kirijo #P4U_MS
    Naoto Shirogane #P4U_NA
    Rise Kujikawa #P4U_RI
    Shadow Labrys #P4U_SL
    Sho #P4U_SH
    Teddie #P4U_KU
    Tohru Adachi #P4U_AD
    Yosuke Hanamura #P4U_YO
    Yu Narukami #P4U_YU
    Yukari Takeba #P4U_YA
    Yukiko Amagi #P4U_YK

    Navigation