Guard
Guarding, commonly known as Blocking, is to keep yourself alive.
There are many different types of blocking, and each is useful for different situations. Correctly picking the right one for each situation is critical for survivability.
When a player blocks an attack using any kind of block, they are put into a state called blockstun during which their ability to act is mostly taken away. YRC, Blue Burst, and Deflect Shield can still be used during blockstun.
- Pushback
Guarding an attack also pushes the defender back. This phenomenon is called pushback. The amount of pushback varies by attack, though generally the higher the Attack Level, the more pushback. Some attacks even pull in the defender instead of pushing them back (known as vaccum)! When the defender guards a strike in the corner, pushback is applied to the attacker instead, making sure that the net pushback both characters experience is the same regardless of screen positioning. This corner effect does not apply to projectiles nor partner characters like Zato-1's Eddie.
- Unblockable Attack
Some attacks cannot be guarded against. These generally fall into two categories: throws and unblockables. Throws are proximity based attacks which cannot be guarded against. Unblockables are special strikes which hit opponents even if they guard. Unblockables, such as Potemkin's Heavenly Potemkin Buster GuardAir ThrowStartup12+0Recovery16AdvantageN/A, must be avoided in some way other than air guarding.
Grounded Guard
Hold 4 or 1

- Basic ground guarding is the most common defensive option. Also known as blocking.
There are 2 types of ground guard: standing guard and crouching guard. Standing guard will block high and mid attacks, crouching guard will block mid and low attacks.
- Standing vs. Crouching Guard
Standing guard experiences more pushback than crouching guard. This means that strategically using standing guard during an attacker's blockstring can push the defender out of range sooner and potentially enabling a punish, especially if the additional pushback makes an attack whiff unexpectedly.
On the other hand, crouching guard can be used to stay closer to the attacker and let the defender use their faster, shorter range buttons at an opportune time.
Airborne Guard
Hold Any Backwards Direction while Airborne (1/4/7)
There is no high-low blocking in the air, making it a common place for defenders to go to avoid blocking ground-based high/low/throw mix-up.
That's not to say that being airborne is a fail-safe defensive posture; getting airborne is a risk since jumps have a bit of vulnerable startup, it raises the defender's R.I.S.C. 50% more than ground guarding, and a guarding strike will force the defender into blockstun until landing, plus 19 frames of additional grounded blockstun. Landing blockstun is reduced to 5 frames on air IB or air IBFD. Air guarding certain attacks such as ![]()
![]() push the defender higher into the air, effectively giving the attacker more frame advantage.
push the defender higher into the air, effectively giving the attacker more frame advantage.
This makes repeated fuzzy jump very risky since a defender is likely to guard a strike while jumping and fall into another blockstring with more R.I.S.C. and even more blockstun than if they had guarded normally!
Air guarding projectiles or getting Guard Crushed will not force defenders into blockstun until landing, but if they do land, they will be forced into 5 frames of grounded blockstun. If the defender recovers in the air, then air options are restored.
Cross-up Protection
Blocking can be difficult since the opponent can do tricks to swap sides. However, there is slight leniency to give players time to switch blocking direction: the first 3 frames after the opponent swaps sides (not necessarily in blockstun), they will still block attacks from the opposite direction even if they are holding forward direction (with respect to opponent)! Blocking with crossup protection will continue to be possible after those three frames until blockstun ends (whether the opponent leaves a gap in blockstun or uses a move that Guard Crushes). Other rules for blocking still apply, such as needing to correctly block high/low.
Instant Block
Begin Guarding Right Before An Attack Connects (2 Frame Window)

Instant Blocking is a more powerful, advanced form of blocking. On successful Instant Block, the defender will flash white. Mistiming an Instant Block locks out IBing subsequent attempts until neutral, up, or any forward direction is input for a cumulative 5 frames. While holding down will not progress the lockout timer, inputting any backward direction before the timer is complete will reset the lockout timer.
- Instant Blocking has the benefit of
- Prevents chip damage
- Pushback for the defender is reduced to zero
- Gain twice the amount of Tension on block and increase Tension Balance
- Does not grant bonus Tension if blocking an attack that causes Guard Crush
- Instant blocking a strike in the air reduces the 19 frame landing recovery to 5 frames
IB does not allow you to make "illegal" blocks: you still must block high/low correctly.
While blocking, players can attempt an Instant Block at any point. Think of it as a minigame: time your blocking to the rhythm of the opponent's hits.
Since faster attacks generally have shorter range, Instant Blocking an opponent's attack often creates new punish opportunities. Instant blocking might even be required to punish certain attacks that are at frame disadvantage but cause too much pushback to punish under normal circumstances.
Faultless Defense
While Guarding, hold any 2 attack buttons (except D) or While Guarding, hold FD button

Faultless Defense (FD) is an interesting and highly useful technique. It's often used to negate chip damage, but it has other important uses.
Faultless Defense is often used to end an attacker's blockstring sooner by pushing them out of attack range. An advanced strategy is to make the attack miss by pushing them away with FD, then punish while the attacker is still recovering from the whiffed attack!
- Notable aspects of Faultless Defense
- Consumes Tension while used and on block
- Can not Faultless Defense when Tension Gauge is empty
- Prevents chip damage
- Prevents R.I.S.C. Level from increasing
- Increased pushback for the defender compared to normal blocking
- Extra pushback increases with Attack Level
- Projectile pushback is unaffected
- Air FD increases gravity compared to normal blocking, letting the defender land sooner
Just like with Instant Blocking, you still must block high/low attacks correctly when using Faultless Defense.
Keep in mind that while FD has to be active when the attack connects, any extra time before/after is wasted Tension. Ideally players should press the buttons briefly - slightly longer than a tap - just before the attacker's hit connects. With some practice, defenders can save some Tension by tapping Faultless Defense right before each hit of an attacker's blockstring!
| Level | Gauge Consumption (Strikes) | Gauge Consumption (Projectiles) |
|---|---|---|
| Lv.0 | 250 | 62 |
| Lv.1 | 300 | 75 |
| Lv.2 | 350 | 87 |
| Lv.3 | 400 | 100 |
| Lv.4 | 450 | 112 |
- Tension Gauge maximum value is 10000.
- Holding ground Faultless Defense takes 400 frames to empty the gauge from max, air Faultless Defense takes 200 frames.
- (Holding Faultless Defense in the air consumes twice as much Tension as holding Faultless Defense on the ground.)
- During Instant Faultless Defense, Tension is reduced by the normal amount for Faultless Defense and then increased by the bonus amount for Instant Block.
Instant Faultless Defense
Instant Block while Holding Faultless Defense

Instant Faultless Defense (usually acronymized as IBFD, although some material may refer to it as IFD) is like a combination of both Instant Block and Faultless Defense, minimizing threats from the opponent and pushing them away without giving up any space yourself.
- Consumes Tension while used and on block
- Can not Instant Faultless Defense when you have no Tension
- Prevents chip damage
- Prevents R.I.S.C. Level from increasing
- Pushback for the defender is reduced to zero
- Pushback for the attacker is greatly increased, even more so than defender pushback from Faultless Defense
- Air IBFD increases gravity compared to normal blocking, letting the defender land sooner
- Air IBFDing a strike reduces the standard 19 frame landing recovery to 5 frames
Defenders can start holding the attack buttons/FD button any amount of time before an IBFD attempt, but they must input the directional input with the correct timing (and sufficient Tension).
Deflect Shield
214D with 50% Burst (air OK)

Deflect Shield is extremely powerful defensive option that works against all guardable attacks (high, low, crossups, and guard crush). If an attacker hits the shield -even with a projectile- then they are pushed a large distance away. Since Deflect Shield can be used even during blockstun or guard crush state, it's very useful for two things: escaping any high/low mixups, even mid-blockstring; pushing the opponent away in a blockstring and enabling a punish.
- Deflects all guardable attacks for 29 frames
- Prevents chip damage
- Prevents R.I.S.C. Level from increasing
- Pushback for the defender is reduced to zero
- Pushback for the attacker is greatly increased, even more so than Instant Faultless Defense
- 19 frame recovery, Counter Hit state during recovery
Landing after a successful Deflect Shield does not alter the landing recovery from the blockstun of the move that was deflected, but landing after a whiffed Deflect Shield is treated as performing an action in the air, overwriting any previous landing recovery.
Guard Crush

Guard Crush is a pseudo-blockstun state with some major differences. During Guard Crush, defenders can only block, Deflect Shield or Psych Burst, but it is not a blocking animation in and of itself, so you can be hit during it if you release the block input.
Unlike blockstun, there is no throw invincibility after recovering from a Guard Crush. The defender is still throw invincible during the Guard Crush, but is vulnerable from the first frame after.
Also unlike blockstun, being forced into Guard Crush state in the air does not extend its duration until landing, so it may be possible to recover in the air depending on your trajectory. Similarly, landing after an air Guard Crush does not apply the 19 frame landing recovery that normal blocks have, instead applying a 5 frame landing recovery.
Getting hit during Guard Crush state results in an invalid combo.
Armored Attacks & Guardpoint
Rare attacks specific to certain characters can have one of two attributes that act similarly, but with distinct differences. Armor and Guardpoint allow a character to absorb an attack and continue uninterrupted.
Armor is only found on ![]() Potemkin's Slide Head
Potemkin's Slide Head![]() GuardLowStartup29Recovery24Advantage0, Hammer Fall
GuardLowStartup29Recovery24Advantage0, Hammer Fall GuardAllStartup18~62Recovery26Advantage-9 and Heat Tackle
 GuardAllStartup12Recovery36Advantage-37. When an opponent hits a character in their Armor frames, they aren't able to cancel the attack as they would on hit or block into their Gatling options, Special Moves, or through Jump Cancelling. A character being hit while in armor takes 50% of the damage the attack would've incurred if it hit raw (affected by Guts and Defense modifiers), and Overdrives ignore armor completely, causing the opponent to be hit with full damage and standard hit effects as normal.
Guardpoint is a blanket term referring to moves that have frames where they automatically block incoming attacks, and the specifics can work differently from instance to instance.
The full list of attacks with Guardpoint attributes are:
![]() Anji's Suigetsu No Hakobi
Anji's Suigetsu No Hakobi GuardStartupRecoveryTotal 34~50Advantage- and held versions of Kou
 GuardAllStartup12 [28]Recovery14Advantage- or Fuujin
 GuardAllStartup16 [32]Recovery21Advantage-8 [-6]
![]() Zato's "Oppose"
Zato's "Oppose" GuardAllStartup74 {78}Recovery(Summon Vanishes) [36 Zato]Advantage-
![]() Leo's Held S and H normals
Leo's Held S and H normals GuardAllStartup10Recovery14Advantage0
![]() Sol's Heavy Mob Cemetery
Sol's Heavy Mob Cemetery GuardGround ThrowStartup13+7Recovery49Advantage-
![]() A.B.A's Judgement and Sentiment
A.B.A's Judgement and Sentiment GuardAll (Guard Crush)Startup17Recovery25Advantage+4 and Frenzy and Astonishment
 GuardStartup7Recovery15Advantage-
Of these, Anji's acts more similarly to a Parry like those found on ![]() Baiken, Zato's experiences separate hit/blockstop due to being originated from a puppet. Leo and Sol's Guardpoints take reduced damage from moves that they guard against, which can kill, and neither have any way to avoid this chip damage. Both of A.B.A's guardpoint moves completely negate chip damage, with Frenzy and AstonishmentGuardStartup7Recovery15Advantage- leaving her fully invulnerable through the move's remaining recovery if activated.
Baiken, Zato's experiences separate hit/blockstop due to being originated from a puppet. Leo and Sol's Guardpoints take reduced damage from moves that they guard against, which can kill, and neither have any way to avoid this chip damage. Both of A.B.A's guardpoint moves completely negate chip damage, with Frenzy and AstonishmentGuardStartup7Recovery15Advantage- leaving her fully invulnerable through the move's remaining recovery if activated.
Grounded Movement
Walking
[4] or [6] while on the ground
Walking is the most basic form of movement by holding ![]() or
or ![]() .
.
Characters will continue to walk so long as their player holds down the directional input. 1 and 3 are not valid walk inputs. Each character has a unique walk speed for both forwards and backwards.
One of the main advantages to walking is that it provides fine grain control over one's positioning. By contrast, jumps lock the player into a fixed arc, and runs maintain momentum for a time after the player releases their input.
Because walks can be canceled immediately, they allow the user to block freely after forwards movement, which running on its own does not allow. Another advantage is that walks are usually silent. Without an associated audio cue, walks can be hard to react to.
Running
6[6] while on the ground or 5 or 6 + Dash while on the ground
Running is conceptually similar to walking, but faster and with some negative trade-offs.
Akin to walking, each character has their own running speed and acceleration. Some characters—such as ![]() Potemkin—cannot run at all. Other characters have special alternatives to running. A list of these special cases can be found below.
Potemkin—cannot run at all. Other characters have special alternatives to running. A list of these special cases can be found below.
Although running requires two consecutive 6 inputs, the player can shift their forwards input into a 3 input so long as they maintain a constant forwards input. The player character will continue to run so long as a valid run input is held. If the player releases the run input and does not cancel the run into another action, they will perform a run skid animation.
| Character | Run Type |
|---|---|
| Step Dash | |
| Pseudo-Step Dash | |
| Hover Dash | |
| Cannot Run |
- Run Skid
When ending a run, there is a skidding animation that gives any action done out of it forward momentum how mch. While characters can still block during a skid, they can not walk. Players can choose to stop immediately by spending some meter to immediately cancel a run into Faultless Defense very briefly, then begin walking for more fine grained movement. This technique is known as FD Brake.
Backdash
44 while on the ground or 4 + Dash while on the ground
Backdashes are movement options which provide a quick burst of backwards movement with some invulnerability.
The exact duration of backdashes and invincibility varies between character and will be listed in each character's frame data. The invulnerability for backdashes begins on the first frame of their animation, but does not last long, making them useful to avoid attacks with good timing.
Backdashes travel a fixed distance at a set speed, are not cancelable, and are completely vulnerable for some period in the latter portion of their animation. For these reasons, they are not always preferable to backwards walking.
Aerial Movement
Jumping
Any Upward Direction while on the ground
Jumping is the most basic way to put one's player character into the air.
Players can jump while on the ground, or while in the air. When a character jumps, they are locked into a fixed arc which is determined by the direction of the jump input combined with any momentum they have at the time of the jump. Each character has their own jump physics. These determine the speed, height, and duration of their jumps. Before the character becomes airborne, there is a short Prejump Animation with some limitations, explained in its respective section. After a player jumps, they take on the airborne property, which affects what moves they can use, as well as how they receive incoming hit effects. During the first airborne frame, characters can only guard and not attack. This is only a factor when calculating the fastest input for Instant Air Specials.
Most characters can jump two times before returning to the ground unless they regain their air options.
High Jump
Any Downward Direction > Any Upward Direction while on the ground
High Jumping (aka super jump) travels higher vertically than standard jumping, but in exchange characters cannot double jump (air dash is still available).
High Jump an be done by going from neutral ![]() , then tapping any downward direction (
, then tapping any downward direction (![]()
![]()
![]() ), then tapping any upward direction (
), then tapping any upward direction (![]()
![]()
![]() ). Pressing
). Pressing ![]()
![]()
![]() will change which direction you high jump, just like normal jumping. During a High Jump, characters will automatically turn to face the opponent if you jump over them.
will change which direction you high jump, just like normal jumping. During a High Jump, characters will automatically turn to face the opponent if you jump over them.
It is always best to mix up the two types of jumps to keep your opponent on their toes depending on the situation.
Prejump
Jumps and High Jumps are not instantaneous - before going airborne, characters will enter a standing state called prejump, where they can not block, but are invincible to throws. If hit during prejump, characters enter standing hitstun.
Characters have different amount of prejump frames, but the rule of thumb is that the heavier/slower the character is, the longer the prejump. Most characters have 4 frames of prejump, but exact values can be found in each character's frame data. ![]() Nagoriyuki's high jump has a significantly longer prejump duration than his regular jump, at 10 frames.
Nagoriyuki's high jump has a significantly longer prejump duration than his regular jump, at 10 frames.
It is actually possible to cancel prejump into Specials, Overdrives, Burst, Deflect Shield, and Wild Assault. The reason for this is that attacks that involve an Up input, such as ![]() Leo's Eisensturm
Leo's Eisensturm GuardAllStartup9Recovery33Advantage-28) can be used without going through hoops to hide the jump input (such as whiffing moves beforehand). It also allows players to be slightly sloppy with their inputs and still get specials (ex 2369S instead of 236S).
Air Dash
j.44 or j.66 or Direction + Dash while Airborne
Air Dashes are the near universal burst movement option while airborne. Most characters can air dash once before landing, while others cannot air dash at all. For a breakdown of these rules, see the air options explanation. Each character has a unique air dash with different speeds, durations, unactionable startup, etc. Each character's Frame Data page has these values, and there is also a comaprison table.
To air dash as soon as possible from a grounded state, players use a technique known as Instant Air Dash.
Air Options
Air Options conceptually represent the amount of times a character can jump or dash while in the air without returning to the ground. Most characters have 1 air option; exceptions are listed below.
| Character | Air Options |
|---|---|
| Can air dash 2 times | |
| Can jump 3 times | |
| 8-Way Air Dash instead of Double Jump and Air Dash | |
| Flight instead of Double Jump and Air Dash | |
| Cannot air dash | |
| Cannot Double Jump | |
| Cannot air dash or Double Jump |
- Regaining Air Options
Characters regain all their air options after:
- Touching the ground
- Air blocking an attack and exiting blockstun while airborne
- This is only relevant to air guarding projectiles and Guard Crush attacks
- Air Throw Escape
- Wall Recovery while airborne
Landing Recovery
Some airborne moves have a set amount of landing recovery like ![]() Ky's Aerial Stun Edge
Ky's Aerial Stun Edge GuardAllStartup21RecoveryUntil Landing+10Advantage-.
- This is straightforward; upon landing the character will enter a completely vulnerable landing animation.
What's unique is that even for moves that don't have a specified landing recovery - like most air normals, or just jumping, there is still a unique landing recovery that disables certain actions for limited amounts of time.
- After landing from an empty jump:
- 1~6F cannot do any movement options except backdash
- 7F onwards all actions possible
- After performing an action in the air (double jumping, air dashing, any air attack without specified landing recovery):
- 1~3F after landing is normal recovery (cannot do any action such as blocking, attacking, moving etc...)
- 4F onwards all actions possible
Another quirk about landing in this game is that characters regain their grounded collision box and are considered grounded the frame before landing, meaning that they can be ground thrown the frame before landing and getting hit the frame before landing will result in grounded hitstun. If a character is in a state where they can freely act in the air but will enter a punishable recovery state upon landing, blocking an attack on this frame will result in grounded blockstun, effectively bypassing the landing recovery.
Ground and Air Recovery
Knockdown Recovery
Getting knocked down by most attacks causes a soft knockdown, where the character will instantly roll backwards and quickly recover. A soft knockdown lasts for 30 frames and is fully invincible.
Certain attacks cause a hard knockdown, where the character will lie on the ground briefly before getting up in a fully invincible state. As the character lies on the ground, they are considered in an Off The Ground state and if hit will be knocked backwards into a soft knockdown. Thus most players tend to use this time to set up okizeme rather than continuing the combo. A hard knockdown lasts for 55 frames.
Stagger Recovery
Any Attack Button During Stagger State

When hit by attacks that cause stagger, players can press any attack button when the Stagger Bar empties to recover sooner. There are three different timings for a successful Stagger Recovery, the faster the timing, the sooner the defender recovers from Stagger. The button icon will glow blue for slow timings, red to orange for normal timings, and gold for fast timings.
There is no penalty to attempting multiple times, and the timing is not very strict, so players usually press a few buttons around when the bar empties and can escape ASAP.
Wall Recovery
Direction During Wall Stick

A character in Wall Stick state will automatically recover after 59 frames if not hit by an attack. This recovery is fully invincible while also allowing the player to perform an attack during this invincibility.
- When stuck to the wall, hold a direction to choose what direction to recover:
 /
/ /
/ recovers straight upwards a significant distance
 /
/ /
/ recovers in place
 /
/ /
/ recovers straight forwards a significant distance
If a character gets stuck to the wall while grounded, without being hit by any launching attacks, they will be unable to recover from the Wall Stick and will instead slump to the ground before standing back up with invincibility similar to a standard hard knockdown. Being hit during this slump will cause a Wall Break. Unlike Wall Recovery, any action you do after will not have any invincibility.
During Wall Recovery, the recovering character is invincible during frames 1~24.
- The recovering character has no collision (able to pass through the other player) during frames 1~9.
- The recovering character may perform any attack starting from frame 10, giving a maximum 15 frames of invincibility for the duration of the move.
During Wall Slump, the slumping character is vulnerable during frames 1~27. Hitting them during this window will Wall Break if the attack can Wall Stick.
- If the attack cannot Wall Stick, it applies its usual properties instead. For standard hitstun, the slumping character is considered crouching.
- The slumping character is invincible during frames 28~42. This behaves standard to other knockdowns.
Normal Attacks
Press ![]() /
/![]() /
/![]() /
/![]() /
/![]() to perform normal attacks. Depending on the current state of your character (standing, crouching, jumping, close to opponent), your character will do different attacks. As a general rule,
to perform normal attacks. Depending on the current state of your character (standing, crouching, jumping, close to opponent), your character will do different attacks. As a general rule, ![]() /
/![]() attacks are weak and fast,
attacks are weak and fast, ![]() /
/![]() attacks are strong and slow, and
attacks are strong and slow, and ![]() attacks are overhead and low attacks.
attacks are overhead and low attacks.
- Command Normals

Command normals are performed by pressing a specific direction with a specific button. Every character has at least two command normals. ![]()
![]() is a universal one, and most also have
is a universal one, and most also have ![]()
![]() . Many have a command normal with
. Many have a command normal with ![]()
![]() or
or ![]()
![]() as well.
as well.
6P
Thanks to its frame 1 upper body invulnerability, 6P is useful as an anti-air and as a counter poke. Diagrams of this in action are here.
Many forward-lunging, plus on block special moves, such as ![]() Giovanna's Trovão
Giovanna's Trovão GuardAll [All (Guard Crush)]Startup27Recovery13Advantage+4 [+15] and
 ![]() May's
May's ![]() Mr. Dolphin Horizontal
Mr. Dolphin Horizontal GuardAllStartup25Recovery20 (18 OH)Advantage+7, are vulnerable to 6P. In addition, many
 ![]() attacks extends the character's hurtbox further out than the animation implies, due to the weapon itself having a hurtbox. Experiment with 6P - you might be surprised at how many attacks can be beaten with it!
attacks extends the character's hurtbox further out than the animation implies, due to the weapon itself having a hurtbox. Experiment with 6P - you might be surprised at how many attacks can be beaten with it!
Other command normals do not have the homogeneity of 6P. Take 6H, for example. ![]() Sol's 6H
Sol's 6H GuardAllStartup9Recovery43Advantage-27 is a risky punishment tool with good speed and range.
 ![]() Faust's 6H
Faust's 6H GuardHighStartup25Recovery44Advantage-34 is a tricky overhead with huge range.
 ![]() Giovanna's 6H
Giovanna's 6H GuardAllStartup17Recovery5 + 10 After LandingAdvantage-10 is a unique, rekka-style normal used for juggle combos and Roman Cancel mix-ups. You will have to study each of your character’s command normals to figure out how to use them.
Gatling Combination
Most normals can cancel into other normals, this is known as a Gatling Combination, or Gatling for short.
There can be character-specific variations, but the general rule is:
- On the ground
 and gatling into themselves, each other, and command normals
 and gatling into
  normals, and command normals
- Close
 gatlings into normals,
  normals, normals, and command normals
 - Far and gatling into normals
- In the air
- Jumping gatlings into itself
- Jumping gatlings into jumping
- Jumping gatlings into jumping and jumping
- Jumping gatlings into jumping
It takes some getting used to, but it should feel natural after some practice. Gatlings do not need to be done immediately, players often delay their gatlings to act as a frame trap - baiting overeager opponents to retaliate then hitting them out of the start-up of their attacks. Note that while most normals can gatling even during recovery frames, ![]()
![]() ,
, ![]()
![]() and jumping
and jumping ![]() can only gatling during active frames.
can only gatling during active frames.
Dust Attack
5D on the ground (Chargeable)

Each character's standing ![]() is an overhead attack.
is an overhead attack.
- Dust Attack starts up in 20~28 frames, depending on how long the button is held. On ground hit, it puts the opponent in a floating crumple state that generally cannot be combo'd from without a Roman Cancel, but is even on hit. On block, the attacker is -15.
- Dust Attack (Hold) (a fully charged Dust Attack) starts up in 28 frames, but is more rewarding. On hit, it launches the opponent into the air. On a raw hit, it causes spinning blowback and can be canceled into a Homing Jump. On block, the attacker is -10.
Note: A canceled Dust Attack cannot normally trade with enemy strikes. If a character's Dust Attack and their opponent's strike are both active on the same frame, the opponent's strike will win and Counter Hit.
Homing Jump
Hold Up after Raw Fully Charged Dust
Leap into the air and chase after the opponent following a raw, fully charged Dust Attack.
During a Homing Jump:
- All air normals can gatling into any air normal
- Canceling an air normal into itself while the opponent is in hitstop performs a unique Finish Blow attack that spikes the opponent down for a hard knockdown and grants Positive Bonus
- The attacker gets an extra air jump or air dash
 Nagoriyuki gains an air jump, but
  Potemkin and Nagoriyuki do not gain an air dash
 Bedman? does not gain an air jump, but gains an extra use of their 8-way air dash
- All air normals become jump cancelable and air dash cancelable if they weren't already (except command normals)
- Homing Jump duration will be shorter the closer the opponent is to the corner
After the Homing Jump, the characters Area Shift and land in the middle of the stage like after a Wall Break.
- If Finish Blow is used, the opponent will crash down and the attacker will land on the opposite side with a frame advantage of +23.
- If the opponent leaves the screen without being hit by a Finish Blow, both characters float to the ground, the opponent rolls and both characters recover at the same time
Typically a Homing Jump combo uses the extra jump and ends with the Finish Blow. ex: j.![]() > j.
> j.![]() > jc, j.
> jc, j.![]() > j.
> j.![]() > jc, j.
> jc, j.![]() > j.
> j.![]() > Finish Blow
> Finish Blow
Sweep
2D on the ground

Sweeps are attacks that must be blocked low and cause a hard knockdown on hit.
A hard knockdown gives the attacker lots of time to set up okizeme. Comboing into a sweep is usually trading damage for okizeme since there are very few ways to combo from it without spending Tension on a Roman Cancel.
Throws
Throws are proximity based attacks which the opponent cannot guard against. In order to throw an opponent, a few conditions must be met:
- The players must be in a similar grounded or airborne state.
- To throw a grounded opponent, the attacker must also be grounded.
- To throw an airborne opponent, the attacker must also be airborne.
- The defender must not have throw invulnerability.
- The defender can be ground thrown while in Stagger.
- The defender must be within the throw's range (see below).
If all of the conditions are met, then the attacker can hit the opponent with a throw.
Normal Throws
6D or 4D (Air OK) Within close proximity of an opponent

Normal throws start up in 2 frames, inflict a hard knockdown, and are in Counter Hit state on whiff. Normal Throws cannot be performed with diagonal inputs (1D, 3D, etc.).
Ground throws used offensively to break though a guarding opponent, while they are used defensively to challenge the opponent's pressure thanks to their fast startup.
Air throws often give people trouble because they are not quite as easy to position as ground throws. The ideal way to air throw someone is to be slightly below them and rising up to meet them. Typically if you are above the opponent, you will not be able to throw before they can. Thus air throws are often used as an anti-air as well as an air-to-air tool when slightly below the opponent.
On top of the usual whiff recovery, air throws also have 10 frames of punishable landing recovery on whiff, although the user is not in Counter Hit state.
Command Throws

Some special moves have the throw property. Potemkin's Potemkin Buster GuardGround ThrowStartup5Recovery37Advantage- and Zato-1's Damned Fang
 GuardGround ThrowStartup6Recovery38Advantage- are two examples of such throws.
These throws cannot be thow escaped and they typically have other unique properties, such as higher damage, more start-up, and more range. They also have throw invincibilty themselves, and will therefore beat a normal throw attempt.
- Hit Grabs
Technically not throws but are often mistaken for them, these are strikes that go into a throw animation on hit A.B.A's 214H GuardAll (Guard Crush)Startup12Recovery30Advantage+2. Deflect Shield will work against these attacks since they are strikes.
Throw Invulnerability
Characters cannot always be thrown. Below is a list of situations when a character cannot be thrown:
- During prejump
- During blockstun plus 5F after
- During hitstun plus 5F after
- During Knockdown plus 5F after
- When they have Throw invulnerability or Full invulnerability
- Common moves with Throw/Full invulnerability include Command Throws, Overdrives, and Burst
- Some ground attacks also discretely count as being in the air, such as
 May's 6K
 GuardHighStartup28Recovery6Advantage+2. These moves can't be ground thrown, but CAN be air thrown.

Priority of Strike vs Throw vs Command Throw
When two strikes hit each other on the same frame, either a clash happens or both characters get hit, but what happens when throws are added to the mix?
- Throw vs Strike: The throw will always win. This is the reason why wakeup throw works in XRD. Since throws are instant, a throw can beat an opponent performing a meaty on you.
- Normal Throw vs. Normal Throw: A Throw Clash occurs.
- Normal Throw vs. Command Throw: The command throw will always win.
- Command Throw vs. Command Throw: Both throws whiff for that frame. Meaning a command throw with more active frames will win in the end.
Throw Clash
Input Throw While Being Thrown (10 Frame Window)

Inputting a normal throw at the same time as an opponent will cancel out the throw and make both characters back off and recover at the same time. This is known as a Throw Clash or Throw Break.
- Only normal throws can be broken; command throws cannot be broken.
- Throw clashes CANNOT be performed if thrown during Faultless Defense.
- Throw clash CANNOT be performed while in Counter Hit state or while recovering from a move, so unsafe attacks are still unsafe.
- The throw clash animation is 31F and fully invincible.
- Air throw clash will restore air options for both characters.
Cancels
There are many types of cancels. A cancel is the act of interrupting the current action and starting a different one.
While most cancels are available on hit/block, some are available on whiff, and a rare few are even only available on block!
- Gatling
- See Gatling Combination for more details
- Special Cancel
- Most normal attacks can cancel into specials, Overdrive, and Wild Assault. This is generally used to create combos and blockstrings, but can have other applications as well.
- Note that while most normals can be special canceled even during recovery frames, , and jumping can only be special canceled during active frames.
- Most special moves can be canceled into from normals, but there are exceptions, such as
 Sol's Night Raid Vortex
 GuardAllStartup15~31 [32]Recovery32Advantage-17 and Fafnir
 GuardAll (Guard Crush)Startup24Recovery16Advantage+11.
 - Jump Cancel
- Some normal attacks can cancel into jump and super jump. This is used in combos as well as pressure.
- Air attacks can only be jump canceled when the character has the air option available
- Projectile normals (Ky and Jack-O's j.Ds) can be jump canceled once the projectile touches the opponent.
- Prejump Cancel
- Prejump can be canceled into specials, supers, Wild Assault, and Burst.
- This is useful for canceling into Special attacks that can not normally be canceled into such as Night Raid Vortex, by c.S, input Jump, cancel into Night Raid Vortex during prejump.
- Dash Cancel
- Some attacks can cancel into a unique ground dash with a fixed duration that varies by character (see character's frame data for more info).
- Some airborne attacks can cancel into forward air dash.
- Can only dash cancel if the character can run/step dash/air dash (sorry Nagoriyuki and Potemkin).
- Projectile normals (Ky and Jack-O's j.Ds) can be dash canceled once the projectile touches the opponent.
- Millia is special and can air dash cancel into either forward or backward air dash.
- Roman Cancel
- See Roman Cancel for more details
- Kara Cancel
- Normals and Ground Dash Cancels can kara cancel into Special moves, Overdrives, Wild Assault, Faultless Defense, Deflect Shield or Psych Burst during their first 3 frames of start-up. Taunts are considered a special move.
- Special moves can be kara canceled into Overdrives during their first 3 frames of start-up.
- Clash
- See Clash for more details

Roman Cancel
Any 3 attack buttons (except D) with 50% Tension
Roman Cancel is a mechanic that allows you to cancel actions that are not normally cancelable at the cost of Tension. The Roman Cancel system in Guilty Gear -Strive- is designed to be multifaceted and comes in various colors. Each color of Roman Cancel releases a shockwave in a circle around your character with different properties and uses.
| Color | Tension | Startup | Recovery | On-Block | Slowdown | Cancel | Situation |
|---|---|---|---|---|---|---|---|
 Blue |
(effect starts super freeze 20F) |
| |||||
 Red |
(effect starts super freeze 25F) |
| |||||
 Purple |
(effect starts super freeze 20F) |
| |||||
 Yellow |
(effect starts super freeze 12F) |
|
Dash Input Roman Cancel
Dash Up/Down/Left/Rigth just before Roman Cancel

Also referred to as "Drift Roman Cancel". Moves the character up/down/left/right during Roman Cancel's super freeze.
- Available for any Roman Cancel except Yellow.
- Can only drift up, down, left or right. Diagonal inputs are ignored.
- Direction + Dash macro or Direction×2 both work. 5 + Dash macro is a forwards drift.
- Red Roman Cancel shockwaves will launch the opponent differently on hit depending on the dash input chosen.
- The opponent launches up and away if you don't drift, lower and much farther away if you drift forward, higher and much closer if you drift backwards, much lower and closer if you drift downward, and much higher and closer if you drift upward.
- Launch duration on a standing opponent: Up (68F) > Back (62F) > Neutral (55F) > Forward (48F) > Down (42F).
Cancel the Roman Cancel
Input attack during Roman Cancel's super freeze

Also referred to as "Fast Roman Cancel" or "Quick Roman Cancel". It is referred to as "Roman Cancel Cancel" in the game tutorials.
- Available for any Roman Cancel except Yellow.
- Inputting a move during a specific window of the Roman Cancel's super freeze (when the initial effects from a Roman Cancel disappear but before the shockwave occurs) cancels the super freeze directly into the inputted move.
- Tension rapidly drains during super freeze at a rate of 2% per frame. By canceling the Roman Cancel, players can retain retain some Tension. The Roman Cancel will spend between 36% and 48% Tension depending on how soon it is canceled.
- Input buffer does not apply to this window.
- Still applies a reduced amount of slowdown at close range, even without the shockwave.
- Can perform charge inputs without charging, as long as the charge direction is input before the Roman Cancel begins (or before hitstop ends). For example, May can 46H instead of [4]6H.
- Preserves momentum from before the Roman Cancel, including from RC Drift.
- Combined with RC Drift to move slightly in a direction before canceling.
| Color | Slowdown (No Cancel) | Slowdown (Cancel Frame 1) | Slowdown (Cancel Frames 2~7) |
|---|---|---|---|
| Blue | 59F | 33F | 31F |
| Red | 39F | 23F | 21F |
| Purple | 19F | 13F | 11F |
Yellow Roman Cancel
Roman Cancel during Blockstun (air OK)
Yellow Roman Cancel is used to stop an attacker and reset the momentum of the match. Yellow Roman Cancels can not be performed during Guard Crush state. Upon activation, the defender creates a shockwave that forces the attacker into a Guard Crush state, granting the defender massive frame advantage (+10 on ground hit). Yellow Roman Cancel is a useful tool for challenging an opponent’s pressure, especially for characters that are lacking in character-specific tools.
However, since YRC is -16 on block and leaves the defender in Counter Hit state, astute attackers can block YRC on prediction and punish it heavily. Practice utilizing all of defensive options available so as to not end up over relying on Yellow Roman Cancel and burning Tension too quickly.
- On hit, Yellow Roman Cancel slows down the opponent for 10 frames and puts them in Guard Crush state for 43 frames including slowdown, granting the user a frame advantage of +10 on ground hit.
- In the extremely rare case that a Yellow Roman Cancel is combo'd into, it will launch the opponent instead.
- Yellow Roman Cancel applies 50% forced proration on hit, so even if the opponent doesn't block in Guard Crush state, the damage is greatly reduced.
- On block, Yellow Roman Cancel is punishable at -16 and leaves the user in Counter Hit state during their recovery.
- Hits opponents when invincible.
- Hits based on a proximity check to an opponent's collision box, similar to a throws. This means it cannot hit extended hurtboxes from long range attacks.
Special Attack
Motion Input + Button

Special attacks are fancier attacks that have special properties such as invincibility or unique movement.
Each character's special attacks are unique and are explained in more detail in each character's page.
There are two main categories of special move inputs:
- Command-type inputs: Requires the player to input directions in a specific order, then input a specific attack button.
- Charge-type inputs: Requires the player to hold or for 30 frames, then input the opposite direction ( and respectively) plus a specific attack button.
There are a few common qualities that special moves share:
- They do 5% of their base damage as chip damage on block unless the defender uses Faultless Defense or Instant Block.
- They build a little bit of Tension immediately when inputted.
- They can be kara canceled into Overdrives during the first 3 frames of the animation
Wild Assault
236D with 50% Burst (Chargeable)

Wild Assaults are fast, forward-moving attacks that can be canceled into from any special cancelable move. They drain 7.14% of the opponent's Burst Gauge on hit or block. A fully charged Wild Assault launches grounded opponents on hit.
There are three different types of Wild Assault, each with different properties. Each character has a specific type as follows:
| Color | Characters | Damage | Startup | Active | Recovery | On-Block | Cancel | Invuln |
|---|---|---|---|---|---|---|---|---|
| Orange | 30 [50] | 16~28 [29] | 3 | 20 | -4 | Yes | ||
| Blue | 30 [50] | 20~31 [32] | 3 | 20 | +13 [+17] | Yes | ||
| White | 30 [50] | 20~31 [32] | 3 | 20 | +7 [+12] | No | 9~22F [9~34F] Strike/Projectile |
- Orange Wild Assaults start up faster, making them excellent combo extenders, and charged hits launch more horizontally.
- Blue Wild Assaults inflict stagger on an uncharged ground hit and Guard Crush on block, creating advantageous situations.
- White Wild Assaults gain strike invincibility from frame 9 onwards, knock the opponent away on hit when uncharged, and inflict Guard Crush on block.
Both Orange and Blue Wild Assaults can be canceled into either normals, specials, jumps, or backdash on hit or block. Doing so also grants forward momentum for any action that doesn't move backward, enabling certain combo conversions that would be otherwise impossible. Orange Wild Assaults grant a massive amount of momentum, while Blue Wild Assaults grant a small amount.
When used to break the wall, opponents are in a hard knockdown state after the Area Shift, similar to when being wall broken by Overdrives.
Psych Burst
Any Attack + D with full Burst Gauge
While at first glance, Bursts merely look like a "combo breaker", there is actually much more to them. There are two different types of Bursts: Blue and Gold. Both have different effects, and understanding how each can be used is crucial to high-level play.
The Burst will be blue or gold depending on the character's current state. The differences between each are described below.
- R.I.S.C. Level resets on activation.
- Psych Bursts become airborne on frame 1.
- Gold Burst has an Attack Level of 4, Blue Burst has an Attack Level of 3.
- Gold Burst has 16 frames of hitstop, Blue Burst has 15 frames of hitstop.
- Recovery, On-Block and On-Hit values listed are while initially grounded.
- If activated while airborne, recovery is until landing + 9 frames after landing.
- If activated while airborne, Gold Burst is fully invincible until landing.
Gold Burst
Burst during Neutral State (Air OK)

Hitting the opponent with Gold Burst will instantly put the user in Positive Bonus. Gold Bursts are great to use as a wakeup option since they are only -2 on block.
- Can not be combo'd into
- Grants Positive Bonus on hit
- Resets R.I.S.C Level
- Unlike Blue Bursts, fully invincible until landing recovery
Blue Burst
Burst during Blockstun or Hitstun (Air OK)

Using a Blue Burst can often save a player from taking massive damage, or ultimately receiving the round-ending blow. A common method of doing so is canceling attacks with jump cancels or Roman Cancels, then blocking the Burst and punishing the recovery.
If the opponent is in a completely invulnerable state, the shockwave can still hit the opponent's collision box instead of their hurtbox and ignore any type of shield or armor, which results in some invulnerable skills, such as Overdrives, still being hit during their invincibility frames.
- Shockwave extends the full length of the screen
- Resets R.I.S.C Level
- Fully vulnerable after recovery, while falling, and during landing recovery
Disabling Blue Burst

Bursts can be temporarily disabled even with a full Burst Gauge. A red X will cover the Burst Gauge during this time.
Bursts will be disabled while:
- Being thrown
- Being hit by a hitgrab
- Being hit by an Overdrive
- Being hit by attacks that force the opponent into non-standard hitstun, such as a Wall Stick state
Overdrives
Motion Input + Button with 50% Tension

Overdrives (commonly referred to as supers) are attacks that are even more powerful than special attacks.
Some Overdrives are useful as reversals like ![]() Ky's Ride the Lightning
Ky's Ride the Lightning GuardAllStartup8+1Recovery99Advantage-82, while others power up the character like
 ![]() Ky Kiske's Dragon Install
Ky Kiske's Dragon Install GuardAllStartup11+1Recovery25Advantage+4. On start-up, Overdrives freeze the game temporarily to show the character doing a fancy pose or an animated cut-in before attacking. This is commonly referred to as "super flash" or "super freeze". Super freeze also has a special input buffer making these attacks not a good "surpise" attack since they easily reactable during neutral.
Overdrives that hit the opponent will Wall Break on the last hit if the opponent collides with the wall regardless of Wall Stick (with the opponent in a hard knockdown state after the Area Shift), although it's worth noting that not all hitstun states collide with the wall for their entire duration, even if the character in question physically touches the wall. Distinct from the last hit, any other hit is fixed to not Wall Break, even if they hit an opponent in Wall Stick state.
Tension Gauge

Tension is a highly important resource in Guilty Gear. Knowing each of the features and subtleties of the Tension Gauge system is a definite requirement for high-level play since it directly affects many of your attack options. The Tension Gauge starts every round empty, so don't be afraid to use it all each round.
The Tension Gauge ranges from 0 to 10000 and is divided into two sections, each representing 50% (5000) Tension. The gauge displays one gear for each metered action you can take, for a maximum of two.
- Gaining Tension
Perform some type of offensive action to gain Tension. This includes attacking the opponent, or simply advancing towards them. As a general rule: the more aggressive the action against the opponent, the faster the Tension Gauge will fill up. Performing these kinds of actions increase Tension Balance, which in turn dictates the amount of Tension gained.
- Moving towards the opponent slowly builds Tension
- The rate of gaining Tension varies by character
- Clashes or being taunted by an opponent builds 10% Tension
- Normal moves build Tension on hit or block
- Special moves build Tension on startup in addition to on hit or block
- The amount of Tension gained varies by special
- Being in Positive Bonus automatically builds Tension, even during hitstop
- Getting hit by an attack builds a small amount of Tension
- Blocking builds a small amount of Tension, Instant Blocking doubles it (except against Guard Crushes)
- Guard Crushes build Tension identically to other attacks of the same Attack Level
For character or move-specific values, please consult the character's Full Frame Data page for more details.
| Level | On-Block Tension | On-Hit Tension |
|---|---|---|
| Lv.0 | 150 | 300 |
| Lv.1 | 200 | 400 |
| Lv.2 | 250 | 500 |
| Lv.3 | 300 | 600 |
| Lv.4 | 350 | 700 |
| Notes: Tension Gain when blocked by an airborne opponent uses On-Hit values. Tension Gain is halved for jumping normals (air specials are unaffected). Tension Gain is increased by 50% on Counter Hit. | ||
- Spending Tension
- Roman Cancels cost 50% Tension
- Canceling the Roman Cancel costs 36~48% Tension
- Overdrives cost 50% Tension
- Faultless Defense consumes Tension on use and on block
- Going into Negative Penalty will remove all of your Tension
- Tension Gain
Tension Gain is a multiplier applied to attacks and other action that gain Tension. There are a few things that affect Tension Gain including Tension Balance, distance from opponent and R.I.S.C. Level. All 3 of these values are multiplied together to create a final Tension Gain multiplier.
Tension Balance × Distance Modifier × R.I.S.C. Level Modifier = Tension Gain
- Tension Balance
The more offensive actions taken, higher the Tension Balance. Aside from simply attacking and advancing towards the opponent, using Overdrives and Instant Blocks greatly increase Tension Balance. Conversely, retreating from the opponent at a distance without attacking will decrease Tension Balance, and by extension, the Tension you will gain. For example, Sol will lose approximately 1100 Tension Balance when backdashing next to the opponent, and approximately 2000 Tension Balance when backdashing at mid range from the opponent.
| Tension Balance | Tension Gain |
|---|---|
| < -20000 | 50% |
| ≥ -20000 | 70% |
| ≥ -15000 | 80% |
| ≥ -10000 | 90% |
| ≥ -5000 | 100% |
| ≥ 5000 | 110% |
| ≥ 10000 | 120% |
| ≥ 15000 | 130% |
| ≥ 20000 | 150% |
| 25000 | Positive Bonus |
| Level | On-Block (Defender) | On-Block (Attacker) | On-Hit (Attacker) |
|---|---|---|---|
| Lv.0 | 10 | 15 | 40 |
| Lv.1 | 20 | 35 | 90 |
| Lv.2 | 30 | 55 | 140 |
| Lv.3 | 40 | 80 | 200 |
| Lv.4 | 50 | 100 | 250 |
|
Note: Tension Balance Gain is doubled on Counter Hit. | |||
- Tension Balance range is -25000 to 25000.
- Positive Bonus is only received upon performing an action such as landing an attack or clashing, and won't passively occur from movement alone.
- Positive Bonus keeps Tension Balance at 25000 for the entire duration regardless of player action.
- Once Positive Bonus ends, Tension Balance is reset to 12500.
- After receiving a Negative Penalty, Tension Balance is reset to 0.
- Overdrives immediately grant 5000 Tension Balance on activation.
- Roman Cancels, whiffed attacks, and getting hit does not change Tension Balance.
- Instant Blocking grants an additional 1000 Tension Balance on top of the amount gained from normally blocking the attack.
- The farther away from the opponent, the faster Tension Balance naturally decreases.
- Tension Balance automatically decrease and eventually reset back to 0 if standing still regardless of current Tension Balance.
Full details on how actions modify Tension Balance are currently unknown, but it is believed to function similarly to previous titles. See the Xrd section for details.
- Distance
The further away from the opponent, the less Tension gained.
- Outside of round start range (≥504 distance) and until 3/4 screen away, the amount of Tension characters build is reduced to 80%.
- At 3/4 screen away (≥1009 distance) or further, the amount of Tension characters build is reduced to 60%.
- R.I.S.C. Level
The higher the R.I.S.C. Level the more Tension gained.
| R.I.S.C. Level | Tension Gain Increase |
|---|---|
| 0% or less | 0% |
| 1% to 50% | +20% |
| 51% to 74% | +50% |
| 76% or more | +100% |
Tension Cooldown
After using any Roman Cancel or Overdrive, the amount of Tension any action builds is reduced by 90%. The duration of the cooldown varies based on what is used, and begins once the move has fully recovered or is interrupted. Using another cooldown-causing action during cooldown will set cooldown timer to whichever duration is longer.
| Move | Tension Cooldown Duration |
|---|---|
| Blue Roman Cancel | 120F (2 seconds) |
| Purple Roman Cancel | 240F (4 seconds) |
| Red Roman Cancel | 240F (4 seconds), or until opponent leaves hitstun |
| Yellow Roman Cancel | 480F (8 seconds) |
| Overdrive (Standard) | 180F (3 seconds) |
| Overdrive (Extended) ※ | 460F (7 2⁄3 seconds) |
| Negative Penalty | 600F (10 seconds) |
| Note: If you cancel the Roman Cancel, the duration is reduced by half. | |
※: Most Overdrives use a standard 180F duration, but a few exceptions exist that use a much larger 460F duration, including:
- Potemkin's Giganter Kai
 GuardAllStartup10+1Recovery17Advantage+100
  Zato-1's Sun Void
 GuardAllStartup11+14RecoveryAdvantage+3
 Jack-O's Cheer Servant On
 GuardStartup3RecoveryTotal 15AdvantageSee Notes
 Happy Chaos' Super Focus
 Guard-Startup5RecoveryTotal 11Advantage-
 Testament's Nostrovia
 GuardAllStartup11+19RecoveryTotal 53Advantage+63
- Bedman?'s call 13C
 GuardStartup4RecoveryTotal 14Advantage-


While almost all moves only begin Tension Gain Penalty from after recovery, ![]() Sol Badguy's Heavy Mob CemeteryGuardGround ThrowStartup13+7Recovery49Advantage- is unique and begins it immediately after super freeze, giving it a functionally much lower duration.
Sol Badguy's Heavy Mob CemeteryGuardGround ThrowStartup13+7Recovery49Advantage- is unique and begins it immediately after super freeze, giving it a functionally much lower duration.
Positive Bonus

By breaking the wall, hitting the opponent with a Finish Blow or Gold Burst, or maxing out Tension Balance, characters enter Positive Bonus state. The HUD will show "POSITIVE" in the corner of the screen next to your character's portrait, and the character will have the following buffs:
- Lasts for 5 seconds (300 frames)
- Automatically gain Tension over time, at 8.4% Tension per second
- Increases even during move hitstop
- Tension Gain Rate increased by 50%
- Tension Cooldown duration decreased by 90%
- Damage for all attacks increased by 10%
- Damage taken from all attacks decreased by 10%
- Automatically gain Burst over time, at 4.8% Burst per second
Needless to say, this is an extremely powerful state, allowing the player to build a huge amount of Tension and spend it all without fear of Tension Gain penalties. This creates situations where players can conceivably pressure the opponent and then buil up enough Tension to Roman Cancel or Overdrive to extend that pressure, or open the opponent up and still have Tension to spare on converting the hit into a full combo. Even if you are put on defense, the enormous Tension Gain and reduced damage taken makes it much easier to escape pressure and avoid defeat.
Negative Penalty

By continually performing actions that lower your Tension Balance, you enter Negative Penalty state.
Actions that lower Tension Balance include consistently attempts to walk back, backdash, or air dash backward at range from the opponent (or sits in one place and does nothing). When near Negative Penalty state, "DANGER" will appear in the corner of the screen next to the character's portrait. If they keep avoiding all contact, the HUD will show "NEGATIVE", and the character will enter Negative Penalty state:
- Immediately lose all stored Tension and Burst
- Enter Tension Cooldown for 10 seconds (600 frames)
Keep-away or run-away tactics will not incur Negative Penalty if the player is actively using some form of offense. Even if it's passive, it's more than enough to not get penalized. For example, if an Axl player remains full screen and tries to keep the opponent away from him using long-range attacks, he will not get penalized.
Burst Gauge

This gauge is used to perform a Wild Assault (consuming 50% of the Burst Gauge), a Deflect Shield (consuming 50% of the Burst Gauge) or a Psych Burst (consuming 100% of the Burst Gauge). Guarding or getting hit by a Wild Assault will also depete the Burst Gauge by 7.14%.
The Burst Gauge starts the match 100% filled and is carried over between rounds; using Burst at the end of one round, will leave the Burst Gauge at the beginning of the next round!
The Burst Gauge is 15000 units. There are two ways for the Burst gauge to increase: over time, and when taking damage. Expanded explanations for each are below:
- Building Burst Over Time
The Burst Gauge will passively fill over time. The rate at which the gauge fills depends on how much life the character has:
- 100%~51% life = 30 Burst units gained every 15 frames
- 50%~26% life = 50 Burst units gained every 15 frames
- 25% life or less = 60 Burst units gained every 15 frames
During Positive Bonus, the Burst Gauge also gains 180 Burst units every 15 frames.
The less health you have, the faster the Burst Gauge will increase. Keep this in mind when low on health and Burst Gauge is nearly filled. It may be beneficial to play defensively for a few extra seconds so your Burst will be ready for the next round (if there is a next round)!
- Building Burst While Taking Damage
The amount of Burst Gauge gained by getting hit is proportional to the base damage of the attack, increasing by 5% per hit in the combo. The full formula is given below:
(50 + Damage × 5) × (1 + (Hit Count - 1) × 0.05)
Some attacks deal additional scaling when used as the first move in the combo. Subsequent hits in the same combo will have an increased hit count value for Burst Gain calculation.
Universal examples include:
- : Hit Count +1
- : Hit Count +1
- Throw: Hit Count +4
Being wall stuck or wall broken also instantly refills a base 375025% Burst units, increasing scaled by the above formula. Being wall stuck and then wall broken in the same combo only grants the Burst units once.
R.I.S.C Level

R.I.S.C Level increases when guarding attacks and depletes when getting hit. As long as the gauge isn't empty, characters will continue to take unscaled damage from attacks, even in a combo. When the gauge is full, you also run the risk of taking a powerful R.I.S.C. Counter Hit. See here to learn more.
Attack Level
Each attack has an Attack Level. Most attacks in the game deal standardized amounts of hitstun, blockstun, etc. based on their Attack Level. Some moves override these standard values, which will be noted in the frame data.
Use the chart below to determine how much hitstun/blockstun an attack will inflict. The level for each attack can be found in the individual character frame data sections.
| Level | Hitstop | Standing Hitstun | Crouching Hitstun | Ground Block | Air Regular Block/FD ※ | Air Instant Block/IFD ※ |
|---|---|---|---|---|---|---|
| Lv.0 | 11 | 12 | 13 | 9 | Until Landing+19 | Until Landing+5 |
| Lv.1 | 12 | 14 | 15 | 11 | Until Landing+19 | Until Landing+5 |
| Lv.2 | 13 | 16 | 17 | 13 | Until Landing+19 | Until Landing+5 |
| Lv.3 | 14 | 19 | 20 | 16 | Until Landing+19 | Until Landing+5 |
| Lv.4 | 15 | 21 | 22 | 18 | Until Landing+19 | Until Landing+5 |
※: Only applies to strikes. Projectiles follow ground blockstun values unless the defender lands while still in blockstun, resulting in 5 frames of landing recovery.
Note: Blocking a move in the air restores an air action. (i.e. air jump or air dash)
Counter Hit

Hitting a character before the recovery of their attack will be a Counter Hit (CH).
Counter Hits increase the damage of the attack by 10% and may alter attack properties, such as enabling a bounce or a tumble, allowing for stronger combos. Depending on the type of Counter Hit, there may also be additional hitstop or slowdown. "Mid" and "Large" counter hits clear the input register when they occur. These Counter Hit types vary based on the move used.
Throws can not Counter Hit, and will always be considered a punish instead.
Some attacks also have Counter Hit state during their recovery, such as whiffed throws, projectiles, non-attacking specials, or DP Dragon Punch A move that has invulnerability during its startup, long recovery, and a rising motion.s. Conversely, some attacks cannot be Counter Hit at all, namely Overdrives. Even if you are to hit them out of their start-up, the game won't consider it a Counter Hit.
Counter Hit Types
Every strike and projectile has a Counter Hit type, which determines its properties when it Counter Hits. These types are Very Small, Small, Mid and Large. The larger the Counter Hit type, the more dramatic the visuals and audio, with louder audio cues, longer hitstop, longer slowdown; and in the case of Large Counter Hits, camera zoom-in.
Normals obey the following rules:
- Very Small: Projectile normals
- Small: and normals
- Mid: normals, , , and air normals
- Large: Grounded normals and
Character-specific command normals, specials and Overdrives will vary, but strikes are generally Mid or Large, occasionally Very Small, but never Small (with the exception of ![]() Leo's bt.K
Leo's bt.K GuardLowStartup5Recovery6Advantage+3 [+0]), whereas projectiles are always Very Small. Specials that either have a follow-up or are a follow-up are also always Very Small.
Note: "Very Small" is not an official term, and is simply used to distinguish between Small Counter Hits that don't inflict slowdown versus ones that do. For the purposes of in-game R-Code records, landing "Very Small" Counter Hits will count towards your Small Counter Hits.
Counter Hit Slowdown
All types of Counter Hit except Very Small Counter Hits inflict slowdown on the opponent, doubling each frame they experience for its duration. Small Counter Hits apply this slowdown immediately, while Mid and Large Counter Hits apply it after hitstop.
Mid and Large Counter Hits create a unique, cinematic hitstop for easy confirms, overriding an attack's normal hitstop with a set period. In addition, during Mid and Large Counter Hits, the receiver is frozen for an extra frame after the attacker leaves hitstop due to the odd number of slowdown frames.
To determine an attack's base hitstop value, please consult Attack Levels and how they apply to each character's attacks.
R.I.S.C. Counter Hits
Hitting a character when their R.I.S.C. Level is at 100% is a guaranteed Counter Hit ignoring standard rules of Counter Hit state. If the attack is a strike, it automatically becomes a Large Counter Hit (unless the strike locks the opponent's position or leads into a special cinematic state on hit, like a raw, fully charged Dust Attack or a hitgrab like ![]() Potemkin's Heat Knuckle
Potemkin's Heat Knuckle GuardAir Guard CrushStartup12Recovery18Advantage+10~+3). Uncharged Dust Attack also launch the opponent instead of the standard Floating Crumple.
The hit that triggers a R.I.S.C. Counter Hit also deals an extra 20% damage instead of the usual 10% extra caused by other types of Counter Hit.
Invincibility
Attribute Invincibility
Some attacks are invulnerable only to certain types.
For example: The start-up of ![]() Sol's Volcanic Viper
Sol's Volcanic Viper GuardAllStartup9Recovery18+10 LandingAdvantage-28 is invulnerable to strikes and projectiles, but not throws.
 ![]() Millia becomes airborne partway through the start-up of her 6H
Millia becomes airborne partway through the start-up of her 6H GuardAllStartup15Recovery23Advantage-8 and is thus ground throw invincible during its first hit, but not against strikes or projectiles. These situations are very simple to describe - the attack is invulnerable to the specified types during the specified times. To beat these attacks, hit them with a type they are vulnerable to, or hit them before/after the invincible period.
Hitbox Invincibility
Some attacks shrink the hurtbox of characters, even when it looks like they occupy that space.
Most anti-air 6P attacks fall into this category. Because of this, they can lose to air attacks when the opponent is able to get close enough to touch the character's hurtbox. Thus the same 2 attacks can win or lose depending on their spacing and timing. Players need to learn how their attack will behave in different scenarios, decide if the outcome is favorable, then correctly execute.
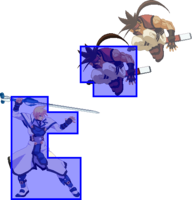
- Example - Successful Anti Air

Sol jumps toward Ky.

Both players attack. Ky's 6P is upper body invincible during startup, Sol's attack misses.

Ky's 6P becomes active and above knees invincible. Sol's attack continues to miss as he falls into Ky's attack and gets hit.


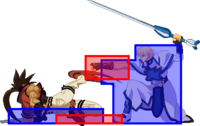
- Example - Unsuccessful Anti Air
Sol jumps toward Ky.
Both delay attacking, Sol is closer to Ky and the ground compared to the above example.

Sol's j.S is now low enough to the ground to hit Ky out of the startup of his 6P.


- Example - Low Profile
Sol sweep can low profile under Ky's 2P.

Sol using upper body invincible of his 6P to go through Ky's f.S.


The frame data will state that attacks have "above knees invincibility", "above chest invincibility", "low profile", etc. to describe how the hurtboxes of attacks grow and shrink.
Activation Range

Some select moves are incapable of hitting an opponent even if the hitbox intersects them, if the attack is a certain distance away. This generally prevents these attacks working on extended hurtboxes from ranges they would otherwise whiff, or to prevent hits from abnormal positions (such as a cross-up attack hitting from same-side).
It should be noted that distance is based on a character's (or projectile's) center, this means some activation ranges can make moves functionally shorter range than its hitbox would suggest against large characters, such as ![]() Potemkin. Additionally distance is always from the front or above, therefore these do not restrict hitting behind or below.
Potemkin. Additionally distance is always from the front or above, therefore these do not restrict hitting behind or below.
If a move is outside its Activation Range on either the X or Y axis, the hitboxes are functionally disabled, meaning it cannot hit, clash, or trigger on-hit cancels.
Attack Types
Attacks come in three broad categories in Guilty Gear that define how they can interact with other attacks.
Strike
Strikes are the most common form of attack in the game like punches, kicks, and sword slashes.
Basically any standard attack is probably a strike. Strikes can clash with other strikes, but not with projectiles and throws. There are rare attacks that are exceptions to these rules, such as ![]() Potemkin's Heat KnuckleGuardAir Guard CrushStartup12Recovery18Advantage+10~+3, which cannot clash with strikes.
Potemkin's Heat KnuckleGuardAir Guard CrushStartup12Recovery18Advantage+10~+3, which cannot clash with strikes.
Strike Clash

A clash happens when you and your opponent's attacks hit each other in a way that both attacks are nullified.
- There are two ways strike clashes happen:
- Disjointed hitboxes hit each other (see here for a more detailed visual example).
- Two of the following normals hit each other even if the hitboxes are not disjointed: , , jumping or jumping .
 Axl's
Axl's  GuardAllStartup7Recovery19Advantage-11 [-3],
  GuardLowStartup10Recovery14Advantage-6, and jumping
  GuardHighStartup9Recovery23Advantage- are exceptions to this rule.


During a strike clash, that hit is nullified, characters are in hitstop for 17 frames, gain 10% Tension, and can cancel into:
- Any attack
- If the attack is jump cancelable, then jump.
- Ground clashes can cancel into forward run and air clashes can cancel into forward air dash.
- Canceling air clashes into double jumps and air dashes requires that air option be available.
- For example, you can not cancel an air clash into a double jump if you have already double jumped prior to the clash.
- Faultless Defense
When clashes happen either the players are unable to react to the clash because it is unexpected, or they understand how the attacks interact well enough to intentionally cause the clash to cancel out the opponent's attack, then retaliate with their own!
Projectile
Projectiles are attacks that are entities independent of the attacker, like ![]() Ky's Stun Edge
Ky's Stun Edge GuardAllStartup13RecoveryTotal 46Advantage-14. Projectiles often have seemingly strange and inconsistent properties. Some moves that would appear to be projectiles, like
 ![]() Testament's Arbiter Sign
Testament's Arbiter Sign GuardLowStartup24Recovery26Advantage-12, are actually not. Additionally, many moves that you would not expect to be projectiles, like
 ![]() Chipp's Alpha Blade
Chipp's Alpha Blade![]() GuardAllStartup29Recovery19Advantage-4, in fact are. Lastly, not all moves that are projectiles can clash with other projectiles.
GuardAllStartup29Recovery19Advantage-4, in fact are. Lastly, not all moves that are projectiles can clash with other projectiles.
Projectile Clash
Each projectile has a clash level. When two projectiles of equal level clash, each projectile will lose one hit (i.e. a 3 hit projectile will become a 2 hit projectile, and a 1 hit projectile disappears). Higher level projectiles will reduce one hit of lower level projectiles without losing any hits.
There are two caveats when equal level projectiles clash: Firstly, projectiles travel fast enough that they will only clash a few times before moving past each other, and neither will truly "win". Secondly, in rare instances the number of hits a projectile can clash with are not equal to the number of hits that projectile will have on hit or block. ![]() I-No's Antidepressant Scale
I-No's Antidepressant Scale GuardAllStartup29RecoveryTotal 51Advantage-8 is a good example, as it can have as many as five hits, but can only clash up to three times.
Projectiles that are Clash Level 5 are a bit wierd: they can clash and destroy lower level projectiles but cannot clash with other Clash Level 5 projectiles.
Some strikes that are intended to nullify projectiles like ![]() Giovanna's TrovãoGuardAll [All (Guard Crush)]Startup27Recovery13Advantage+4 [+15] have strike clashboxes that determine their interactions with projectiles. These moves clash with other projectiles in basically the same manner as projectiles would but are not in themselves projectiles.
Giovanna's TrovãoGuardAll [All (Guard Crush)]Startup27Recovery13Advantage+4 [+15] have strike clashboxes that determine their interactions with projectiles. These moves clash with other projectiles in basically the same manner as projectiles would but are not in themselves projectiles.
Throw
Throws are short ranged unblockable attacks that temporarily turn both characters invincible before dealing damage to the opponent. Throw interactions are described in more detail here.
Other
Attacks from Eddie (Zato-1's shadow) and Happy Chaos' At the Ready are in their own unique category as strike attacks that can not clash. Eddie is also surrounded by a hurtbox, so he can be hit by strikes and projectiles (but not throws).
Taunts and Respects
Taunt button for Taunt 6 + Taunt button for Respect

Both Taunts and Respects can be canceled into any action besides movement and proximity blocking (Faultless Defense and Instant Faultless Defense are still possible), starting from 1 second into the animation for Respects and 2 seconds into the animation for Taunts. They can be used to give a false sense of vulnerability as your opponent may be lured into attacking.
Performing a Taunt will raise the opponent's Tension by 10%.