General Gameplan
Faust is a hybrid zoner, so he can thrive both at a distance and up in his opponent's face, depending on the situation.
At a distance, zone your opponent out with your superior range and strong antiairs. It is generally advised to only toss items after knockdowns like 2H and 2D, because that is the only time it is truly safe. In practice, though, toss items from a distance as often as your opponent will let you get away with it, while maintaining the threat of your pokes. Some items will let you snowball into a string of items that can be very difficult to navigate. Keep an eye on your opponent to take advantage of any openings they show while trying to approach during these item trains.
Items can also create advantageous situations that can help you land your second, arguably more powerful win condition, Snip Snip Snip (236H GuardGround ThrowStartup6Recovery41Advantage-). Take advantage of the afro's unique properties to mix your opponent up with instant overheads, lows, crossups, and regrabs (see the Snip Snip Snip section for more). Use the threat of Snip Snip Snip to push your opponent into your strike options, and vice versa.
Item Toss

It could be anything!

Faust has a unique item mechanic that allows him to throw an item using (236P). The item thrown is determined randomly and can change the flow of battle for either player depending on the item. Be careful, as many of them can also hit you!
Below is a table ordered from most to least impactful items, describing what a Faust should generally do when seeing the item pulled in neutral. For further details on how Items work and what they do, check out the Overview Page.
|
|
|
|
|
|
|
|
|
|


For more detailed strategy advice about playing around items, check out the Strategy Page!
Neutral
Faust's neutral centers mostly around midrange zoning, but can snowball into item spam under the right conditions. Faust is also very good at turning stray hits into a hard knockdown, letting him run his powerful okizeme. Faust's back walk speed is very fast, making it easier to play with distance to make your opponent whiff an attack. Faust is also well equipped to deal with opponents jumping in, with a robust set of antiairs and air to airs. In addition, if opponents refuse to approach out of fear of these strong options, tossing items from full screen can force them to come to you and make you stop.
Control the ground with a mix of your long range and shorter range pokes. Mixing the spacing you play at will make it harder for your opponent to predict and counter your moves. Faust has a large variety of neutral pokes, and using the right one for the situation is vital.

f.S
 GuardAllStartup12Recovery20Advantage-8 Long and Fast

5H
 GuardAllStartup13Recovery18Advantage-7 Counter poke

2D
 GuardLowStartup12Recovery18Advantage-4 Low and Safe

2H
 GuardLowStartup14Recovery29Advantage-12 Long and Low

5K
 GuardAllStartup7Recovery8Advantage-2 Quick and Active

2P
 GuardLowStartup7Recovery11Advantage-3 Quick and Low


- f.SGuardAllStartup12Recovery20Advantage-8: Slightly shorter than 2H, but less committal. It is safe on block at longer ranges. Combo into 5H or 2H on normal hit depending on spacing, Mix Mix Mix loop on counter hit.
- 5HGuardAllStartup13Recovery18Advantage-7: A large, extremely active hitbox with decent recovery. This move is great for fishing for counter hits, and is safe on block. The hurtbox does not move much during startup, so this is also a good whiff punish. Combos into 5HH on normal hit, Thrust
 GuardAllStartup26~37Recovery19Advantage-12 on counter hit.
- 2HGuardLowStartup14Recovery29Advantage-12: A very long low poke. Great for whiff punishing from a long distance. It has very long recovery, so use it carefully.
- 2DGuardLowStartup12Recovery18Advantage-4: Shorter range than f.S with the same startup, but is much better on block. The large pushback and short recovery make this move a very low commitment in neutral. Go for oki on normal hit, or a Mix Mix Mix loop on counter hit.
- 5KGuardAllStartup7Recovery8Advantage-2: A quick, active poke with great range for its speed. Like 5h, the hurtbox doesn't move forward much during startup making it a good whiff punish. Especially good as a grounded if your opponent as an afro on.
- 2PGuardLowStartup7Recovery11Advantage-3: A quick low poke, with extra range. It is a very low commitment, with very low reward. If your opponent jumps over this, you will usually recover in time to antiair. If you land this at close range, you can combo into 6P, but often you will simply return to neutral. It is plus on counter hit, but it is hard to hit confirm into a combo.
- low j.2K
 GuardAllStartup10Recovery9 after LandingAdvantage-: A very active counterpoke with low recovery. Usually no conversions on normal hit, but can combo into Mix Mix Mix on crouching normal hit (spacing dependent) and on counter hit.

Faust has several extremely strong tools to stuff aerial approaches. Depending on how your opponent is moving, you may want to stay on the ground, meet them in the air, or simply avoid the interaction by running under or backing off. If your opponent blocks an air to air, you can often airdash cancel and use a jumpin of your own to get offense started.

6P
 GuardAllStartup9Recovery32Advantage-21 Upper Body Invuln
5K
GuardAllStartup7Recovery8Advantage-2 Fast, Active, in Front

2K
 GuardAll, Low, LowStartup5Recovery12Advantage-2 Fast, Above

2S
 GuardAllStartup11Recovery26Advantage-19 Slow, Active

j.P
 GuardHighStartup7Recovery6Advantage+3 (IAD j.PP) Fast and safe

j.H
 GuardHighStartup9Recovery15Advantage+8 (IAD) Long range


- 6PGuardAllStartup9Recovery32Advantage-21: Massive, fast antiair that hits opponents who are above and in front of Faust. Has extremely long whiff recovery in exchange. On both normal hit and counter hit you may choose to toss items or combo into Mix Mix Mix. Good as an option to do on reaction, due to its upper body invulnerability.
- 5KGuardAllStartup7Recovery8Advantage-2: A true war crimes button, covers the space in front of Faust incredibly well. On hit, combo into 6H > 214K for a wallbounce from midscreen for massive damage.
- 2KGuardAll, Low, LowStartup5Recovery12Advantage-2: The first hit of 2k is a very fast antiair which hits directly above Faust. On hit you can once again combo into 6H > 214K, but there are more options to choose from. See the combos section for more.
- 2SGuardAllStartup11Recovery26Advantage-19: This is a large, but slow antiair with long recovery. In return it has disjoint at the top, long active frames, and high potential damage on counter hit. 2S is more situational than the previous options, but still quite useful.
- j.PGuardHighStartup7Recovery6Advantage+3 (IAD j.PP): A fast air to air that hits mostly in front of Faust. This move has very little whiff recovery, so is your least committal air to air. On hit you can link other air normals, and often route into mix mix mix.
- j.K
 GuardHighStartup7Recovery18Advantage-: This move has the same startup as j.P, but with a longer hitbox that hits lower, and longer recovery. Combos into Mix Mix Mix on hit, or more with an airdash cancel.

- j.HGuardHighStartup9Recovery15Advantage+8 (IAD): Paint the skies red. This move has quick startup, plenty of active frames, massive range, disjoint at the tip, short recovery, and strong conversions. Rising j.H can stuff a lot of jumpins on a read, and is not easy to punish. You will often be able to airdash cancel (drift down) and j.H again for more corner carry. It also wallbounces, giving you big damage if you are close enough to the wall.
Approaching
There are situations where you must close the distance, such as fighting other zoners, and dealing with dashblocking. As a hybrid zoner, Faust lacks particularly strong tools to do this, so you mostly need play solid footsies and use the varied range of your pokes to slowly work your way in. Once you have 50% tension, you gain access to Scarecrow PRC, and can use that to force your way into a closer range.
Grounded Approaches
- 5P
 GuardAllStartup5Recovery8Advantage-2: It's fast, and it hits pretty far for a 5 frame button. The extended cancel window and self gatling make 5P a good way to get pressure started.

- 2KGuardAll, Low, LowStartup5Recovery12Advantage-2: Aim to have the second and third hits of this move connect. While 2K lacks the extended cancel window of 5P, cancelling into 2D will frametrap, discouraging mashing.
- 5KGuardAllStartup7Recovery8Advantage-2: With its range and quick startup, 5k can also be used to approach. It can also jail and frametrap into 2D, so you can use this to scare opponents out of defending against throws
- 2DGuardLowStartup12Recovery18Advantage-4: A more zoning-type approach option, 2d is safe on block and the pushback can push your opponent closer to the wall. The reward is good, both on hit and on counterhit.
- low j.2KGuardAllStartup10Recovery9 after LandingAdvantage-: While this move has little to no reward on normal hit and on block, it's not punishing either. Because j.2K moves you forward and puts you in the air, you can use it to get over lows and take space with a hitbox out. On block and on normal hit (spaced), using 2p will often stuff mash attempts, leaving you plus on counter hit.
Jumpins
You can jump in with any of Faust's normals. Jumpins are quite committal, especially airdash jumpins due Faust's unique steerable airdash. For further info, see here. With non airdash jumpins, you can always back out or make space with air backdash. After a good jump in, you will be plus, letting you run strong offense.
- j.PGuardHighStartup7Recovery6Advantage+3 (IAD j.PP): Jumping forward with j.P is an option, but more often IAD[2] j.P will be more useful. j.P has a self gatling which can be used to land a second one closer to the ground and be plus on block. Another option is to cancel into j.2K, which will frametrap and be plus on block as well.
- j.KGuardHighStartup7Recovery18Advantage-: j.K gatlings into j.D, making it more useful than j.P for non-airdash jumpins. Like j.P, cancelling into j.2K off an airdash will leave you plus on block, but this will jail instead of frametrapping. IAD[8] j.K > j.D is another option to frametrap and be plus.
- j.S
 GuardHighStartup14Recovery20Advantage+6 (IAD): This one is significantly slower, but hits deep below Faust and can be harder to antiair. It works well as a normal jumpin, and if blocked higher up can be canceled into j.H to remain advantageous. IAD j.s will leave you plus on block. IAD[8] j.S > j.H will jail and leave you more advantageous, but is significantly easier to antiair.

- j.HGuardHighStartup9Recovery15Advantage+8 (IAD): j.H will not hit crouching opponents, but most of the time they will block high when they see you jump because all of your other jumpins will. Is very advantageous on block, and if it connects low enough, will let you do an f-shiki with j.K (only converts with meter).
- j.D
 GuardHighStartup13Recovery23Advantage+5 (IAD): Like j.S, j.D hits deep and in front of Faust. It lacks a gatling into j.H, though, so you need to land this one deeper to be plus on block. Good to do from IAD (no steering, or slight steer down soon before pressing). This will ignite afros as well, giving you more setups to play with.
Offense
Strike Throw, often using Fausts Command Grab 236HGuardGround ThrowStartup6Recovery41Advantage-, is usually the basis of his meterless offense. When either very slightly minus or plus, run up and throw the opponent, or frame trap An offensive technique where the attacker leaves a small opening in their offense, goading the defender into performing an attack. This opening is designed such that the attacker can easily counter the defender's attack with their own. your opponent instead to catch their attempt to escape throw.

c.S is usually your best and highest reward pressure starter

236H is your Command Grab, and often the end goal
2K, a double hitting low to try and catch them escaping throws

5P with its self gatling can give quick hard to react to stagger pressure

Without a hard knockdown, meter or items, Fausts' pressure is generally limited to simple stagger pressure. You will need to make reads on your opponents defensive habits and have good timing to open them up. When you do have one of those, your options open up considerably, and become much more elaborate. See sections below for advice on how to approach these options.
You should look to manually delay attacks to create frametraps to hit your opponents attempts to escape throw. c.S delay.f.S delay.5H should usually be your default option when trying to frametrap. After c.S, you can also represent 2D as a gapless low, dash 5K to try and catch backdash and dash up c.S to reset pressure, among other things.
At further ranges, you can look to create spacing traps and do stagger pressure with uncancelled attacks, where your substantial range can make it difficult for your opponent to challenge, even if you are minus. This is a similar thought process to how you play neutral, and you should also refer to that section for further advice. You are likely to be spending a lot of time here, so it is important to be very comfortable with all your options.
After your opponent blocks a midrange poke, you should primarily be playing reactively, and then punishing your opponents response. 2P, f.S, 2D, low j.2K and 5H are all only slightly minus, and these are options you should be looking to end blockstrings with where possible, and RPS after. 6H, high j.2K and 6P will require similar RPS but are much more minus and therefore need more risky special cancels more often. 2H can fall into either category and is particularly important to space well, as it is much better at far ranges than close.
For example, if the opponent blocks, f.S 2H, you can represent options like:
Doing nothing (blocking) and walking back - your opponent cannot easily beat nothing, and this leaves you open to play reactively and respond to whatever they do. Dashblocking can also leave you closer and able to react to what they do.
Quicker options to hit them out of their response - good options include things like; 2P and 5P to catch dash up attempts, 5K to catch airdashes and jumps, j.2K to catch slower approaches and low crush. 236S is your main frametrap option, though be cautious about overusing or relying on it, as it is unsafe on block. The gap it leaves will depend on how far away you are.
Doing a more dominant option, preemptively - 6P is especially dominant at counterpoking, but its big recovery means it does not have the best risk/reward. 5H, with its complete lack of hurtbox extension, is a great option to counterpoke and whiff punish with, though be cautious of its slow speed.
Capitalising on their inaction - sometimes they will just sit there doing nothing, hoping you do something unsafe, and this is when you need to pick options that capitalise on this. 236[P] is mostly safe if well spaced, 236P much less so and not something to overuse. 41236[K] can leave you plus, though often pretty far away. Simply dashing up a little before doing an attack (perhaps f.S) can put you back into a similar situation. If they just continue to sit there, you will keep building meter and risc, improving your reward every time, so do not feel forced to do unsafe options if your opponent is not making you.

Faust can safejump A very well-timed jump attack on a character who is rising from a knockdown. Your goal is to attack extremely close to when you land so that, if the character performs an invincible reversal attack, you will land and be able to block. The opponent is then forced to block your jumping attack, since reversaling doesn't work, which will give you some nice pressure and hopefully an opening. after any hard knockdown as long as he is close enough, typically using his steerable airdash. Any air normal can be used to safejump, but the most useful ones are j.H and j.D. j.D is the most stable, and should probably be your default. Without afro, any j.H safejump can be crouched under and can sometimes even be whiff punished by fast crouching normals. In exchange, a well timed one will give you a F-Shiki Sometimes known as "Fuzzy Overhead". When you are in blockstun, you can switch high/low blocking, but your blocking animation and hurtbox does not change until you leave blockstun or block another attack. F-Shikis take advantage of this and use overheads that would miss on crouching characters, but not on standing characters. on block with rising j.K (requires meter to convert).
Autotimed Safejumps
OTG c.S IAD dl tap 2 j.D- you will need to steer down a little bit, but not too much as that can make the j.D whiff completely.OTG c.S IAD[2] j.H- easy, autotimed, and very plus, but can whiff if they crouch, jump, or do a crouching normal.236H IAD j.D- don't steer your airdash at all, you'll automatically get the perfect safejump.2D 236[P] IAD dl tap 2 j.D- after 2D, you have enough time to slip in a Monch.
If you are not close enough to get an OTG c.S, for example after an airthrow, Thrust, or a super wallbreak, you can typically still safejump with an IAD j.D, though more manual timing may be required. See Here for more
How exactly you choose to spend meter is up to you, and there are no right or wrong ways to do it, different people prioritize different things. However, some very efficient and effective uses are shown below.
Offensive Meter Use
Most of the time, offensive meter use means covering risky options, extending combos, or opening your opponent up. Some suggestions (though there are many other things you can do!):
- Scarecrow PRC - A meterless scarecrow is slow, reactable and punishable. But if you Roman cancel the startup, you can teleport and act immediately, which gives enormous utility. See the dedicated section below.
- 236S FRC - After attempting to frametrap with MixMixMix, you are left punishable, so spending meter here for a high low is an excellent choice. 236S(blocked) > 66FRRC j.K gives a very fast overhead, with an excellent situation on block. 236S (blocked) > 22 FRRC 2K gives a very quick low, which can be hitconfirmed into 6P for better reward.
- j.2K RRC - This allows you to convert off j.2K, which instantly makes the move miles better. This unlocks high j.2K as a whiff punish, and will still cover you on block.
- 5D RRC - lets you convert off an overhead you normally cannot, for big reward. Depending on your playstyle and the situtation you are in, you can choose to RRC from pretty much any hit to get a bigger combo.
- Covering throw attempts - A whiffed throw (or command grab) is etrememly punishable, but you can PRC the recovery to make yourself safe, and often continue pressure.
- Using 236D - It is a little tricky for Faust to make efficient use Wild Assault during pressure, but it can be an excellent frametrap after options like 2H or 5H. On block, you could cancel into into an airdash (though whether they blocked the 236D crouching is very important), or simply let it recover and run up afterwards.
- Combo extensions - there are many possible ways to use meter to enhance your combos, see section below.
Defensive Meter Use
See also the general defense section.
On Defense you can spend meter on Faultless Defense (and instant FD), YRC, Deflect Shield, and Reversal Overdrive. Defending effectively takes a lot of experience, and who you are fighting is extremely important. You will need to do a lot of experimentation yourself to find when you personally get the most out of these options. (FD is very good though! You should probably be doing it quite a lot on defense!)
You can also use meter to cover otherwise risky escape options to get out of the corner, like jumping into a mixmixmix, or Scarecrow.
632146H GuardAllStartup16+5Recovery48Advantage-32 is a very slow reversal, so it often isn't very good alone. It can, however be roman canceled before the super flash granting you the benefit of invulnerability without having to commit to the actual move. This makes it way better, as you can actually punish meaty c.S with it most of the time. See the 'Super PRC' section in defense.
YRC can be used the same as all other characters, granting a +10 guard crush on hit. If you're close enough, you can immediately turn this into a strike throw situation with 236H or 2K.
Using Meter in Combos
In general, using meter in combos is most recommended when it would kill, extend into a wallbreak, or if the damage increase is enormous (due to a funny starter). If you can get a wallbreak without spending meter, breaking with 632146H or 236D is almost always a good option because it grants a hard knockdown in addition to the positive bonus from breaking the wall. Generally it is better to use whichever resource you have more of, since having both options during your positive bonus pressure will allow for more flexible routing.
Spending meter for combo extension is very varied, and there are many possibilites. Often using a Red roman cancel to convert off something you usually cannot (like 5D or j.2K) is great, or using meter to extend a combo to wallbreak that otherwise wouldn't. For more advanced possibilities, there are suggestions in the Combo Page, but don't overprioritize fancy combos over other things.Using Special Moves
Faust's special moves tend to be more situational in their use than many other characters, and it is uncommon to use them in blockstrings.
- 236P
 GuardStartup26RecoveryTotal 40Advantage-: Item toss is rarely safe to use outside of knockdowns. On block, it is -22 at best, making it punishable by most characters. It is safe to toss items after all knockdowns and long range otg hits. See the dedicated section above.
- 236S
 GuardAllStartup17Recovery14 after LandingAdvantage-7: Mix Mix Mix is usually a combo tool, and sometimes be used frametrap or crossup. Can frametrap after normals in a pinch, but it is punishable on block, so use it sparingly without meter. For further advice on steering, see the combo page.

- j.236P
 GuardAllStartup27RecoveryTotal 48Advantage-: Love is a solid neutral tool that controls the space below and in front of Faust. It is useful after higher hits of j.2K, but leaves a significant gap that can be punished. Be cautious about overusing it, as it is very punishable by a knowledgable opponent.

- 236236P
 GuardStartup1+3RecoveryTotal 33AdvantageN/A: W-W-What Could This Be? is useful in neutral if you don't have any better idea of how to spend your meter. It is not particularly useful for okizeme, though, because the extra items tend to get in the way of any setup you would normally go for. 236236236P
 GuardStartup1+1RecoveryTotal 48AdvantageN/A:W-W-W-W-W-W-W-W-W-What Could This Be? is a meme. Use it to inflict mental damage, but otherwise avoid.


- 632146H
 GuardAllStartup16+5Recovery48Advantage-32: Bone Crushing Excitement is a very slow reversal super. It is usually the optimal wallbreak because it grants a hard knockdown after the area shift. If using it as a reversal, it is often better to PRC it before the super flash to get a punish, as most meaty c.Ses will recover in time to block it. See SuperPRC for help.

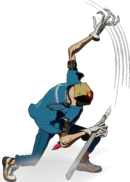
The first hitbox of Thrust. Frame 26, very eaily low profiled with 6P
The Second hitbox, on frame 30. Huge range, will clash with 6P.


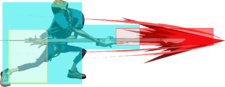
Faust attacks with a menacing red trail behind his scalpel. If Faust lands a grounded hit and inputs 4 (backwards from his opponent) he reels the opponent in, launching them toward him for a short time. Pressing H before the opponent hits the ground will do a follow-up golf swing attack with three possible timings. As usual, check out the Overview Page for frame data and more general info.
When Roman Cancelled, hitting the sweet spot can lead to some of Fausts highest damage combos, but it otherwise is not particularly important. In fact, if you aren't roman cancelling it, you can outdamage the sweetspot by doing an early hit, then a small dash OTG 2H.

This is what you need to hit to get the Sweet Spot. It does 120 damage and has a huge launch with smoke.

This is the early hit hitbox; it gives better oki, and follow it up with dash OTG 2H for max damage.
The very early hit. Usually no reason to go for this.


To hit the sweet spot, you want to hit them as low as possible, but before they hit the ground. This is a 2F window, so can be challenging. Doing an early hit instead of the sweetspot can also let you safejump with an IAD An air dash performed from a standing position as quickly and as low to the ground as possible from a jump. Done by inputting 956 754, and depending on the game, using a dash macro right after a jump. j.D, though you will have to time the j.D manually. Any timing of swing will leave you at about +55, with more than enough time to throw an item, or perhaps two on the sweetspot (as they are further away).
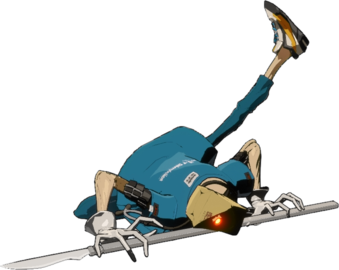
Early Hit: The opponent is knocked away for a hard knockdown. If the opponent is close to the wall, they will hit the ground before impacting it. A low risk option with solid reward if you are not confident in your golfing skills or want to sacrifice damage for okizeme, particularly near the corner where Sweetspot would break the wall.
Sweetspot: Action lines around the screen and a dramatic camera angle will indicate a successful hit as the opponent is knocked even further away for a hard knockdown. Automatically breaks the wall when in range. Disables opponent's Burst from initial hitstop until landing.
Late Hit: The opponent falls to the ground, and 'Hole in One!' will hit OTG. Deals less damage, and leaves Faust at a frame disadvantage of -10.
Empty: No H is pressed, dealing no damage and leaving the opponent in a hard knockdown directly in front of Faust. Sacrifices the most damage for the strongest okizeme, leaving Faust enough time to toss an item and still do a Meaty attack. Highly situational, but useful when Faust is in the corner and wants to swap sides with the opponent.
It is also possibly to kara cancel both the thrust and the Pull Back into both overdrives. One that could be useful is kara cancelling Pull Back into Bone Crushing Excitement, which will lock out your opponent from bursting. Input 632146H very quickly to perform this.Scarecrows (214P/K/S) are very slow fullscreen teleports if you have to wait for the attack, so avoid using them by themself. However, they are extremely potent when used with either items or meter.

Scarecrow With Items/Afro
214K just before any item hits for an unreactable crossaup (that often combos into the 214K). Meteors are the best item to use this with, but it can be done with any other strike item. Due to the fixed timing of an afro explosion, it is easy to cross up with that as well. It is generally a good idea to hold onto meter for this, either to get a full combo on it or to cover yourself on block. Be cautious of crossup protection - you must have been on the other side for at least 3 frames, otherwise you can block both directions. It must also not be a true blockstring, unless they are guard crushed.
Scarecrow PRC
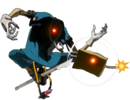
Scarecrow PRC is a very strong neutral skip that allows you to teleport in front of or behind your opponent. This can be used to net easy whiff punishes, or simply to close distance and get pressure started. You will want to Purple Roman Cancel the moment the scarecrows appear, and then you can do whatever you like. 214S or 214K 66PRC (you can use the dash and RC buttons) into 236H, 2K and c.S are excellent options.Fausts Command Grab 236HGuardGround ThrowStartup6Recovery41Advantage-, Snip Snip Snip, gives the opponent an Afro (see links to overview page for details). This extends the opponents hurtbox for overheads, and can be lit on fire, extending combos on hit, and a delayed detonation on block. There are many other possibilities beyond these two examples, but these should give you a good base to start from.
236H IAD j.D c.S 9 j.D (7 dl.j.H ...)
or
236H IAD j.D c.S dl.2D
The first and most simple thing to do with Snip, but a very important option. Immediately airdashing after Snip, and then doing a j.D as quickly as possible is an autotimed safejump A very well-timed jump attack on a character who is rising from a knockdown. Your goal is to attack extremely close to when you land so that, if the character performs an invincible reversal attack, you will land and be able to block. The opponent is then forced to block your jumping attack, since reversaling doesn't work, which will give you some nice pressure and hopefully an opening., which can string gaplessly into c.S.
From there, going either 2D or rising j.D is an unreactable high low. If your opponent does block, be ready for them to challenge after. Jump back j.H is a relatively safe option after a blocked j.D. However, the threat of the Afro explosion later can often discourage opponents from attacking, or mess up their punish attempts.
If you think they are not ready for it, you can airdash after the j.D, or run forward after the 2D, and get a mixup option very similar to the one below.
236H IAD j.D c.S 9 dl. j.S j.H dash c.S [ 2D / j.D / 214K / 236H ]
After landing the Snip Snip Snip (236HGuardGround ThrowStartup6Recovery41Advantage-), immediately jump and airdash towards the opponent, and press j.D as soon as possible for an autotimed safejump A very well-timed jump attack on a character who is rising from a knockdown. Your goal is to attack extremely close to when you land so that, if the character performs an invincible reversal attack, you will land and be able to block. The opponent is then forced to block your jumping attack, since reversaling doesn't work, which will give you some nice pressure and hopefully an opening..
Using their fear of an incoming mixup after c.S, you can 9 dl. j.S j.H c.S to kill time before the Afro pops.
Be cautious about overusing this option, as it does leave a substantial gap.
At this point, you can go high with j.D, low with 2D, throw them with 236H, or even crossup with 214K, and the Afro pop will convert from all of these if you time it correctly, creating an incredibly fearsome mixup with much higher reward. For all except the crossup, the resulting Pop will Guard Crush them and leave you plus for another mixup even if they do block it.
Defense
The majority of defense is universal, and depends more on the opponent than your character, so will not be covered in great detail here. Important options are noted below.
- Blocking - The first and most important defensive option. Sometimes you must simply block.
- Mashing (or abare An attack during the opponent's pressure, intended to interrupt it.) - Challenging small gaps with quick attacks. For Faust, his fastest attack is 5P, which is 5F, with great reach. Confirm into 6P on hit if you can, 2P on block or if not. 5K and 2P are also good abare options in some situations, though a little slower. 6P and 2K can be useful to challenge specific options (usually airborne ones).
- Jumping - generally the lowest risk option to avoid throws. Simply blocking, or falling with j.D are usually your best options after. You can be hit during jump startup.
- Backdash - higher reward option to beat throws, and some attacks, though typically more risky and easier to call out than jump.
- Faultless Defense - pushes the opponent further away, potentially opening gaps, and weakening their offensive options (particularly throw)
- Burst, YRC, and Deflect Shield - metered options to try and get the opponent off you. Can be highly punishable if baited, but powerful get off me tools.
- More advanced defensive techniques - fuzzy jumping, fuzzy mashing, throw teching with fuzzy throw, Instant Blocking, Instant Faultless Defense. Will not be covered here, but see the rest of the site for details.
- Crawl - Crawl is a unique defensive option that Faust has, letting him low profile in an extremely unusual way. It is difficult to use however, and requires fairly in depth matchup knowledge to use well. See the Strategy Page for further advice.
632146H~FPRC~X
Fausts reversal overdrive, Bone Crushing ExcitementGuardAllStartup16+5Recovery48Advantage-32 is extremely slow, at 21F. This makes it much worse as a traditional reversal, as if your opponent does something as simple as a c.S on wakeup, they will recover in time to block it. However, you can use its glacial speed to your advantage.
After 632146H is input, but before the superflash has occured, do a purple roman cancel. This will allow you to keep the invuln frames of the overdrive, and invuln through things, but not have to wait for the attack to come out. Typically, you will then want to Fast Roman Cancel the PRC into either throw, command grab, or cS to try and punish whatever you just invuln'd through. This will only cost 50 meter rather than the 100 you might expect, because despite getting its invuln frames, the Overdrive never completed its startup and hence you never spent any meter on it (It is even cheaper if you FPRC).
To practice doing this, have the opponent knock you down in training mode with 2D, and then do a slightly delayed c.S when you wakeup, and then try to super PRC through this. If you do it correctly, the clover will appear, you will invuln through the c.S, and then you will PRC, spending only 50 meter.
SuperPRC has the advantage over normal reversal that you cannot safejump it, however it is not unbeatable; during the PRC startup, and the startup of the followup attack, you can be counterhit. Therefore if your opponent does a very delayed c.S, or other highly active or delayed options, it can be counterhit. To beat these, just let the reversal rock.
Bad Habits and Common mistakes
While it is important to represent your options, overusing your command normals like 6H and specials like Mix Mix Mix in neutral is a bad idea, especially if they fail to land more than once. Pay attention to the options that your opponent is using and adapt your own options rather than throwing out big callouts randomly.
Here's a short list of moves that should only be used for callouts and can be punished heavily if abused:
- 6PGuardAllStartup9Recovery32Advantage-21 - Fausts 6P has much more recovery than most, so be very careful when swinging with it in neutral.
- j.236PGuardAllStartup27RecoveryTotal 48Advantage- - Use sparingly as a mixup after j.2KGuardAllStartup10Recovery9 after LandingAdvantage- on block, but probably not much otherwise.
- 214S
 GuardHighStartup50 [69]Recovery36Advantage-40* [-35]* - Do not do any meterless scarecrows if you can possibly avoid it. They are not mix, and are easily and heavily punishable by a knowledgable opponent.
 - 236SGuardAllStartup17Recovery14 after LandingAdvantage-7 - The best special cancel frametrap Faust has, but typically punishable on block, do not do it too often. Learn to be comfortable leaving a 2D or 5H uncancelled on block.
- 6H
 GuardHighStartup25Recovery44Advantage-34 - Very long range overhead, but enormous recovery. Can catch people off guard, but be careful about overusing it. Do not attempt to anti-air with this.

Faust's kit is designed with items in mind. Trying to rush in and overwhelm your opponent can work out sometimes, but more often than not, without items to back you up, your options become more straightforward to block and punish for your opponent.
Here's a short list of combos that are safe to pull items on (all these combos are assuming the hits land):
- f.S > 2H > Item Throw
- 5HH > Item Throw > Item Throw
- 2K > 2D > Item Throw
- CH 6P > Item Throw > Item Throw
- Mix Mix MixGuardAllStartup17Recovery14 after LandingAdvantage-7 > Item Throw
- 6H > Item Throw
- 41236K > 4 > H > Item Throw
- Throw > Item Throw
If you have a hard knockdown, you may wish to do a safejump A very well-timed jump attack on a character who is rising from a knockdown. Your goal is to attack extremely close to when you land so that, if the character performs an invincible reversal attack, you will land and be able to block. The opponent is then forced to block your jumping attack, since reversaling doesn't work, which will give you some nice pressure and hopefully an opening. instead, but do not forgo items after things like 5HH or 2H.
You can also keep pulling items if you are covered by other items. If you throw a hammer, you are usually safe to throw another item. Get those item trains going.While Item Toss is important, Item Toss can be very punishable especially when done after one of your options gets blocked.
For example, Item Toss is an excellent option on a succesful 2K > 2D, but an awful idea if the 2K > 2D gets blocked. Try to make each Item Toss a conscious decision rather than a part of a combo string that assumes all your hits will land.
Additionally, when pulling items try not to get too greedy. Usually you'll only have time to pull one or two items unless you pull an offensive item like 100T weight, hammer, meteor or mini faust.
Pulling an item on block after 5H is -22, which is typically the best you can do. If you do this very rarely, you might be able to sneak some in, but be very cautious.
Doing a Monch.png) GuardStartup27RecoveryTotal 31Advantage- after 5H or 2H is only -13 however, and is a reasonable option to represent sometimes, as it will be very difficult to punish if you are spaced well.
GuardStartup27RecoveryTotal 31Advantage- after 5H or 2H is only -13 however, and is a reasonable option to represent sometimes, as it will be very difficult to punish if you are spaced well.