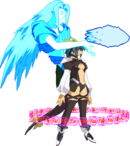
Check Dizzy’s Dustloop Overview page for more details on each specific move.
- 5K
 GuardMidStartup7Recovery14Advantage-4 and 2K
 GuardLowStartup6Recovery9Advantage-1 are your primary safe neutral buttons and route into knockdown.
 - 5H
 GuardMidStartup12Recovery15Advantage-4 has longer range but is riskier, as it extends her hurtbox
 - 2H
 GuardMidStartup8Recovery38Advantage-23 and 2D
 GuardLowStartup12Recovery33Advantage-19 are your best knockdown tools. 2HGuardMidStartup8Recovery38Advantage-23 is delayable and easy to adjust timing for setups while 2DGuardLowStartup12Recovery33Advantage-19 is longer range and safer on block due to being jump cancellable.
 - j.S
 GuardHigh/AirStartup9Recovery16Advantage-, j.2S
 GuardHigh/AirStartup7Recovery8Advantage-, and j.H
 GuardHigh/AirStartup11Recovery28Advantage- are all very strong air normals. j.SGuardHigh/AirStartup9Recovery16Advantage- is long and disjointed, j.2SGuardHigh/AirStartup7Recovery8Advantage- is throw invulnerable and hits low down, and j.HGuardHigh/AirStartup11Recovery28Advantage- is big and deals a ton of damage and hitstun.
 - H Ice spike (236H
 GuardAllStartup14Recovery42Advantage-23) can be used for knockdown at longer ranges, but is very unsafe on block. Typically you only want to use it after hit confirming a string such as 2K 5H, but it can be used as a risky frametrap on block.
 - Fish summon (214x) is the core of Dizzy’s moveset.
- For neutral, P
 GuardAllStartup58~68 (26~35)Recovery12 [Total 36]Advantage-, HGuardAllStartup77 (44)Recovery19 [Total 36]Advantage-, and DGuardAllStartup72~77 (40~44)Recovery24 [Total 36]Advantage- fish are all recommended. For pressure, PGuardAllStartup58~68 (26~35)Recovery12 [Total 36]Advantage-, KGuardAllStartup58~60 (27)Recovery0 [Total 36]Advantage-, and DGuardAllStartup72~77 (40~44)Recovery24 [Total 36]Advantage- fish are recommended. Always use two fish commands.
- For neutral, P
- Bubble (j.214x) is one of your space control tools. K
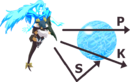 GuardStartup9RecoveryTotal 22Advantage- bubble is generally the recommended option, but SGuardStartup9RecoveryTotal 22Advantage- bubble is also useful. Learn the angles and plan accordingly.
 - Knife (421S
 GuardAllStartup22RecoveryTotal 37Advantage-) is used both in pressure and in neutral.
 - 2S
 GuardMidStartup7Recovery22Advantage-11 is your best grounded anti air. High recovery, so try not to whiff.
 - F.S
 GuardMidStartup8Recovery12Advantage-4 is a situational grounded anti air. Good for sniping IADs, and leads to a combo. Not very useful and somewhat risky in most other situations.
 - Air Throw
 Guard88 pixelsStartupRecoveryAdvantage- is generally your best anti air. Leads to knockdown on most of the screen. Hard, but learning it is a good skill to have in general for this game.
 - Air-to-air j.P
 GuardHigh/AirStartup6Recovery10Advantage- is a solid, low risk preemptive anti air option.


Dizzy’s neutral is based on her high mobility and summons. Ideally, you want to use her air mobility to either run away and make space, or to approach and get advantage. Once you’ve made this space or gotten a hit, you can summon, which makes her neutral terrifying. 5K GuardMidStartup7Recovery14Advantage-4 and 2K
 GuardLowStartup6Recovery9Advantage-1 are both very solid pokes, and while 5H
 GuardMidStartup12Recovery15Advantage-4 does have a large extended hurtbox, it has good range and can convert into a knockdown. For summons, all of them have solid uses in neutral. Bubble
 GuardStartup9RecoveryTotal 22Advantage- is generally low commitment, and is amazing space control. Knife
 GuardAllStartup22RecoveryTotal 37Advantage- can be held and released whenever you want, so it’s effective as a safety tool, and also tracks your opponent. Fish is the most committal, but also the most rewarding. P
 GuardAllStartup58~68 (26~35)Recovery12 [Total 36]Advantage- fish stays out forever and can interrupt the opponents combos or blockstrings. HGuardAllStartup77 (44)Recovery19 [Total 36]Advantage- and SGuardAllStartup77 (44)Recovery19 [Total 41]Advantage- fish are fullscreen lasers, but you’ll primarily be using HGuardAllStartup77 (44)Recovery19 [Total 36]Advantage-. DGuardAllStartup72~77 (40~44)Recovery24 [Total 36]Advantage- fish is a gigantic bite that does incredible damage and staggers the opponent, allowing you a free knockdown. It also is very evasive.
GuardMidStartup7Recovery14Advantage-4, 2KGuardLowStartup6Recovery9Advantage-1, and 5HGuardMidStartup12Recovery15Advantage-4, trying to get a hit or space to allow you to summon safely. Summoning at the midrange is not recommended in most matchups, as the opponent can punish you heavily for doing so.
Dizzy has a few strong options for roundstart. 5KGuardMidStartup7Recovery14Advantage-4 can check the opponent and is fast and low recovery, allowing her to escape if it whiffs. You can also utilize her high air mobility and airdash back or forward, creating distance or closing the gap. A common low-level Dizzy strategy is airdash back, airdash forward j.2S GuardHigh/AirStartup7Recovery8Advantage-, and while this may seem powerful it’ll tend to get you blown up as you fight better opponents.
5K/2K: The most common grounded starters. You’ll hit these in neutral and 2K as your low opener. Fast and good range.
Airdash j.2S > j.H: Most common overhead starter. High mixup in Dizzy setups. Leads into a common ground combo into KD, unless you’re in a fish setup combo.
Throw: Very strong tool to use a lot. Throw combo is optional and up to your preference. You get better oki with no combo, but meter and damage with the combo. You will usually use the f.S air hit route.Starter > c.S > 5H > 2H/2D - The most important combo to learn. Leads to a good knockdown anywhere on the screen. The c.S can be omitted if you deem the distance to be too great.
Starter > c.S > 5H > 236H - Use instead of the above variant if you deem the opponent to be too far out for 2H or 2D. Gets a solid knockdown in the corner, but less than ideal oki midscreen.
Starter > f.S > 236H - Situational air hit combo. The starter will often be the f.S itself. Leads to ice spike knockdown.
Starter > j.P > j.S > jc (jump cancel) j.P > j.S > j.D - Basic anti air combo. Common starter will be 2S or air-to-air j.P. Mess with the amount of j.Ps to adjust for height.
One of the easiest and most reliable setups to learn. This can be done after any knockdown in the corner, and off of throw midscreen.
Summon K-D fish and then jump forward. As you fall, do either a late airdash j.2S > j.H string or land 2K c.S 5H. The D fish will then hit and stagger them and you can follow up with a throw ender or a normal combo ender.
If used off of an ice spike ender in the corner, you will need to meaty 5K or 2K after summoning the fish and then jump after the normal recovers.
Note that after an ice spike or throw ender, you will need to microdash before summoning for it to reach the opponent. This can be difficult, as it is easy to microdash too far into throw range.
This setup is DP safe if you meaty 5K/2K and hold back.
A very strong tick throw based setup. This can be done off of 2H and 2D knockdowns midscreen, and all knockdowns in the corner.
Summon P-D fish and let the first P fish bite meaty the opponent. This can be difficult due to variable wakeup timing, but it’s something you get used to. In between the bites, do dash 2K c.S, or throw. This is the basis of the mixup. If you want, you can jump cancel the c.S before the D fish bite and go for a high low.
Notation: 214P-D > P fish bite > dash 2K c.S > P fish bite > dash 2K c.S > D fish bite > pressure if they blocked, ender if they pressed
All 2k c.S can be substituted for throws if you want.