
The panic button
< BBCF
No edit summary |
|||
| (15 intermediate revisions by 2 users not shown) | |||
| Line 201: | Line 201: | ||
|recovery = 30 | |recovery = 30 | ||
}} | }} | ||
Terumi's other low attack. This can be be used in his mix-up game | Terumi's other low attack. This can be be used in his mix-up game and gatlings into {{clr|D|5D}} to stay safe or further cancel to {{clr|B|6B}} for resets. Because it knocks the opponent down, it allows for immediate use of {{clr|C|22C}} on hit. | ||
On Counter-Hit, it inflicts hard knockdown, allowing a link other normals for more damage and even {{clr|D|2D}} if done immediately. | On Counter-Hit, it inflicts hard knockdown, allowing a link other normals for more damage and even {{clr|D|2D}} if done immediately. | ||
| Line 217: | Line 217: | ||
|recovery = 9 | |recovery = 9 | ||
}} | }} | ||
Jumping jab. One of his best options for hitting crouchers on a jump-in. Also useful as an air-to-air option. With 50 Heat, it can be used as | Jumping jab. One of his best options for hitting crouchers on a jump-in. Also useful as an air-to-air option. With 50 Heat, it can be used as an instant overhead by doing {{clr|C|5C(1)}} → RC → {{clr|A|j.A}}. | ||
[[/Frame_Data#Revolver_Action_Table|Gatling options]]: {{clr|A|j.A}}, {{clr|B|j.B}}, {{clr|C|j.C}}, {{clr|D|j.D}}, {{clr|D|j.2D}} | [[/Frame_Data#Revolver_Action_Table|Gatling options]]: {{clr|A|j.A}}, {{clr|B|j.B}}, {{clr|C|j.C}}, {{clr|D|j.D}}, {{clr|D|j.2D}} | ||
| Line 272: | Line 272: | ||
|recovery = 18 | |recovery = 18 | ||
}} | }} | ||
''' | Terumi's 2nd longest ranged normal, as well as his go-to poke in neutral. The max range of this move isn't at the tip, but at around the snake's eyes. It's a strike-projectile and can be used to nullify other projectiles, but will lose to level 2 ones. The startup is a bit slow, but {{clr|D|5D}} has good hitstun which makes confirms into {{clr|C|6C}} not too difficult. | ||
*Gains 15 Heat on hit | |||
**Minimum 5 | |||
* | **8 on block. | ||
---- | ---- | ||
'''Overdrive Version''' | '''Overdrive Version''' | ||
The range of {{clr|D|5D}} extends greatly, now reaching to the tip. It also hits lower to the ground, making it less susceptible to low profiles. | |||
*Gains 17 Heat on hit | |||
**Minimum 7 | |||
**10 Heat on block | |||
*Drains 2 Heat on contact. | |||
[[/Frame_Data#Revolver_Action_Table|Gatling options]]: {{clr|B|6B}}, {{clr|C|6C}}, {{clr|D|2D}}, {{clr|D|6D}} | [[/Frame_Data#Revolver_Action_Table|Gatling options]]: {{clr|B|6B}}, {{clr|C|6C}}, {{clr|D|2D}}, {{clr|D|6D}} | ||
| Line 291: | Line 293: | ||
===<big>{{clr|D|2D}}</big>=== | ===<big>{{clr|D|2D}}</big>=== | ||
{{BBCF Move Card | {{BBCF Move Card | ||
|input=2D | |input=2D, 2D OD | ||
|versioned=input|names=2D, 2D OD | |||
|description= | |description= | ||
{{#invoke:FrameChart|drawFrameData | {{#invoke:FrameChart|drawFrameData | ||
| Line 298: | Line 301: | ||
|recovery = 22 | |recovery = 22 | ||
}} | }} | ||
' | A projectile that spawns far from Terumi and then comes toward him, it has a strong vacuum effect which also pulls the opponent. {{clr|D|2D}} can be used as a pressure reset, having the potential to be +17 if the opponent is close enough to him, but this also means the startup is often slower than the initial 40f, so it's very vulnerable to abare. Generally, Terumi has safer ways to reset pressure such as {{clr|D|j.2D}}. It can occasionally see use in okizeme to outrange certain reversals. | ||
Its only utility in combos is from CH {{clr|A|6A}} for optimal meter regen. | |||
*Counter-Hit state for the entire duration. | |||
*Gains 24 Heat on hit | |||
**Minimum 5 | |||
**9 Heat on block | |||
---- | ---- | ||
'''Overdrive Version''' | '''Overdrive Version''' | ||
Now hits three times which helps to capitalise on the frame advantage, and the hitbox is larger, but {{clr|D|2D}} stil suffers the same issues as the normal version. | |||
* | *Gains 35 Heat on hit | ||
**Minimum 21 | |||
**22 Heat on block | |||
*Drains 6 Heat on contact | |||
[[/Frame_Data#Revolver_Action_Table|Gatling options]]: None | [[/Frame_Data#Revolver_Action_Table|Gatling options]]: None | ||
| Line 327: | Line 332: | ||
|recovery = 24 | |recovery = 24 | ||
}} | }} | ||
Essentially a hitgrab since it fixes the position of the opponent if the followup triggers (Requires the opponent to be within 400,000 units horizontally, which isn't hard at all). For the most part this is just combo filler due to being outclassed by Terumi's other tools. However it's Terumi's fastest Fatal Counter move that doesn't cost meter, so it has niche use as a punish tool. | Essentially a hitgrab since it fixes the position of the opponent if the followup triggers (Requires the opponent to be within 400,000 units horizontally, which isn't hard at all). For the most part this is just combo filler due to being outclassed by Terumi's other tools. However it's Terumi's fastest Fatal Counter move that doesn't cost meter, so it has niche use as a punish tool. | ||
As followup hits only occur if they're relatively close, the long untech of the first hit can be used to extend some combos. | As followup hits only occur if they're relatively close, the long untech of the first hit can be used to extend some combos. | ||
*Fatal Counter | |||
*First hit crumple stuns on ground hit | |||
*Twirl stuns on air hit. | |||
*Gains 30 heat | |||
**Minimum 8. | |||
---- | ---- | ||
'''Overdrive Version''' | '''Overdrive Version''' | ||
Significantly better as combo filler, as it has great meter gain and good scaling. Allows Terumi to tack on a super at the end, though the height and distance makes it hard, if not impossible, to connect certain supers. On the last hit, Terumi kicks the opponent farther/higher than the normal version, if hit high enough you can also follow up with another {{clr|D|6D}} from about halfscreen (requires a microdash outside the corner) for a lot of meter gain without much scaling. | Significantly better as combo filler, as it has great meter gain and good scaling. Allows Terumi to tack on a super at the end, though the height and distance makes it hard, if not impossible, to connect certain supers. On the last hit, Terumi kicks the opponent farther/higher than the normal version, if hit high enough you can also follow up with another {{clr|D|6D}} from about halfscreen (requires a microdash outside the corner) for a lot of meter gain without much scaling. | ||
*Gains 42 Heat on hit | |||
**Minimum 16 | |||
*Drains 5 Heat on contact | |||
[[/Frame_Data#Revolver_Action_Table|Gatling options (on hit)]]: {{clr|C|6C}} | [[/Frame_Data#Revolver_Action_Table|Gatling options (on hit)]]: {{clr|C|6C}} | ||
| Line 353: | Line 363: | ||
|recovery = 16 | |recovery = 16 | ||
}} | }} | ||
Terumi preforms a short-ranged kick. Like {{clr|D|5D}}, it clashes with level 1 projectiles. Being jump-cancellable and super-cancellable, it allows for mix-ups and safejumps. | Terumi preforms a short-ranged kick. Like {{clr|D|5D}}, it clashes with level 1 projectiles. Being jump-cancellable and super-cancellable, it allows for mix-ups and safejumps. | ||
This move can also be used as a counter-poke in certain situations, due to it's speed and disjointed hitbox, it'll beat out moves with extended hurtboxes and clash with ones that don't. | |||
*Launches on hit. | |||
*Gains 13 Heat on hit | |||
**Minimum 5 | |||
**7 on Block. | |||
---- | ---- | ||
'''Overdrive Version''' | '''Overdrive Version''' | ||
Untechable time is greatly increased, allowing Terumi to loop {{clr|D|4D}} → {{clr|D|j.2D}} more than once. | Untechable time is greatly increased, allowing Terumi to loop {{clr|D|4D}} → {{clr|D|j.2D}} more than once. | ||
*Gains 17 Heat on hit | |||
**Minimum 7 | |||
**11 on Block | |||
*Drains 2 Heat on contact. | |||
[[/Frame_Data#Revolver_Action_Table|Gatling options]]: None | [[/Frame_Data#Revolver_Action_Table|Gatling options]]: None | ||
| Line 379: | Line 394: | ||
|specialRecovery = 6 | |specialRecovery = 6 | ||
}} | }} | ||
Terumi's main air-to-ground normal and keepaway tool, thanks to | Terumi's main air-to-ground normal and keepaway tool, thanks to its massive, disjointed hitbox, as well as its short landing recovery. This allows him to prevent his opponent from approaching too carelessly. However, this move is quite slow to come out, making it risky to throw out if the opponent is too close. | ||
It can be very hard to confirm without a Counter-Hit, {{clr|D|5D}} only links if {{clr|D|j.D}} is done as late as possible, {{clr|D|j.2D}} only links on an airborne opponent, and all of Terumi's other normals are hard to link due to {{clr|D|j.D}}'s high pushback and knockback. With Counter-Hit, however, it can generally combo into {{clr|D|5D}} unless you hit very early in your jump. | It can be very hard to confirm without a Counter-Hit, {{clr|D|5D}} only links if {{clr|D|j.D}} is done as late as possible, {{clr|D|j.2D}} only links on an airborne opponent, and all of Terumi's other normals are hard to link due to {{clr|D|j.D}}'s high pushback and knockback. With Counter-Hit, however, it can generally combo into {{clr|D|5D}} unless you hit very early in your jump. | ||
*Ground bounces on CH | |||
*Gains 18 Heat on hit | |||
**Minimum 5. | |||
**7 on block. | |||
---- | ---- | ||
'''Overdrive Version''' | '''Overdrive Version''' | ||
During OD, the hitbox becomes even bigger, making it even harder to contest. Thanks to {{clr|D|j.2D}}'s | During OD, the hitbox becomes even bigger, making it even harder to contest. Thanks to {{clr|D|j.2D}}'s hard knockdown in OD, it can be used as combo filler. | ||
*Gains 20 Heat on hit | |||
**Minimum 7 | |||
**11% on block | |||
*Drains 2 on contact. | |||
[[/Frame_Data#Revolver_Action_Table|Gatling options]]: {{clr|D|j.2D}} | [[/Frame_Data#Revolver_Action_Table|Gatling options]]: {{clr|D|j.2D}} | ||
| Line 404: | Line 425: | ||
|specialRecovery = 7 | |specialRecovery = 7 | ||
}} | }} | ||
Terumi's main air combo ender and a decent pressure reset. Combined with jump startup, the fastest it can be done is 20F. While it is +3 on block when TK'd, the only time Terumi can go into it without leaving a 10+ frame gap is from {{clr|C|5C(1)}} or {{clr|C|2C}} | Terumi's main air combo ender and a decent pressure reset. Combined with jump startup, the fastest it can be done is 20F. While it is +3 on block when TK'd, the only time Terumi can go into it without leaving a 10+ frame gap is from {{clr|C|5C(1)}} or {{clr|C|2C}} | ||
{{clr|D|j.2D}} can also be used as a meaty if you know your opponent will Emergency tech due to its of active frames, frame advantage (up to +8 if timed right) and the ability to safe-jump or OS reversals if timed right. | {{clr|D|j.2D}} can also be used as a meaty if you know your opponent will Emergency tech due to its of active frames, frame advantage (up to +8 if timed right) and the ability to safe-jump or OS reversals if timed right. | ||
*Gains 12 Heat on hit | |||
**Minimum 5 | |||
**6 on block. | |||
---- | ---- | ||
'''Overdrive Version''' | '''Overdrive Version''' | ||
In Overdrive, {{clr|D|j.2D}} becomes a combo extender. It always causes a hard knockdown, allowing follow-ups whenever it lands no matter what. Great combo filler and pressure option. In Overdrive you can loop {{clr|D|4D}} → {{clr|D|j.2D}} for massive meter gain. | In Overdrive, {{clr|D|j.2D}} becomes a combo extender. It always causes a hard knockdown, allowing follow-ups whenever it lands no matter what. Great combo filler and pressure option. In Overdrive you can loop {{clr|D|4D}} → {{clr|D|j.2D}} for massive meter gain. | ||
*Gains 16 Heat on hit | |||
**Minimum 7 | |||
**10 on block | |||
*Drains 2 Heat on contact. | |||
[[/Frame_Data#Revolver_Action_Table|Gatling options]]: None | [[/Frame_Data#Revolver_Action_Table|Gatling options]]: None | ||
| Line 466: | Line 492: | ||
|description= | |description= | ||
A relatively standard Crush Trigger. Its hitbox hits very low. Considering Terumi's Heat gain, this move is useful in combos to deal more damage, if you don't want to (or can't)invest a Distortion. | A relatively standard Crush Trigger. Its hitbox hits very low. Considering Terumi's Heat gain, this move is useful in combos to deal more damage, if you don't want to (or can't)invest a Distortion. | ||
*Launches the opponent high on air hit. | |||
}} | }} | ||
Latest revision as of 03:17, 20 April 2024
Overview
Overview
Yuuki Terumi is a mobile rushdown character centered around meter. With his Drive, he can gain massive amounts of meter, and use it to effectively open up his opponent or use his vast number of Distortion Drives for damage or utility. However, without meter Terumi is quite lackluster and can find it very hard to safely approach his opponent. Coupled with a low overall health total, it only takes a few bad calls to lose a round.
Thankfully, his air dash and run speed help make up for his lack of strong pokes. Once he's in, he can spend meter for effective pressure and potentially snowball out of control. His Overdrive is great, especially as a comeback factor. On top of gaining more meter with his Drive he can steal meter on block and force reactions out of opponents. It also vastly improves his combo potential. Terumi is easy to pick up and play for those seeking good mobility and high damage.
 |
| Health |
| 10,500 |
| Prejump |
| 4F |
| Backdash |
| 22F (1~5F Inv All, 2~15 airborne) |
| Fastest Attack |
| 5A (5F, whiffs crouchers) 2A (7F) |
| Reversals |
| 623B (7F) 236236A (Catch 1~112F) 632146D (17F) 236236D/214214D (27F) |
| Fatal Starters |
| 6B 6D 41236C |
Drive: Force Eater
Terumi's Drive is centered around Heat gain. By using his Drive, Terumi gains extra meter on hit and block, far beyond what most characters normally get; note that meter gain from his Drive prorates along with the combo, so you will get less for doing multiple Drives in one combo. The opponent will also not gain any Heat when they block (or get hit by) Terumi's Drive attacks. Overdrive: Nightmare Reaper
Increases the Heat gained from Drive attacks and generally improves them in terms of hitboxes, damage, etc. Terumi will also drain the opponent's meter when his opponent blocks (or gets hit by) his Drive attacks.
Also allows Terumi to cancel his supers into other supers (even the same one he just performed) so long as he has enough Heat to perform another super. It also gets rid of Heat gauge cooldown, meaning you can use a distortion and then proceed to gain meter as you normally would. Nightmare Reaper also allows Terumi to cancel any super into his Exceed Accel on hit and on block, allowing him to easily end his combos with big damage and gain Active Flow.StartupThe time before an attack is active. Written startup values include the first active frame, so the startup on a frame chart will display one less square than the written value. Frames
Active The active frames of an attack refers to the amount of time an attack can hit the opponent. Frames
InactiveFrames in the middle of multi-hit attacks which cannot hit the opponent, but are after the move has become active at least once. Frames
Recovery The recovery of an attack refers to the amount of time an attacker must wait before they may perform another action, even blocking. Frames
Special RecoveryThe recovery of an attack refers to the amount of time an attacker must wait before they may perform another action.Recovery frames which happen under abnormal conditions, such as after landing. Frames
ProjectileIndicates an entity that exists separately from the character has become active. Usually something like a Fireball A projectile which usually travels slowly across the screen in a horizontal path above the ground.. Active
CancelA window in which to cancel a move. Can be varied in usage. Window
Normal Moves
5A


Total: 16
Terumi's fastest normal at 5 frames. 5A is mainly used as either an anti-air when 6A would whiff. Also is a abare, but not a good one as it whiffs on all crouching characters except Tager and Hakumen.
Gatling options: 5A, 2A, 6A, 5B, 2B, 6B, 5C, 2C, 6C, 3C, 5D, 2D, 6D, 4D
5B

+2 on block, very useful poke


| Damage | GuardHow this attack can be guarded. Throws have their throw range listed instead. | StartupHow many frames the attack needs to go through in order to reach its active frames. The listed startup frame coincides with the move's first active frame. | ActiveHow many frames where there is a hitbox that can hit an opponent. The first active frame occurs on the listed startup frame. | RecoveryHow many frames that the character must go through after an attack's active frames to automatically go back to a neutral stance, or the total duration of the move if it has no hitbox/creates projectiles. | Frame AdvHow many frames the attacker's recovery ends before the defender's blockstun ends if the attack is blocked. A positive value indicates that the attacker recovers first, while a negative value indicates that the defender recovers first. This value usually assumes that the attack's first active frame (of each hit, if multi-hit) is blocked. | On ODRThe difference between the attacker's total animation length and the period the opponent is in overdrive raid. This frame advantage is based off the assumption that both players input during the hitstop of a prior move, so that this attack and ODR start on the same frame. | AttributeSome attacks are invulnerable to attacks with specific attributes. This notes what attributes each attack possesses. H - Head B - Body F - Foot P - Projectile. Independent projectiles will have their Durability level listed, e.g. a projectile with Durability level 2 will show P2 T - Throw D - Doll attack, such as Carl's or Relius' doll Burst - Burst, which has its own unique attribute |
Invuln |
|---|---|---|---|---|---|---|---|---|
| 500 | Mid | 8 | 3 | 12 | +2 | B |
Total: 22
Terumi's 5B has much shorter range than most other 5Bs. However, it's an excellent pressure option due to being +2 on block. This can also be used as a high damage counter poke in his neutral game thanks to Terumi's high run speed.
Gatling options: 6A, 2B, 6B, 5C, 2C, 6C, 3C, 5D, 2D, 6D, 4D
| Starter RatingDetermines the starting value of the hitstun/untech decay timer and subsequent combo length | P1Proration applied to future hits when used as the first hit of a combo | P2Proration applied to future hits when used during any part of a combo | Attack LevelDefault Attack Level Values
| |||||||||||||||||||||||||||||||||||
|---|---|---|---|---|---|---|---|---|---|---|---|---|---|---|---|---|---|---|---|---|---|---|---|---|---|---|---|---|---|---|---|---|---|---|---|---|---|---|
| Long | 100 | 89 | 3 |
5C


| Damage | GuardHow this attack can be guarded. Throws have their throw range listed instead. | StartupHow many frames the attack needs to go through in order to reach its active frames. The listed startup frame coincides with the move's first active frame. | ActiveHow many frames where there is a hitbox that can hit an opponent. The first active frame occurs on the listed startup frame. | RecoveryHow many frames that the character must go through after an attack's active frames to automatically go back to a neutral stance, or the total duration of the move if it has no hitbox/creates projectiles. | Frame AdvHow many frames the attacker's recovery ends before the defender's blockstun ends if the attack is blocked. A positive value indicates that the attacker recovers first, while a negative value indicates that the defender recovers first. This value usually assumes that the attack's first active frame (of each hit, if multi-hit) is blocked. | On ODRThe difference between the attacker's total animation length and the period the opponent is in overdrive raid. This frame advantage is based off the assumption that both players input during the hitstop of a prior move, so that this attack and ODR start on the same frame. | AttributeSome attacks are invulnerable to attacks with specific attributes. This notes what attributes each attack possesses. H - Head B - Body F - Foot P - Projectile. Independent projectiles will have their Durability level listed, e.g. a projectile with Durability level 2 will show P2 T - Throw D - Doll attack, such as Carl's or Relius' doll Burst - Burst, which has its own unique attribute |
Invuln |
|---|---|---|---|---|---|---|---|---|
| 490×2 | All | 11 | 2(11)2 | 2+18L | -2 | B |
Total: 37
5C moves Terumi forward, helping him to stay in his effective range. It can be jump canceled on the first hit, although Terumi can't use an air action afterwards. Jump Cancelling can be used to reset pressure, or extend pressure with j.2D. With meter, 5C(1) can be Rapid Cancelled for a mix-up with either j.A/j.B, or a low/throw after landing.
- Launches on CH
- Hard KD on air hit
Gatling options: 6B, 2C, 6C, 3C, 5D, 2D, 6D, 4D
| Starter RatingDetermines the starting value of the hitstun/untech decay timer and subsequent combo length | P1Proration applied to future hits when used as the first hit of a combo | P2Proration applied to future hits when used during any part of a combo | Attack LevelDefault Attack Level Values
| |||||||||||||||||||||||||||||||||||
|---|---|---|---|---|---|---|---|---|---|---|---|---|---|---|---|---|---|---|---|---|---|---|---|---|---|---|---|---|---|---|---|---|---|---|---|---|---|---|
| Long | 100 | 89 | 3 |
- Airborne from frame 9, second hit occurs 5 frames after Terumi's vertical speed reaches 0
- Gap between hits/recovery before landing can be altered by external forces
2A


| Damage | GuardHow this attack can be guarded. Throws have their throw range listed instead. | StartupHow many frames the attack needs to go through in order to reach its active frames. The listed startup frame coincides with the move's first active frame. | ActiveHow many frames where there is a hitbox that can hit an opponent. The first active frame occurs on the listed startup frame. | RecoveryHow many frames that the character must go through after an attack's active frames to automatically go back to a neutral stance, or the total duration of the move if it has no hitbox/creates projectiles. | Frame AdvHow many frames the attacker's recovery ends before the defender's blockstun ends if the attack is blocked. A positive value indicates that the attacker recovers first, while a negative value indicates that the defender recovers first. This value usually assumes that the attack's first active frame (of each hit, if multi-hit) is blocked. | On ODRThe difference between the attacker's total animation length and the period the opponent is in overdrive raid. This frame advantage is based off the assumption that both players input during the hitstop of a prior move, so that this attack and ODR start on the same frame. | AttributeSome attacks are invulnerable to attacks with specific attributes. This notes what attributes each attack possesses. H - Head B - Body F - Foot P - Projectile. Independent projectiles will have their Durability level listed, e.g. a projectile with Durability level 2 will show P2 T - Throw D - Doll attack, such as Carl's or Relius' doll Burst - Burst, which has its own unique attribute |
Invuln |
|---|---|---|---|---|---|---|---|---|
| 300 | All | 7 | 2 | 10 | ±0 | F |
Total: 18
One of Terumi's greatest tools in pressure due to having only 7 frames of startup and being ±0 on block, and is also useful for tick throws. Can be frame trapped into 6C or 236D. While it can be used to get out of pressure, the range is not that great.
Gatling options: 5A, 2A, 6A, 5B, 2B, 6B, 5C, 2C, 6C, 3C, 5D, 2D, 6D, 4D
| Starter RatingDetermines the starting value of the hitstun/untech decay timer and subsequent combo length | P1Proration applied to future hits when used as the first hit of a combo | P2Proration applied to future hits when used during any part of a combo | Attack LevelDefault Attack Level Values
| |||||||||||||||||||||||||||||||||||
|---|---|---|---|---|---|---|---|---|---|---|---|---|---|---|---|---|---|---|---|---|---|---|---|---|---|---|---|---|---|---|---|---|---|---|---|---|---|---|
| Normal | 100 | 80 | 1 |
2B


| Damage | GuardHow this attack can be guarded. Throws have their throw range listed instead. | StartupHow many frames the attack needs to go through in order to reach its active frames. The listed startup frame coincides with the move's first active frame. | ActiveHow many frames where there is a hitbox that can hit an opponent. The first active frame occurs on the listed startup frame. | RecoveryHow many frames that the character must go through after an attack's active frames to automatically go back to a neutral stance, or the total duration of the move if it has no hitbox/creates projectiles. | Frame AdvHow many frames the attacker's recovery ends before the defender's blockstun ends if the attack is blocked. A positive value indicates that the attacker recovers first, while a negative value indicates that the defender recovers first. This value usually assumes that the attack's first active frame (of each hit, if multi-hit) is blocked. | On ODRThe difference between the attacker's total animation length and the period the opponent is in overdrive raid. This frame advantage is based off the assumption that both players input during the hitstop of a prior move, so that this attack and ODR start on the same frame. | AttributeSome attacks are invulnerable to attacks with specific attributes. This notes what attributes each attack possesses. H - Head B - Body F - Foot P - Projectile. Independent projectiles will have their Durability level listed, e.g. a projectile with Durability level 2 will show P2 T - Throw D - Doll attack, such as Carl's or Relius' doll Burst - Burst, which has its own unique attribute |
Invuln |
|---|---|---|---|---|---|---|---|---|
| 480 | Low | 9 | 3 | 19 | -8 | F |
Total: 30
This move is one of his best pokes due to it's range, but needs to be used with caution due to it's sluggish 19 frames of recovery. This is also Terumi main low. Beware of Instant Blocks, as it creates a gap when chaining into any C or D normal besides 3C and 4D.
Gatling options: 6A, 5B, 6B, 5C, 2C, 6C, 3C, 5D, 2D, 6D, 4D
| Starter RatingDetermines the starting value of the hitstun/untech decay timer and subsequent combo length | P1Proration applied to future hits when used as the first hit of a combo | P2Proration applied to future hits when used during any part of a combo | Attack LevelDefault Attack Level Values
| |||||||||||||||||||||||||||||||||||
|---|---|---|---|---|---|---|---|---|---|---|---|---|---|---|---|---|---|---|---|---|---|---|---|---|---|---|---|---|---|---|---|---|---|---|---|---|---|---|
| Long | 90 | 85 | 2 |
2C


| Damage | GuardHow this attack can be guarded. Throws have their throw range listed instead. | StartupHow many frames the attack needs to go through in order to reach its active frames. The listed startup frame coincides with the move's first active frame. | ActiveHow many frames where there is a hitbox that can hit an opponent. The first active frame occurs on the listed startup frame. | RecoveryHow many frames that the character must go through after an attack's active frames to automatically go back to a neutral stance, or the total duration of the move if it has no hitbox/creates projectiles. | Frame AdvHow many frames the attacker's recovery ends before the defender's blockstun ends if the attack is blocked. A positive value indicates that the attacker recovers first, while a negative value indicates that the defender recovers first. This value usually assumes that the attack's first active frame (of each hit, if multi-hit) is blocked. | On ODRThe difference between the attacker's total animation length and the period the opponent is in overdrive raid. This frame advantage is based off the assumption that both players input during the hitstop of a prior move, so that this attack and ODR start on the same frame. | AttributeSome attacks are invulnerable to attacks with specific attributes. This notes what attributes each attack possesses. H - Head B - Body F - Foot P - Projectile. Independent projectiles will have their Durability level listed, e.g. a projectile with Durability level 2 will show P2 T - Throw D - Doll attack, such as Carl's or Relius' doll Burst - Burst, which has its own unique attribute |
Invuln |
|---|---|---|---|---|---|---|---|---|
| 720 | Mid | 13 | 4 | 25 | -12 | F |
Total: 41
This is one of Terumi's longest ranged normals, but is quite poor as a neutral tool due to the startup, recovery and extended hurtbox. 2C is also not a low. It's jump-cancelable on hit and block, and Terumi can use an air option after a jump cancel, unlike 5C. It's useful in pressure as you can jump cancel into j.2D without leaving much of a gap (4F), or as a frame trap after a 2A.
- Terumi's hurtbox extends during the startup frames and is as long as the hitbox.
Gatling options: 6B, 5C, 6C, 3C, 5D, 2D, 6D, 4D
| Starter RatingDetermines the starting value of the hitstun/untech decay timer and subsequent combo length | P1Proration applied to future hits when used as the first hit of a combo | P2Proration applied to future hits when used during any part of a combo | Attack LevelDefault Attack Level Values
| |||||||||||||||||||||||||||||||||||
|---|---|---|---|---|---|---|---|---|---|---|---|---|---|---|---|---|---|---|---|---|---|---|---|---|---|---|---|---|---|---|---|---|---|---|---|---|---|---|
| Long | 100 | 89 | 3 |
6A

Very fast anti-air


| Damage | GuardHow this attack can be guarded. Throws have their throw range listed instead. | StartupHow many frames the attack needs to go through in order to reach its active frames. The listed startup frame coincides with the move's first active frame. | ActiveHow many frames where there is a hitbox that can hit an opponent. The first active frame occurs on the listed startup frame. | RecoveryHow many frames that the character must go through after an attack's active frames to automatically go back to a neutral stance, or the total duration of the move if it has no hitbox/creates projectiles. | Frame AdvHow many frames the attacker's recovery ends before the defender's blockstun ends if the attack is blocked. A positive value indicates that the attacker recovers first, while a negative value indicates that the defender recovers first. This value usually assumes that the attack's first active frame (of each hit, if multi-hit) is blocked. | On ODRThe difference between the attacker's total animation length and the period the opponent is in overdrive raid. This frame advantage is based off the assumption that both players input during the hitstop of a prior move, so that this attack and ODR start on the same frame. | AttributeSome attacks are invulnerable to attacks with specific attributes. This notes what attributes each attack possesses. H - Head B - Body F - Foot P - Projectile. Independent projectiles will have their Durability level listed, e.g. a projectile with Durability level 2 will show P2 T - Throw D - Doll attack, such as Carl's or Relius' doll Burst - Burst, which has its own unique attribute |
Invuln |
|---|---|---|---|---|---|---|---|---|
| 550 | Mid | 9 | 3 | 24 | -10 | B | 5~11 H |
Total: 35
Terumi's primary Anti-Air. It has good horizontal range, only 9F startup, the hitbox covers Terumi's entire head, and it's jump-cancelable on hit and block. The only downside is that the damage off of it without a Counter-hit can leave a lot to be desired, even with meter.
On Counter-Hit, it has a lot more hitstun, allowing for good damage and meter gain.
Gatling options: 6B, 5C, 2C, 6C, 3C, 5D, 2D, 6D, 4D
| Starter RatingDetermines the starting value of the hitstun/untech decay timer and subsequent combo length | P1Proration applied to future hits when used as the first hit of a combo | P2Proration applied to future hits when used during any part of a combo | Attack LevelDefault Attack Level Values
| |||||||||||||||||||||||||||||||||||
|---|---|---|---|---|---|---|---|---|---|---|---|---|---|---|---|---|---|---|---|---|---|---|---|---|---|---|---|---|---|---|---|---|---|---|---|---|---|---|
| Normal | 90 | 79 | 3 |
6B


| Version | Damage | GuardHow this attack can be guarded. Throws have their throw range listed instead. | StartupHow many frames the attack needs to go through in order to reach its active frames. The listed startup frame coincides with the move's first active frame. | ActiveHow many frames where there is a hitbox that can hit an opponent. The first active frame occurs on the listed startup frame. | RecoveryHow many frames that the character must go through after an attack's active frames to automatically go back to a neutral stance, or the total duration of the move if it has no hitbox/creates projectiles. | Frame AdvHow many frames the attacker's recovery ends before the defender's blockstun ends if the attack is blocked. A positive value indicates that the attacker recovers first, while a negative value indicates that the defender recovers first. This value usually assumes that the attack's first active frame (of each hit, if multi-hit) is blocked. | On ODRThe difference between the attacker's total animation length and the period the opponent is in overdrive raid. This frame advantage is based off the assumption that both players input during the hitstop of a prior move, so that this attack and ODR start on the same frame. | AttributeSome attacks are invulnerable to attacks with specific attributes. This notes what attributes each attack possesses. H - Head B - Body F - Foot P - Projectile. Independent projectiles will have their Durability level listed, e.g. a projectile with Durability level 2 will show P2 T - Throw D - Doll attack, such as Carl's or Relius' doll Burst - Burst, which has its own unique attribute |
Invuln |
|---|---|---|---|---|---|---|---|---|---|
| 6B | 650 | Mid | 24 | 3 | 12 | +3 | B | 13~26 FT | |
| 6[B] | 31 |
6B
Total: 38
[6B]
Total: 31
Terumi does a short dash before ramming his knee into his opponent. In pressure, it can be chained into from almost all of Terumi's normals, and its useful for frame trapping due to the Foot and Throw invuln. However, this move can easily be beat out if the opponent has a DP. This move is also air unblockable, and can catch opponents trying to jump out of Terumi's pressure.
The feint version is performed by holding B. It is used almost exclusively for throw setups and mind games, due to lacking the Foot and Throw invuln of the non-feint version. Although it can be used to bait reversals in certain matchups (Ex: Jin's Yukikaze or Hakumen's Zanshin).
How much this normal is used depends entirely on the matchup and the opponent's defensive options. In some matchups it goes entirely untouched, but in others it'll be leaned on as a crutch.
- Hard KD on air hit.
- Crumple stuns on CH.
- Fatal Counter.
Gatling options (on hit): 6C, 6D
| Version | Starter RatingDetermines the starting value of the hitstun/untech decay timer and subsequent combo length | P1Proration applied to future hits when used as the first hit of a combo | P2Proration applied to future hits when used during any part of a combo | Attack LevelDefault Attack Level Values
| |||||||||||||||||||||||||||||||||||
|---|---|---|---|---|---|---|---|---|---|---|---|---|---|---|---|---|---|---|---|---|---|---|---|---|---|---|---|---|---|---|---|---|---|---|---|---|---|---|---|
| 6B | Long | 90 | 92 | 4 | |||||||||||||||||||||||||||||||||||
| 6[B] |
6B:
- Fatal Counter
- On CH Crumple Duration 61, Crumple Fall 81F
6[B]:
- Can cancel into throw or specials from frame 25
6C

I hope you have 50 meter


| Damage | GuardHow this attack can be guarded. Throws have their throw range listed instead. | StartupHow many frames the attack needs to go through in order to reach its active frames. The listed startup frame coincides with the move's first active frame. | ActiveHow many frames where there is a hitbox that can hit an opponent. The first active frame occurs on the listed startup frame. | RecoveryHow many frames that the character must go through after an attack's active frames to automatically go back to a neutral stance, or the total duration of the move if it has no hitbox/creates projectiles. | Frame AdvHow many frames the attacker's recovery ends before the defender's blockstun ends if the attack is blocked. A positive value indicates that the attacker recovers first, while a negative value indicates that the defender recovers first. This value usually assumes that the attack's first active frame (of each hit, if multi-hit) is blocked. | On ODRThe difference between the attacker's total animation length and the period the opponent is in overdrive raid. This frame advantage is based off the assumption that both players input during the hitstop of a prior move, so that this attack and ODR start on the same frame. | AttributeSome attacks are invulnerable to attacks with specific attributes. This notes what attributes each attack possesses. H - Head B - Body F - Foot P - Projectile. Independent projectiles will have their Durability level listed, e.g. a projectile with Durability level 2 will show P2 T - Throw D - Doll attack, such as Carl's or Relius' doll Burst - Burst, which has its own unique attribute |
Invuln |
|---|---|---|---|---|---|---|---|---|
| 500, 300, 650 | All | 13 | 2(8)3(17)4 | 31 | -14 | B |
Total: 77
This is Terumi's longest ranged normal. However, it doesn't lead to anything without a Counter-Hit or Rapid Cancel. It will not end well if you throw it out randomly in neutral.
In pressure, it is not an bad option for closing distance when 6B cannot reach, considering Terumi's meter gain. It can also be RC'd just before the third hit to mix in a surprise low/throw.
Note that there is no gap between the second and the third hit, but if the opponent IB'd, they can reversal you out.
It is a soft KD, but it has a high groundbounce which leaves Terumi plus enough to safejump or pickup easily after RC.
- Hard KD on CH
- Counter Hit Recovery.
Gatling options: None
| Starter RatingDetermines the starting value of the hitstun/untech decay timer and subsequent combo length | P1Proration applied to future hits when used as the first hit of a combo | P2Proration applied to future hits when used during any part of a combo | Attack LevelDefault Attack Level Values
| |||||||||||||||||||||||||||||||||||
|---|---|---|---|---|---|---|---|---|---|---|---|---|---|---|---|---|---|---|---|---|---|---|---|---|---|---|---|---|---|---|---|---|---|---|---|---|---|---|
| Long | 90 | 94 | 5 |
- Counterhit state during recovery
3C


| Damage | GuardHow this attack can be guarded. Throws have their throw range listed instead. | StartupHow many frames the attack needs to go through in order to reach its active frames. The listed startup frame coincides with the move's first active frame. | ActiveHow many frames where there is a hitbox that can hit an opponent. The first active frame occurs on the listed startup frame. | RecoveryHow many frames that the character must go through after an attack's active frames to automatically go back to a neutral stance, or the total duration of the move if it has no hitbox/creates projectiles. | Frame AdvHow many frames the attacker's recovery ends before the defender's blockstun ends if the attack is blocked. A positive value indicates that the attacker recovers first, while a negative value indicates that the defender recovers first. This value usually assumes that the attack's first active frame (of each hit, if multi-hit) is blocked. | On ODRThe difference between the attacker's total animation length and the period the opponent is in overdrive raid. This frame advantage is based off the assumption that both players input during the hitstop of a prior move, so that this attack and ODR start on the same frame. | AttributeSome attacks are invulnerable to attacks with specific attributes. This notes what attributes each attack possesses. H - Head B - Body F - Foot P - Projectile. Independent projectiles will have their Durability level listed, e.g. a projectile with Durability level 2 will show P2 T - Throw D - Doll attack, such as Carl's or Relius' doll Burst - Burst, which has its own unique attribute |
Invuln |
|---|---|---|---|---|---|---|---|---|
| 700 | Low | 10 | 2 | 30 | -13 | F |
Total: 41
Terumi's other low attack. This can be be used in his mix-up game and gatlings into 5D to stay safe or further cancel to 6B for resets. Because it knocks the opponent down, it allows for immediate use of 22C on hit.
On Counter-Hit, it inflicts hard knockdown, allowing a link other normals for more damage and even 2D if done immediately.
Gatling options: 6C, 5D, 2D, 6D
| Starter RatingDetermines the starting value of the hitstun/untech decay timer and subsequent combo length | P1Proration applied to future hits when used as the first hit of a combo | P2Proration applied to future hits when used during any part of a combo | Attack LevelDefault Attack Level Values
| |||||||||||||||||||||||||||||||||||
|---|---|---|---|---|---|---|---|---|---|---|---|---|---|---|---|---|---|---|---|---|---|---|---|---|---|---|---|---|---|---|---|---|---|---|---|---|---|---|
| Long | 90 | 92 | 4 |
j.A


| Damage | GuardHow this attack can be guarded. Throws have their throw range listed instead. | StartupHow many frames the attack needs to go through in order to reach its active frames. The listed startup frame coincides with the move's first active frame. | ActiveHow many frames where there is a hitbox that can hit an opponent. The first active frame occurs on the listed startup frame. | RecoveryHow many frames that the character must go through after an attack's active frames to automatically go back to a neutral stance, or the total duration of the move if it has no hitbox/creates projectiles. | Frame AdvHow many frames the attacker's recovery ends before the defender's blockstun ends if the attack is blocked. A positive value indicates that the attacker recovers first, while a negative value indicates that the defender recovers first. This value usually assumes that the attack's first active frame (of each hit, if multi-hit) is blocked. | On ODRThe difference between the attacker's total animation length and the period the opponent is in overdrive raid. This frame advantage is based off the assumption that both players input during the hitstop of a prior move, so that this attack and ODR start on the same frame. | AttributeSome attacks are invulnerable to attacks with specific attributes. This notes what attributes each attack possesses. H - Head B - Body F - Foot P - Projectile. Independent projectiles will have their Durability level listed, e.g. a projectile with Durability level 2 will show P2 T - Throw D - Doll attack, such as Carl's or Relius' doll Burst - Burst, which has its own unique attribute |
Invuln |
|---|---|---|---|---|---|---|---|---|
| 300 | High/Air | 7 | 3 | 9 | H |
Total: 18
Jumping jab. One of his best options for hitting crouchers on a jump-in. Also useful as an air-to-air option. With 50 Heat, it can be used as an instant overhead by doing 5C(1) → RC → j.A.
Gatling options: j.A, j.B, j.C, j.D, j.2D
| Starter RatingDetermines the starting value of the hitstun/untech decay timer and subsequent combo length | P1Proration applied to future hits when used as the first hit of a combo | P2Proration applied to future hits when used during any part of a combo | Attack LevelDefault Attack Level Values
| |||||||||||||||||||||||||||||||||||
|---|---|---|---|---|---|---|---|---|---|---|---|---|---|---|---|---|---|---|---|---|---|---|---|---|---|---|---|---|---|---|---|---|---|---|---|---|---|---|
| Normal | 80 | 80 | 1 |
j.B


| Damage | GuardHow this attack can be guarded. Throws have their throw range listed instead. | StartupHow many frames the attack needs to go through in order to reach its active frames. The listed startup frame coincides with the move's first active frame. | ActiveHow many frames where there is a hitbox that can hit an opponent. The first active frame occurs on the listed startup frame. | RecoveryHow many frames that the character must go through after an attack's active frames to automatically go back to a neutral stance, or the total duration of the move if it has no hitbox/creates projectiles. | Frame AdvHow many frames the attacker's recovery ends before the defender's blockstun ends if the attack is blocked. A positive value indicates that the attacker recovers first, while a negative value indicates that the defender recovers first. This value usually assumes that the attack's first active frame (of each hit, if multi-hit) is blocked. | On ODRThe difference between the attacker's total animation length and the period the opponent is in overdrive raid. This frame advantage is based off the assumption that both players input during the hitstop of a prior move, so that this attack and ODR start on the same frame. | AttributeSome attacks are invulnerable to attacks with specific attributes. This notes what attributes each attack possesses. H - Head B - Body F - Foot P - Projectile. Independent projectiles will have their Durability level listed, e.g. a projectile with Durability level 2 will show P2 T - Throw D - Doll attack, such as Carl's or Relius' doll Burst - Burst, which has its own unique attribute |
Invuln |
|---|---|---|---|---|---|---|---|---|
| 380×2 | High/Air | 10 | 4(2)2 | 14 | H |
Total: 31
An all-purpose air normal, but compared to some of his other normals, it's not that good of a jump-in. It has great horizontal range, decent vertical range, and can cross up in the later parts of the move.
Gatling options: j.C, j.D, j.2D
| Starter RatingDetermines the starting value of the hitstun/untech decay timer and subsequent combo length | P1Proration applied to future hits when used as the first hit of a combo | P2Proration applied to future hits when used during any part of a combo | Attack LevelDefault Attack Level Values
| |||||||||||||||||||||||||||||||||||
|---|---|---|---|---|---|---|---|---|---|---|---|---|---|---|---|---|---|---|---|---|---|---|---|---|---|---|---|---|---|---|---|---|---|---|---|---|---|---|
| Long | 80 | 85 | 2 |
j.C


| Damage | GuardHow this attack can be guarded. Throws have their throw range listed instead. | StartupHow many frames the attack needs to go through in order to reach its active frames. The listed startup frame coincides with the move's first active frame. | ActiveHow many frames where there is a hitbox that can hit an opponent. The first active frame occurs on the listed startup frame. | RecoveryHow many frames that the character must go through after an attack's active frames to automatically go back to a neutral stance, or the total duration of the move if it has no hitbox/creates projectiles. | Frame AdvHow many frames the attacker's recovery ends before the defender's blockstun ends if the attack is blocked. A positive value indicates that the attacker recovers first, while a negative value indicates that the defender recovers first. This value usually assumes that the attack's first active frame (of each hit, if multi-hit) is blocked. | On ODRThe difference between the attacker's total animation length and the period the opponent is in overdrive raid. This frame advantage is based off the assumption that both players input during the hitstop of a prior move, so that this attack and ODR start on the same frame. | AttributeSome attacks are invulnerable to attacks with specific attributes. This notes what attributes each attack possesses. H - Head B - Body F - Foot P - Projectile. Independent projectiles will have their Durability level listed, e.g. a projectile with Durability level 2 will show P2 T - Throw D - Doll attack, such as Carl's or Relius' doll Burst - Burst, which has its own unique attribute |
Invuln |
|---|---|---|---|---|---|---|---|---|
| 350×2, 550 | High/Air | 11 | 2(3)2(4)2 | 18 | -3 | H |
Total: 41
Terumi's j.C sees a lot of use in neutral, where it's used for Terumi to protect himself from an approach where j.D would be too slow. Not that great of a jump-in, but it is still good to use off of an IAD.
Gatling options: j.D, j.2D
| Starter RatingDetermines the starting value of the hitstun/untech decay timer and subsequent combo length | P1Proration applied to future hits when used as the first hit of a combo | P2Proration applied to future hits when used during any part of a combo | Attack LevelDefault Attack Level Values
| |||||||||||||||||||||||||||||||||||
|---|---|---|---|---|---|---|---|---|---|---|---|---|---|---|---|---|---|---|---|---|---|---|---|---|---|---|---|---|---|---|---|---|---|---|---|---|---|---|
| Long | 80 | 89 | 2,2,3 |
Drive Moves
- All Terumi's Drive moves will generates a fixed amount of heat. This value is listed in the (minimum X%) part of the description.
- The heat gain listed here is the heat gain on raw hit (the first hit of the combo).
To see the details of how Terumi's heat gain is calculated, see Frame Data page.
5D

Jabak- wait, wrong character.


| Damage | GuardHow this attack can be guarded. Throws have their throw range listed instead. | StartupHow many frames the attack needs to go through in order to reach its active frames. The listed startup frame coincides with the move's first active frame. | ActiveHow many frames where there is a hitbox that can hit an opponent. The first active frame occurs on the listed startup frame. | RecoveryHow many frames that the character must go through after an attack's active frames to automatically go back to a neutral stance, or the total duration of the move if it has no hitbox/creates projectiles. | Frame AdvHow many frames the attacker's recovery ends before the defender's blockstun ends if the attack is blocked. A positive value indicates that the attacker recovers first, while a negative value indicates that the defender recovers first. This value usually assumes that the attack's first active frame (of each hit, if multi-hit) is blocked. | On ODRThe difference between the attacker's total animation length and the period the opponent is in overdrive raid. This frame advantage is based off the assumption that both players input during the hitstop of a prior move, so that this attack and ODR start on the same frame. | AttributeSome attacks are invulnerable to attacks with specific attributes. This notes what attributes each attack possesses. H - Head B - Body F - Foot P - Projectile. Independent projectiles will have their Durability level listed, e.g. a projectile with Durability level 2 will show P2 T - Throw D - Doll attack, such as Carl's or Relius' doll Burst - Burst, which has its own unique attribute |
Invuln |
|---|---|---|---|---|---|---|---|---|
| 620 | All | 13 | 4 | 18 | -3 | BP |
Total: 34
Terumi's 2nd longest ranged normal, as well as his go-to poke in neutral. The max range of this move isn't at the tip, but at around the snake's eyes. It's a strike-projectile and can be used to nullify other projectiles, but will lose to level 2 ones. The startup is a bit slow, but 5D has good hitstun which makes confirms into 6C not too difficult.
- Gains 15 Heat on hit
- Minimum 5
- 8 on block.
Overdrive Version
The range of 5D extends greatly, now reaching to the tip. It also hits lower to the ground, making it less susceptible to low profiles.
- Gains 17 Heat on hit
- Minimum 7
- 10 Heat on block
- Drains 2 Heat on contact.
Gatling options: 6B, 6C, 2D, 6D
| Starter RatingDetermines the starting value of the hitstun/untech decay timer and subsequent combo length | P1Proration applied to future hits when used as the first hit of a combo | P2Proration applied to future hits when used during any part of a combo | Attack LevelDefault Attack Level Values
| |||||||||||||||||||||||||||||||||||
|---|---|---|---|---|---|---|---|---|---|---|---|---|---|---|---|---|---|---|---|---|---|---|---|---|---|---|---|---|---|---|---|---|---|---|---|---|---|---|
| Long | 100 | 82 | 4 |
- 90%+500 [90%+700] extra Heat gain
- Bigger Hitbox during OD
2D

- BBCF Yuuki Terumi 2D Hitbox.png
- BBCF Yuuki Terumi 2D-OD Hittbox.png
| Version | Damage | GuardHow this attack can be guarded. Throws have their throw range listed instead. | StartupHow many frames the attack needs to go through in order to reach its active frames. The listed startup frame coincides with the move's first active frame. | ActiveHow many frames where there is a hitbox that can hit an opponent. The first active frame occurs on the listed startup frame. | RecoveryHow many frames that the character must go through after an attack's active frames to automatically go back to a neutral stance, or the total duration of the move if it has no hitbox/creates projectiles. | Frame AdvHow many frames the attacker's recovery ends before the defender's blockstun ends if the attack is blocked. A positive value indicates that the attacker recovers first, while a negative value indicates that the defender recovers first. This value usually assumes that the attack's first active frame (of each hit, if multi-hit) is blocked. | On ODRThe difference between the attacker's total animation length and the period the opponent is in overdrive raid. This frame advantage is based off the assumption that both players input during the hitstop of a prior move, so that this attack and ODR start on the same frame. | AttributeSome attacks are invulnerable to attacks with specific attributes. This notes what attributes each attack possesses. H - Head B - Body F - Foot P - Projectile. Independent projectiles will have their Durability level listed, e.g. a projectile with Durability level 2 will show P2 T - Throw D - Doll attack, such as Carl's or Relius' doll Burst - Burst, which has its own unique attribute |
Invuln |
|---|---|---|---|---|---|---|---|---|---|
| 2D | 680 | All | 40 | 15 | Total 61 | +5 | P1 | ||
| 2D OD | 350×3 | All | 40 | 3×5 | Total 61 | +11 | P1 |
Total: 61
A projectile that spawns far from Terumi and then comes toward him, it has a strong vacuum effect which also pulls the opponent. 2D can be used as a pressure reset, having the potential to be +17 if the opponent is close enough to him, but this also means the startup is often slower than the initial 40f, so it's very vulnerable to abare. Generally, Terumi has safer ways to reset pressure such as j.2D. It can occasionally see use in okizeme to outrange certain reversals.
Its only utility in combos is from CH 6A for optimal meter regen.
- Counter-Hit state for the entire duration.
- Gains 24 Heat on hit
- Minimum 5
- 9 Heat on block
Overdrive Version
Now hits three times which helps to capitalise on the frame advantage, and the hitbox is larger, but 2D stil suffers the same issues as the normal version.
- Gains 35 Heat on hit
- Minimum 21
- 22 Heat on block
- Drains 6 Heat on contact
Gatling options: None
| Version | Starter RatingDetermines the starting value of the hitstun/untech decay timer and subsequent combo length | P1Proration applied to future hits when used as the first hit of a combo | P2Proration applied to future hits when used during any part of a combo | Attack LevelDefault Attack Level Values
| |||||||||||||||||||||||||||||||||||
|---|---|---|---|---|---|---|---|---|---|---|---|---|---|---|---|---|---|---|---|---|---|---|---|---|---|---|---|---|---|---|---|---|---|---|---|---|---|---|---|
| 2D | Long | 90 | 82 | 4 | |||||||||||||||||||||||||||||||||||
| 2D OD | Long | 90 | 82 | 4 |
2D:
- 216%+500 extra Heat gain
- Bonus Proration 110%
2D OD:
- 216%+500 extra Heat gain
- Bonus Proration 110%
- Max 3 hits
6D


- BBCF Yuuki Terumi 6D Hitbox.png
| Version | Damage | GuardHow this attack can be guarded. Throws have their throw range listed instead. | StartupHow many frames the attack needs to go through in order to reach its active frames. The listed startup frame coincides with the move's first active frame. | ActiveHow many frames where there is a hitbox that can hit an opponent. The first active frame occurs on the listed startup frame. | RecoveryHow many frames that the character must go through after an attack's active frames to automatically go back to a neutral stance, or the total duration of the move if it has no hitbox/creates projectiles. | Frame AdvHow many frames the attacker's recovery ends before the defender's blockstun ends if the attack is blocked. A positive value indicates that the attacker recovers first, while a negative value indicates that the defender recovers first. This value usually assumes that the attack's first active frame (of each hit, if multi-hit) is blocked. | On ODRThe difference between the attacker's total animation length and the period the opponent is in overdrive raid. This frame advantage is based off the assumption that both players input during the hitstop of a prior move, so that this attack and ODR start on the same frame. | AttributeSome attacks are invulnerable to attacks with specific attributes. This notes what attributes each attack possesses. H - Head B - Body F - Foot P - Projectile. Independent projectiles will have their Durability level listed, e.g. a projectile with Durability level 2 will show P2 T - Throw D - Doll attack, such as Carl's or Relius' doll Burst - Burst, which has its own unique attribute |
Invuln |
|---|---|---|---|---|---|---|---|---|---|
| 6D | 350 | Mid | 18 | 3 | 24 | -8 | B | ||
| 6D Followup | 300×2, 550 | All | B | ||||||
| 6D Followup OD | 250×4, 550 | All | B |
Total: 44
Essentially a hitgrab since it fixes the position of the opponent if the followup triggers (Requires the opponent to be within 400,000 units horizontally, which isn't hard at all). For the most part this is just combo filler due to being outclassed by Terumi's other tools. However it's Terumi's fastest Fatal Counter move that doesn't cost meter, so it has niche use as a punish tool.
As followup hits only occur if they're relatively close, the long untech of the first hit can be used to extend some combos.
- Fatal Counter
- First hit crumple stuns on ground hit
- Twirl stuns on air hit.
- Gains 30 heat
- Minimum 8.
Overdrive Version
Significantly better as combo filler, as it has great meter gain and good scaling. Allows Terumi to tack on a super at the end, though the height and distance makes it hard, if not impossible, to connect certain supers. On the last hit, Terumi kicks the opponent farther/higher than the normal version, if hit high enough you can also follow up with another 6D from about halfscreen (requires a microdash outside the corner) for a lot of meter gain without much scaling.
- Gains 42 Heat on hit
- Minimum 16
- Drains 5 Heat on contact
| Version | Starter RatingDetermines the starting value of the hitstun/untech decay timer and subsequent combo length | P1Proration applied to future hits when used as the first hit of a combo | P2Proration applied to future hits when used during any part of a combo | Attack LevelDefault Attack Level Values
| |||||||||||||||||||||||||||||||||||
|---|---|---|---|---|---|---|---|---|---|---|---|---|---|---|---|---|---|---|---|---|---|---|---|---|---|---|---|---|---|---|---|---|---|---|---|---|---|---|---|
| 6D | Long | 100 | 100 | 4 | |||||||||||||||||||||||||||||||||||
| 6D Followup | Long | 100 | 82 | 3×2,5 | |||||||||||||||||||||||||||||||||||
| 6D Followup OD | Long | 100 | 82 | 3×4,5 |
6D:
- Fatal Counter
- If within range, does followup attack
- Crumple Duration 29F, Crumple Fall 62F
- On CH Crumple Duration 61F, Crumple Fall 81F
6D Followup:
- 468%+400 extra Heat gain
6D Followup OD:
- 468%+300 extra Heat gain
4D

Best Drive normal for beating projectiles


| Damage | GuardHow this attack can be guarded. Throws have their throw range listed instead. | StartupHow many frames the attack needs to go through in order to reach its active frames. The listed startup frame coincides with the move's first active frame. | ActiveHow many frames where there is a hitbox that can hit an opponent. The first active frame occurs on the listed startup frame. | RecoveryHow many frames that the character must go through after an attack's active frames to automatically go back to a neutral stance, or the total duration of the move if it has no hitbox/creates projectiles. | Frame AdvHow many frames the attacker's recovery ends before the defender's blockstun ends if the attack is blocked. A positive value indicates that the attacker recovers first, while a negative value indicates that the defender recovers first. This value usually assumes that the attack's first active frame (of each hit, if multi-hit) is blocked. | On ODRThe difference between the attacker's total animation length and the period the opponent is in overdrive raid. This frame advantage is based off the assumption that both players input during the hitstop of a prior move, so that this attack and ODR start on the same frame. | AttributeSome attacks are invulnerable to attacks with specific attributes. This notes what attributes each attack possesses. H - Head B - Body F - Foot P - Projectile. Independent projectiles will have their Durability level listed, e.g. a projectile with Durability level 2 will show P2 T - Throw D - Doll attack, such as Carl's or Relius' doll Burst - Burst, which has its own unique attribute |
Invuln |
|---|---|---|---|---|---|---|---|---|
| 600 | All | 10 | 6 | 16 | -8 | BP |
Total: 31
Terumi preforms a short-ranged kick. Like 5D, it clashes with level 1 projectiles. Being jump-cancellable and super-cancellable, it allows for mix-ups and safejumps. This move can also be used as a counter-poke in certain situations, due to it's speed and disjointed hitbox, it'll beat out moves with extended hurtboxes and clash with ones that don't.
- Launches on hit.
- Gains 13 Heat on hit
- Minimum 5
- 7 on Block.
Overdrive Version
Untechable time is greatly increased, allowing Terumi to loop 4D → j.2D more than once.
- Gains 17 Heat on hit
- Minimum 7
- 11 on Block
- Drains 2 Heat on contact.
Gatling options: None
| Starter RatingDetermines the starting value of the hitstun/untech decay timer and subsequent combo length | P1Proration applied to future hits when used as the first hit of a combo | P2Proration applied to future hits when used during any part of a combo | Attack LevelDefault Attack Level Values
| |||||||||||||||||||||||||||||||||||
|---|---|---|---|---|---|---|---|---|---|---|---|---|---|---|---|---|---|---|---|---|---|---|---|---|---|---|---|---|---|---|---|---|---|---|---|---|---|---|
| Long | 100 | 85 | 2 |
- 72%+500 [72%+700] extra Heat gain
- Recovery animation is technically 24 frames, but the last 8 frames are cancellable into any action
j.D

Neutral in a can


| Damage | GuardHow this attack can be guarded. Throws have their throw range listed instead. | StartupHow many frames the attack needs to go through in order to reach its active frames. The listed startup frame coincides with the move's first active frame. | ActiveHow many frames where there is a hitbox that can hit an opponent. The first active frame occurs on the listed startup frame. | RecoveryHow many frames that the character must go through after an attack's active frames to automatically go back to a neutral stance, or the total duration of the move if it has no hitbox/creates projectiles. | Frame AdvHow many frames the attacker's recovery ends before the defender's blockstun ends if the attack is blocked. A positive value indicates that the attacker recovers first, while a negative value indicates that the defender recovers first. This value usually assumes that the attack's first active frame (of each hit, if multi-hit) is blocked. | On ODRThe difference between the attacker's total animation length and the period the opponent is in overdrive raid. This frame advantage is based off the assumption that both players input during the hitstop of a prior move, so that this attack and ODR start on the same frame. | AttributeSome attacks are invulnerable to attacks with specific attributes. This notes what attributes each attack possesses. H - Head B - Body F - Foot P - Projectile. Independent projectiles will have their Durability level listed, e.g. a projectile with Durability level 2 will show P2 T - Throw D - Doll attack, such as Carl's or Relius' doll Burst - Burst, which has its own unique attribute |
Invuln |
|---|---|---|---|---|---|---|---|---|
| 660 | All | 20 | 4 | 23+6L | HP |
Total: 52
Terumi's main air-to-ground normal and keepaway tool, thanks to its massive, disjointed hitbox, as well as its short landing recovery. This allows him to prevent his opponent from approaching too carelessly. However, this move is quite slow to come out, making it risky to throw out if the opponent is too close.
It can be very hard to confirm without a Counter-Hit, 5D only links if j.D is done as late as possible, j.2D only links on an airborne opponent, and all of Terumi's other normals are hard to link due to j.D's high pushback and knockback. With Counter-Hit, however, it can generally combo into 5D unless you hit very early in your jump.
- Ground bounces on CH
- Gains 18 Heat on hit
- Minimum 5.
- 7 on block.
Overdrive Version
During OD, the hitbox becomes even bigger, making it even harder to contest. Thanks to j.2D's hard knockdown in OD, it can be used as combo filler.
- Gains 20 Heat on hit
- Minimum 7
- 11% on block
- Drains 2 on contact.
Gatling options: j.2D
| Starter RatingDetermines the starting value of the hitstun/untech decay timer and subsequent combo length | P1Proration applied to future hits when used as the first hit of a combo | P2Proration applied to future hits when used during any part of a combo | Attack LevelDefault Attack Level Values
| |||||||||||||||||||||||||||||||||||
|---|---|---|---|---|---|---|---|---|---|---|---|---|---|---|---|---|---|---|---|---|---|---|---|---|---|---|---|---|---|---|---|---|---|---|---|---|---|---|
| Long | 80 | 82 | 4 |
- 115%+500 [115%+700] extra Heat gain
- Bigger Hitbox during OD
j.2D


| Damage | GuardHow this attack can be guarded. Throws have their throw range listed instead. | StartupHow many frames the attack needs to go through in order to reach its active frames. The listed startup frame coincides with the move's first active frame. | ActiveHow many frames where there is a hitbox that can hit an opponent. The first active frame occurs on the listed startup frame. | RecoveryHow many frames that the character must go through after an attack's active frames to automatically go back to a neutral stance, or the total duration of the move if it has no hitbox/creates projectiles. | Frame AdvHow many frames the attacker's recovery ends before the defender's blockstun ends if the attack is blocked. A positive value indicates that the attacker recovers first, while a negative value indicates that the defender recovers first. This value usually assumes that the attack's first active frame (of each hit, if multi-hit) is blocked. | On ODRThe difference between the attacker's total animation length and the period the opponent is in overdrive raid. This frame advantage is based off the assumption that both players input during the hitstop of a prior move, so that this attack and ODR start on the same frame. | AttributeSome attacks are invulnerable to attacks with specific attributes. This notes what attributes each attack possesses. H - Head B - Body F - Foot P - Projectile. Independent projectiles will have their Durability level listed, e.g. a projectile with Durability level 2 will show P2 T - Throw D - Doll attack, such as Carl's or Relius' doll Burst - Burst, which has its own unique attribute |
Invuln |
|---|---|---|---|---|---|---|---|---|
| 640 | All | 15 | 8 | Until L+7 | ~+3 | H |
Total: 29
Terumi's main air combo ender and a decent pressure reset. Combined with jump startup, the fastest it can be done is 20F. While it is +3 on block when TK'd, the only time Terumi can go into it without leaving a 10+ frame gap is from 5C(1) or 2C
j.2D can also be used as a meaty if you know your opponent will Emergency tech due to its of active frames, frame advantage (up to +8 if timed right) and the ability to safe-jump or OS reversals if timed right.
- Gains 12 Heat on hit
- Minimum 5
- 6 on block.
Overdrive Version In Overdrive, j.2D becomes a combo extender. It always causes a hard knockdown, allowing follow-ups whenever it lands no matter what. Great combo filler and pressure option. In Overdrive you can loop 4D → j.2D for massive meter gain.
- Gains 16 Heat on hit
- Minimum 7
- 10 on block
- Drains 2 Heat on contact.
Gatling options: None
| Starter RatingDetermines the starting value of the hitstun/untech decay timer and subsequent combo length | P1Proration applied to future hits when used as the first hit of a combo | P2Proration applied to future hits when used during any part of a combo | Attack LevelDefault Attack Level Values
| |||||||||||||||||||||||||||||||||||
|---|---|---|---|---|---|---|---|---|---|---|---|---|---|---|---|---|---|---|---|---|---|---|---|---|---|---|---|---|---|---|---|---|---|---|---|---|---|---|
| Long | 80 | 79 | 3 |
- 43.2%+500 [43.2%+700] extra Heat gain
Universal Mechanics
Forward Throw
5B+C

- BBCF Yuuki Terumi B+C Hitbox.png
| Damage | GuardHow this attack can be guarded. Throws have their throw range listed instead. | StartupHow many frames the attack needs to go through in order to reach its active frames. The listed startup frame coincides with the move's first active frame. | ActiveHow many frames where there is a hitbox that can hit an opponent. The first active frame occurs on the listed startup frame. | RecoveryHow many frames that the character must go through after an attack's active frames to automatically go back to a neutral stance, or the total duration of the move if it has no hitbox/creates projectiles. | Frame AdvHow many frames the attacker's recovery ends before the defender's blockstun ends if the attack is blocked. A positive value indicates that the attacker recovers first, while a negative value indicates that the defender recovers first. This value usually assumes that the attack's first active frame (of each hit, if multi-hit) is blocked. | On ODRThe difference between the attacker's total animation length and the period the opponent is in overdrive raid. This frame advantage is based off the assumption that both players input during the hitstop of a prior move, so that this attack and ODR start on the same frame. | AttributeSome attacks are invulnerable to attacks with specific attributes. This notes what attributes each attack possesses. H - Head B - Body F - Foot P - Projectile. Independent projectiles will have their Durability level listed, e.g. a projectile with Durability level 2 will show P2 T - Throw D - Doll attack, such as Carl's or Relius' doll Burst - Burst, which has its own unique attribute |
Invuln |
|---|---|---|---|---|---|---|---|---|
| 0, 300, 1200 | Throw | 7 | 3 | 23 | T |
- 100% minimum damage.
- Inflicts Hard knockdown.
Can cancel into Crush Trigger, Overdrive, and any special except 22C or super on the first hit of the grab. All options above, including 22C, are possible on the 2nd hit.
| Starter RatingDetermines the starting value of the hitstun/untech decay timer and subsequent combo length | P1Proration applied to future hits when used as the first hit of a combo | P2Proration applied to future hits when used during any part of a combo | Attack LevelDefault Attack Level Values
| |||||||||||||||||||||||||||||||||||
|---|---|---|---|---|---|---|---|---|---|---|---|---|---|---|---|---|---|---|---|---|---|---|---|---|---|---|---|---|---|---|---|---|---|---|---|---|---|---|
| Normal | 100 | 50 | 0, 4×2 |
- Minimum Damage 100%: 1500
Back Throw
4B+C

- BBCF Yuuki Terumi 4B+C Hitbox.png
| Damage | GuardHow this attack can be guarded. Throws have their throw range listed instead. | StartupHow many frames the attack needs to go through in order to reach its active frames. The listed startup frame coincides with the move's first active frame. | ActiveHow many frames where there is a hitbox that can hit an opponent. The first active frame occurs on the listed startup frame. | RecoveryHow many frames that the character must go through after an attack's active frames to automatically go back to a neutral stance, or the total duration of the move if it has no hitbox/creates projectiles. | Frame AdvHow many frames the attacker's recovery ends before the defender's blockstun ends if the attack is blocked. A positive value indicates that the attacker recovers first, while a negative value indicates that the defender recovers first. This value usually assumes that the attack's first active frame (of each hit, if multi-hit) is blocked. | On ODRThe difference between the attacker's total animation length and the period the opponent is in overdrive raid. This frame advantage is based off the assumption that both players input during the hitstop of a prior move, so that this attack and ODR start on the same frame. | AttributeSome attacks are invulnerable to attacks with specific attributes. This notes what attributes each attack possesses. H - Head B - Body F - Foot P - Projectile. Independent projectiles will have their Durability level listed, e.g. a projectile with Durability level 2 will show P2 T - Throw D - Doll attack, such as Carl's or Relius' doll Burst - Burst, which has its own unique attribute |
Invuln |
|---|---|---|---|---|---|---|---|---|
| 0, 300, 0, 1200 | Throw | 7 | 3 | 23 | T |
- 100% minimum damage.
- Wall bounces.
First hit works the same as the Forward Grab, while the second hit tosses the opponent behind Terumi and wall bounces, allowing follow-ups after dashing. Also cancellable with specials, supers, and Overdrive.
| Starter RatingDetermines the starting value of the hitstun/untech decay timer and subsequent combo length | P1Proration applied to future hits when used as the first hit of a combo | P2Proration applied to future hits when used during any part of a combo | Attack LevelDefault Attack Level Values
| |||||||||||||||||||||||||||||||||||
|---|---|---|---|---|---|---|---|---|---|---|---|---|---|---|---|---|---|---|---|---|---|---|---|---|---|---|---|---|---|---|---|---|---|---|---|---|---|---|
| Normal | 100 | 50 | 0, 4, 0, 4 |
- Minimum Damage 100%: 1500
- Maximum Slide duration 10F
Air Throw
j.B+C

- BBCF Yuuki Terumi jB+C Hitbox.png
| Damage | GuardHow this attack can be guarded. Throws have their throw range listed instead. | StartupHow many frames the attack needs to go through in order to reach its active frames. The listed startup frame coincides with the move's first active frame. | ActiveHow many frames where there is a hitbox that can hit an opponent. The first active frame occurs on the listed startup frame. | RecoveryHow many frames that the character must go through after an attack's active frames to automatically go back to a neutral stance, or the total duration of the move if it has no hitbox/creates projectiles. | Frame AdvHow many frames the attacker's recovery ends before the defender's blockstun ends if the attack is blocked. A positive value indicates that the attacker recovers first, while a negative value indicates that the defender recovers first. This value usually assumes that the attack's first active frame (of each hit, if multi-hit) is blocked. | On ODRThe difference between the attacker's total animation length and the period the opponent is in overdrive raid. This frame advantage is based off the assumption that both players input during the hitstop of a prior move, so that this attack and ODR start on the same frame. | AttributeSome attacks are invulnerable to attacks with specific attributes. This notes what attributes each attack possesses. H - Head B - Body F - Foot P - Projectile. Independent projectiles will have their Durability level listed, e.g. a projectile with Durability level 2 will show P2 T - Throw D - Doll attack, such as Carl's or Relius' doll Burst - Burst, which has its own unique attribute |
Invuln |
|---|---|---|---|---|---|---|---|---|
| 0, 300, 0, 1200 | Throw | 7 | 3 | 23+3L | T |
- 100% minimum damage.
Works the same as back throw, except when the opponent wall bounces, they bounce back towards Terumi.
Beware of doing air grabs with the opponent too close to the corner. If they are, they will not wall bounce and they will simply be put in a hard knockdown, where only 41236C can reach in time to combo.
| Starter RatingDetermines the starting value of the hitstun/untech decay timer and subsequent combo length | P1Proration applied to future hits when used as the first hit of a combo | P2Proration applied to future hits when used during any part of a combo | Attack LevelDefault Attack Level Values
| |||||||||||||||||||||||||||||||||||
|---|---|---|---|---|---|---|---|---|---|---|---|---|---|---|---|---|---|---|---|---|---|---|---|---|---|---|---|---|---|---|---|---|---|---|---|---|---|---|
| Normal | 100 | 50 | 0, 4, 0, 4 |
- Minimum Damage 100%: 1500
- Maximum Slide duration 10F
Counter Assault
6A+B while Blocking
Good as an anti-air, not as a Counter Assault
- BBCF Yuuki Terumi 6A+B Hitbox.png
| Damage | GuardHow this attack can be guarded. Throws have their throw range listed instead. | StartupHow many frames the attack needs to go through in order to reach its active frames. The listed startup frame coincides with the move's first active frame. | ActiveHow many frames where there is a hitbox that can hit an opponent. The first active frame occurs on the listed startup frame. | RecoveryHow many frames that the character must go through after an attack's active frames to automatically go back to a neutral stance, or the total duration of the move if it has no hitbox/creates projectiles. | Frame AdvHow many frames the attacker's recovery ends before the defender's blockstun ends if the attack is blocked. A positive value indicates that the attacker recovers first, while a negative value indicates that the defender recovers first. This value usually assumes that the attack's first active frame (of each hit, if multi-hit) is blocked. | On ODRThe difference between the attacker's total animation length and the period the opponent is in overdrive raid. This frame advantage is based off the assumption that both players input during the hitstop of a prior move, so that this attack and ODR start on the same frame. | AttributeSome attacks are invulnerable to attacks with specific attributes. This notes what attributes each attack possesses. H - Head B - Body F - Foot P - Projectile. Independent projectiles will have their Durability level listed, e.g. a projectile with Durability level 2 will show P2 T - Throw D - Doll attack, such as Carl's or Relius' doll Burst - Burst, which has its own unique attribute |
Invuln |
|---|---|---|---|---|---|---|---|---|
| 0 | All | 13 | 2 | 32 | -15 | B | 1~20 All |
- Knocks the opponent full screen on Counter-Hit.
Decent speed and range but has a nasty habit of whiffing, making it situational at best.
| Starter RatingDetermines the starting value of the hitstun/untech decay timer and subsequent combo length | P1Proration applied to future hits when used as the first hit of a combo | P2Proration applied to future hits when used during any part of a combo | Attack LevelDefault Attack Level Values
| |||||||||||||||||||||||||||||||||||
|---|---|---|---|---|---|---|---|---|---|---|---|---|---|---|---|---|---|---|---|---|---|---|---|---|---|---|---|---|---|---|---|---|---|---|---|---|---|---|
| Very Short | 50 | 92 | 4 |
Crush Trigger
5A+B (Chargeable)

Charge

Release


- BBCF Yuuki Terumi 5+BA Hitbox.png
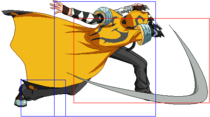

| Version | Damage | GuardHow this attack can be guarded. Throws have their throw range listed instead. | StartupHow many frames the attack needs to go through in order to reach its active frames. The listed startup frame coincides with the move's first active frame. | ActiveHow many frames where there is a hitbox that can hit an opponent. The first active frame occurs on the listed startup frame. | RecoveryHow many frames that the character must go through after an attack's active frames to automatically go back to a neutral stance, or the total duration of the move if it has no hitbox/creates projectiles. | Frame AdvHow many frames the attacker's recovery ends before the defender's blockstun ends if the attack is blocked. A positive value indicates that the attacker recovers first, while a negative value indicates that the defender recovers first. This value usually assumes that the attack's first active frame (of each hit, if multi-hit) is blocked. | On ODRThe difference between the attacker's total animation length and the period the opponent is in overdrive raid. This frame advantage is based off the assumption that both players input during the hitstop of a prior move, so that this attack and ODR start on the same frame. | AttributeSome attacks are invulnerable to attacks with specific attributes. This notes what attributes each attack possesses. H - Head B - Body F - Foot P - Projectile. Independent projectiles will have their Durability level listed, e.g. a projectile with Durability level 2 will show P2 T - Throw D - Doll attack, such as Carl's or Relius' doll Burst - Burst, which has its own unique attribute |
Invuln |
|---|---|---|---|---|---|---|---|---|---|
| 5A+B | 1000 | Guard Break 32/Barrier | 20 | 1 | 25 | 0 | B | ||
| 5[A+B] | 1000 | Guard Break 60/Barrier | 30~61 | 1 | 25 | 0 | B |
A relatively standard Crush Trigger. Its hitbox hits very low. Considering Terumi's Heat gain, this move is useful in combos to deal more damage, if you don't want to (or can't)invest a Distortion.
- Launches the opponent high on air hit.
| Version | Starter RatingDetermines the starting value of the hitstun/untech decay timer and subsequent combo length | P1Proration applied to future hits when used as the first hit of a combo | P2Proration applied to future hits when used during any part of a combo | Attack LevelDefault Attack Level Values
| |||||||||||||||||||||||||||||||||||
|---|---|---|---|---|---|---|---|---|---|---|---|---|---|---|---|---|---|---|---|---|---|---|---|---|---|---|---|---|---|---|---|---|---|---|---|---|---|---|---|
| 5A+B | Normal | 80 | 60 | ||||||||||||||||||||||||||||||||||||
| 5[A+B] | Long | 80 | 100 |
5A+B:
- Crumple Duration 50F, Crumple Fall 83F
5[A+B]:
- Crumple Duration 50F, Crumple Fall 83F
Special Moves
Note: All of Terumi's Specials can be cancelled into any of his Distortion Drives.
Snakebite
236D
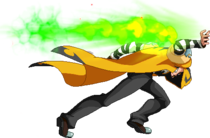
"Jagaku"

- BBCF Yuuki Terumi 236D Hitbox.png
| Version | Damage | GuardHow this attack can be guarded. Throws have their throw range listed instead. | StartupHow many frames the attack needs to go through in order to reach its active frames. The listed startup frame coincides with the move's first active frame. | ActiveHow many frames where there is a hitbox that can hit an opponent. The first active frame occurs on the listed startup frame. | RecoveryHow many frames that the character must go through after an attack's active frames to automatically go back to a neutral stance, or the total duration of the move if it has no hitbox/creates projectiles. | Frame AdvHow many frames the attacker's recovery ends before the defender's blockstun ends if the attack is blocked. A positive value indicates that the attacker recovers first, while a negative value indicates that the defender recovers first. This value usually assumes that the attack's first active frame (of each hit, if multi-hit) is blocked. | On ODRThe difference between the attacker's total animation length and the period the opponent is in overdrive raid. This frame advantage is based off the assumption that both players input during the hitstop of a prior move, so that this attack and ODR start on the same frame. | AttributeSome attacks are invulnerable to attacks with specific attributes. This notes what attributes each attack possesses. H - Head B - Body F - Foot P - Projectile. Independent projectiles will have their Durability level listed, e.g. a projectile with Durability level 2 will show P2 T - Throw D - Doll attack, such as Carl's or Relius' doll Burst - Burst, which has its own unique attribute |
Invuln |
|---|---|---|---|---|---|---|---|---|---|
| 236D | 520 | All | 16 | 3 | 11 (24) | -4 | B | ||
| 236D Followup | 300, 1000 |
- Followup gains 27% heat on hit (minimum 7%).
- In Overdrive: Followup gains 32% heat on hit (minimum 7.5%) and drains 5% from the opponent.
A hitgrab that ends with Terumi's opponent knocked down at his feet if it hits fully. One of Terumi's main combo enders, and a combo extender with meter. Also works as a decent whiff punish in a pinch. It's super-cancelable on the first and third hit, and Terumi can RC at any point during the move. However, when used as a combo ender, it can be very hard to punish rolls at midscreen.
If the move hits high so the follow-up does not come out, Terumi can follow up with 5A or 5B for decent corner carry.
- Followup only triggers when the opponent is low enough.
- On-block recovery is 24F; whiff recovery is 11F.
| Version | Starter RatingDetermines the starting value of the hitstun/untech decay timer and subsequent combo length | P1Proration applied to future hits when used as the first hit of a combo | P2Proration applied to future hits when used during any part of a combo | Attack LevelDefault Attack Level Values
| |||||||||||||||||||||||||||||||||||
|---|---|---|---|---|---|---|---|---|---|---|---|---|---|---|---|---|---|---|---|---|---|---|---|---|---|---|---|---|---|---|---|---|---|---|---|---|---|---|---|
| 236D | Long | 90 | 89 | 3 | |||||||||||||||||||||||||||||||||||
| 236D Followup | 100 | 89×2 | 3 |
236D:
- Goes into followup on ground hit
- On block, immediately goes into extended recovery animation (24F)
236D Followup:
- 144%+700 [144%+750] extra Heat gain
Retaliating Fang
214D

Good reward on hit, but sadly not reliable
"Gasenshou"
.png)
.png)
- BBCF Yuuki Terumi 214D Hitbox.png
| Damage | GuardHow this attack can be guarded. Throws have their throw range listed instead. | StartupHow many frames the attack needs to go through in order to reach its active frames. The listed startup frame coincides with the move's first active frame. | ActiveHow many frames where there is a hitbox that can hit an opponent. The first active frame occurs on the listed startup frame. | RecoveryHow many frames that the character must go through after an attack's active frames to automatically go back to a neutral stance, or the total duration of the move if it has no hitbox/creates projectiles. | Frame AdvHow many frames the attacker's recovery ends before the defender's blockstun ends if the attack is blocked. A positive value indicates that the attacker recovers first, while a negative value indicates that the defender recovers first. This value usually assumes that the attack's first active frame (of each hit, if multi-hit) is blocked. | On ODRThe difference between the attacker's total animation length and the period the opponent is in overdrive raid. This frame advantage is based off the assumption that both players input during the hitstop of a prior move, so that this attack and ODR start on the same frame. | AttributeSome attacks are invulnerable to attacks with specific attributes. This notes what attributes each attack possesses. H - Head B - Body F - Foot P - Projectile. Independent projectiles will have their Durability level listed, e.g. a projectile with Durability level 2 will show P2 T - Throw D - Doll attack, such as Carl's or Relius' doll Burst - Burst, which has its own unique attribute |
Invuln |
|---|---|---|---|---|---|---|---|---|
| 0, 196×2, 49×12, 539 | Throw(160) | 25 | 3 | 43 | T |
Has great range for a command grab, but it's very slow. Can be used sparingly as a mix-up option to build meter, but Terumi will be punished very heavily for it on whiff.
- Counter Hit state for entire duration.
- Fixed Heat gain: 34.5%. Up to 10% heat will be drained for opponent under OD.
| Starter RatingDetermines the starting value of the hitstun/untech decay timer and subsequent combo length | P1Proration applied to future hits when used as the first hit of a combo | P2Proration applied to future hits when used during any part of a combo | Attack LevelDefault Attack Level Values
| |||||||||||||||||||||||||||||||||||
|---|---|---|---|---|---|---|---|---|---|---|---|---|---|---|---|---|---|---|---|---|---|---|---|---|---|---|---|---|---|---|---|---|---|---|---|---|---|---|
| Very Short | 100 | 80×2,90×13 | 1 |
- Fixed Heat gain: 0×3, 100×3, 150×3, 250×3, 350×3, 600 = 3450
- Under Overdrive if opponent has sufficient Heat: [0×3, 100×3, 200×3, 350×3, 450×3, 850] = 4450
- Hits standing or crouching opponents only
Cleaving Fang
22C/22CCCC near downed opponent

"Garengeki"

- BBCF Yuuki Terumi 22C Hitbox.png
| Version | Damage | GuardHow this attack can be guarded. Throws have their throw range listed instead. | StartupHow many frames the attack needs to go through in order to reach its active frames. The listed startup frame coincides with the move's first active frame. | ActiveHow many frames where there is a hitbox that can hit an opponent. The first active frame occurs on the listed startup frame. | RecoveryHow many frames that the character must go through after an attack's active frames to automatically go back to a neutral stance, or the total duration of the move if it has no hitbox/creates projectiles. | Frame AdvHow many frames the attacker's recovery ends before the defender's blockstun ends if the attack is blocked. A positive value indicates that the attacker recovers first, while a negative value indicates that the defender recovers first. This value usually assumes that the attack's first active frame (of each hit, if multi-hit) is blocked. | On ODRThe difference between the attacker's total animation length and the period the opponent is in overdrive raid. This frame advantage is based off the assumption that both players input during the hitstop of a prior move, so that this attack and ODR start on the same frame. | AttributeSome attacks are invulnerable to attacks with specific attributes. This notes what attributes each attack possesses. H - Head B - Body F - Foot P - Projectile. Independent projectiles will have their Durability level listed, e.g. a projectile with Durability level 2 will show P2 T - Throw D - Doll attack, such as Carl's or Relius' doll Burst - Burst, which has its own unique attribute |
Invuln |
|---|---|---|---|---|---|---|---|---|---|
| 22C | 400×2, 1100 | All | 11 | 3(16)3(29)1 | 25 | F | |||
| 22CCCC | 400×2, 250×3, 1100 | All | 11 | 3(16)3,2,2(15)3(29)1 | 25 | F |
Purely combo filler. This move cannot be activated unless opponent is downed currently or has been downed during the current combo. 3C, 236D, also allow use of this move, even if your opponent hasn't hit the ground yet. Floorslides also count, but groundbounces (The bounce of 6C for example) do not. 5B+C is also a way to land this move
22C (Light)
Light Version deals two stomps and one kick. The kick for both versions will wall bounces in the corner, allowing follow-ups. In midscreen, 236D (whiff) into 5/2A is your staple combo route.
While most of the time Heavy version is better, it also costs extra combo time, meaning some combo parts will break, especially on a Short starter, thus light version becomes an alternative.
22CCCC (Heavy)
Heavy Version deals five stomps and one kick, and has 110% bonus proration on last hit. The extra C inputs to activate the heavy version can be input at any time before the second stomp hits.
- Can be Overdrive cancelled.
| Version | Starter RatingDetermines the starting value of the hitstun/untech decay timer and subsequent combo length | P1Proration applied to future hits when used as the first hit of a combo | P2Proration applied to future hits when used during any part of a combo | Attack LevelDefault Attack Level Values
| |||||||||||||||||||||||||||||||||||
|---|---|---|---|---|---|---|---|---|---|---|---|---|---|---|---|---|---|---|---|---|---|---|---|---|---|---|---|---|---|---|---|---|---|---|---|---|---|---|---|
| 22C | Long | 100 | 79 | 3 | |||||||||||||||||||||||||||||||||||
| 22CCCC | Long | 100 | 79 | 3 |
22C:
- Hits opponent only in downed or airborne state only
22CCCC:
- Bonus Proration 110% on the last hit
- Maximum Slide duration 1F,
Agonizing Fang
214C

Your only standing overhead
"Tsuishouga"

- BBCF Yuuki Terumi 214C Hitbox.png
| Damage | GuardHow this attack can be guarded. Throws have their throw range listed instead. | StartupHow many frames the attack needs to go through in order to reach its active frames. The listed startup frame coincides with the move's first active frame. | ActiveHow many frames where there is a hitbox that can hit an opponent. The first active frame occurs on the listed startup frame. | RecoveryHow many frames that the character must go through after an attack's active frames to automatically go back to a neutral stance, or the total duration of the move if it has no hitbox/creates projectiles. | Frame AdvHow many frames the attacker's recovery ends before the defender's blockstun ends if the attack is blocked. A positive value indicates that the attacker recovers first, while a negative value indicates that the defender recovers first. This value usually assumes that the attack's first active frame (of each hit, if multi-hit) is blocked. | On ODRThe difference between the attacker's total animation length and the period the opponent is in overdrive raid. This frame advantage is based off the assumption that both players input during the hitstop of a prior move, so that this attack and ODR start on the same frame. | AttributeSome attacks are invulnerable to attacks with specific attributes. This notes what attributes each attack possesses. H - Head B - Body F - Foot P - Projectile. Independent projectiles will have their Durability level listed, e.g. a projectile with Durability level 2 will show P2 T - Throw D - Doll attack, such as Carl's or Relius' doll Burst - Burst, which has its own unique attribute |
Invuln |
|---|---|---|---|---|---|---|---|---|
| 800 | High | 19 | 3 | 18 | -4 | B |
A very fast overhead that can come from almost all of Terumi's normals, making it hard to react to. Safe on normal block and advantageous on hit to continue offence. 214C leads to decent reward, and while needing heat to combo, this isn't a big condition to meet with Terumi's meter gain, it can also ink into 2A on CH.
Also sees use in corner combos thanks to its KD properties and Garengeki being special-cancelable.
- Hard KDs on air hit.
| Starter RatingDetermines the starting value of the hitstun/untech decay timer and subsequent combo length | P1Proration applied to future hits when used as the first hit of a combo | P2Proration applied to future hits when used during any part of a combo | Attack LevelDefault Attack Level Values
| |||||||||||||||||||||||||||||||||||
|---|---|---|---|---|---|---|---|---|---|---|---|---|---|---|---|---|---|---|---|---|---|---|---|---|---|---|---|---|---|---|---|---|---|---|---|---|---|---|
| Normal | 80 | 89 | 3 |
- Forces Crouching on hit
Distortion Drives
- All Distortion Drives have the following properties unless otherwise stated:
- Cost 50 Heat
- Heat Gauge Cooldown 180F
- Under Terumi's Overdrive, Distortion Drives have the following additional properties:
- Can cancel Distortion Drives into other Distortion Drives/Exceed Accel, provided that one has at least 50 Heat
- Heat Gauge Cooldown is disabled in the entire duration of Overdrive
Gleaming Fang
41236C (Air OK)

"Jakyou Messenga"


- BBCF Yuuki Terumi 41236C Hitbox.png
- BBCF Yuuki Terumi 41236C-ODFollowup Hitbox.png
- BBCF Yuuki Terumi j41236C Hitbox.png
- BBCF Yuuki Terumi j41236C-ODFollowup Hitbox.png
| Version | Damage | GuardHow this attack can be guarded. Throws have their throw range listed instead. | StartupHow many frames the attack needs to go through in order to reach its active frames. The listed startup frame coincides with the move's first active frame. | ActiveHow many frames where there is a hitbox that can hit an opponent. The first active frame occurs on the listed startup frame. | RecoveryHow many frames that the character must go through after an attack's active frames to automatically go back to a neutral stance, or the total duration of the move if it has no hitbox/creates projectiles. | Frame AdvHow many frames the attacker's recovery ends before the defender's blockstun ends if the attack is blocked. A positive value indicates that the attacker recovers first, while a negative value indicates that the defender recovers first. This value usually assumes that the attack's first active frame (of each hit, if multi-hit) is blocked. | On ODRThe difference between the attacker's total animation length and the period the opponent is in overdrive raid. This frame advantage is based off the assumption that both players input during the hitstop of a prior move, so that this attack and ODR start on the same frame. | AttributeSome attacks are invulnerable to attacks with specific attributes. This notes what attributes each attack possesses. H - Head B - Body F - Foot P - Projectile. Independent projectiles will have their Durability level listed, e.g. a projectile with Durability level 2 will show P2 T - Throw D - Doll attack, such as Carl's or Relius' doll Burst - Burst, which has its own unique attribute |
Invuln |
|---|---|---|---|---|---|---|---|---|---|
| 41236C | 0, 2400 | All | 4+(15 Flash)+8 | 10 | 39 | -4 | B | 1~21 P | |
| 41236C OD | 0, 1000, 0, 2400 | All | 4+(15 Flash)+8 | 10 [(24)4] | 36 | -4 | B | 1~21 P | |
| j.41236C | 0, 2400 | All | 4+(15 Flash)+3 | Until L | 21 | -4 | H | 1~Until L P | |
| j.41236C OD | 0, 1000, 0, 2400 | All | 4+(15 Flash)+3 | Until L [(17)4] | 20 [36] | -4 | H, B | 1~Until L P |
Terumi rushes at the opponent enveloped in a dark green aura, moving across nearly the entire screen (air version varies depending on how high Terumi is when used). Both versions cannot hit players behind them, even with hitbox overlaps, so it's not possible to do a diving crossup with the air version, for example. The air version also has a very tight hitbox which only just covers Terumi himself (And not the Snake graphical effect) and stops being active the instant Terumi touches the floor, so it has a bad habit of landing short when used as a dive attack.
Sadly only features projectile invulnerability and a hurtbox that reaches in front of his hitbox on the ground version, so don't be too surprised if you rush face-first into an active hitbox if you throw this out in neutral. At distance some characters can even just throw out a jab on reaction to the superflash. The unusually short super flash does mean they don't get a lot of time to react, however. Terumi subtly teleports to a set point behind the opponent on hit/block, meaning the spacing afterwards will be consistent even if hitting an extended hurtbox.
Normal Version
Can net ~3K combos on hit with minimal effort. It's -4 on block, and even on Instant Block it can be hard to punish. The projectile invincibility makes this move good for getting in on zoners or punishing projectile supers.
Overdrive Version
In OD, this move gains an additional rush, cancelling out the side switch. This only occurs on hit/block. It adds damage and gives more time to follow up. Curiously, if the first attack is guardpointed, the second hit will do no damage.
- Inflicts Fatal Counter.
- Switches sides on hit/block.
- Minimum damage: 360 [560]
| Version | Starter RatingDetermines the starting value of the hitstun/untech decay timer and subsequent combo length | P1Proration applied to future hits when used as the first hit of a combo | P2Proration applied to future hits when used during any part of a combo | Attack LevelDefault Attack Level Values
| |||||||||||||||||||||||||||||||||||
|---|---|---|---|---|---|---|---|---|---|---|---|---|---|---|---|---|---|---|---|---|---|---|---|---|---|---|---|---|---|---|---|---|---|---|---|---|---|---|---|
| 41236C | Normal | 100 | 100, 70 | 5 | |||||||||||||||||||||||||||||||||||
| 41236C OD | Normal | 100 | 100×3, 70 | 5 | |||||||||||||||||||||||||||||||||||
| j.41236C | Normal | 100 | 100, 70 | 5 | |||||||||||||||||||||||||||||||||||
| j.41236C OD | Normal | 100 | 100×3, 70 | 5 |
41236C:
- Fatal Counter
- Enters recovery immediately on hit/block
- Cannot be Rapid Cancelled until after last hit
- Can pass through opponent 1-42
- Minimum Damage 15%: 360
41236C OD:
- Values in [] occur on hit/block
- Fatal Counter
- Skips remaning active frames of first hit on hit/block
- Cannot be Rapid Cancelled between 0 damage hits and damaging hits
- Can pass through opponent 1-42
- Minimum Damage 20%×3, 15%: 560
j.41236C:
- Fatal Counter
- Cannot be Rapid Cancelled until after last hit
- Minimum Damage 15%: 360
j.41236C OD:
- Values in [] occur on hit/block
- Fatal Counter
- Cannot be Rapid Cancelled between 0 damage hits and damaging hits
- Minimum Damage 20%×3, 15%: 560
The Divine Twin Blades
623B (Air OK)

"Gouga Soutenjin"

- BBCF Yuuki Terumi 623B Hitbox.png
Same hitboxes for ground and air versions
| Version | Damage | GuardHow this attack can be guarded. Throws have their throw range listed instead. | StartupHow many frames the attack needs to go through in order to reach its active frames. The listed startup frame coincides with the move's first active frame. | ActiveHow many frames where there is a hitbox that can hit an opponent. The first active frame occurs on the listed startup frame. | RecoveryHow many frames that the character must go through after an attack's active frames to automatically go back to a neutral stance, or the total duration of the move if it has no hitbox/creates projectiles. | Frame AdvHow many frames the attacker's recovery ends before the defender's blockstun ends if the attack is blocked. A positive value indicates that the attacker recovers first, while a negative value indicates that the defender recovers first. This value usually assumes that the attack's first active frame (of each hit, if multi-hit) is blocked. | On ODRThe difference between the attacker's total animation length and the period the opponent is in overdrive raid. This frame advantage is based off the assumption that both players input during the hitstop of a prior move, so that this attack and ODR start on the same frame. | AttributeSome attacks are invulnerable to attacks with specific attributes. This notes what attributes each attack possesses. H - Head B - Body F - Foot P - Projectile. Independent projectiles will have their Durability level listed, e.g. a projectile with Durability level 2 will show P2 T - Throw D - Doll attack, such as Carl's or Relius' doll Burst - Burst, which has its own unique attribute |
Invuln |
|---|---|---|---|---|---|---|---|---|---|
| 623B | 1100×2, 1800 | Mid | 4+(15 Flash)+3 | 4,8(15)6 | 27+21L | -35 | B×2, H | 1~10 All | |
| 623B OD | 1000×5 | Mid | 4+(15 Flash)+3 | 4,4,4(15)6(14)4 | 9+21L | -35 | B×4, H | 1~10 All | |
| j.623B | 1100×2, 1800 | All | 4+(15 Flash)+3 | 4,8(15)6 | Until L+21L | H | 1~14 All | ||
| j.623B OD | 1000×5 | All | 4+(15 Flash)+3 | 4,4,4(15)6(14)4 | Until+21L | H | 1~14 All |
Terumi's main reversal option. Despite appearances, the snake-effect during the move has no hitboxes, meaning it has less range than it appears.
Normal Version
Very fast, but also very unsafe on block or whiff, and will whiff on very low profiles moves. Recommended to use when you have 100 meter so you can RC it safely. Can be followed up on Counter-Hit with dash 5B to recover some heat.
Overdrive Version OD adds an extra kick at the end which ground-bounces the opponent, making it a staple OD combo extender. The ground version gives 8 frames to follow up, while the air version gives 11 frames, so it is the best to cancel from the airborne frames of 5C.
It's usefulness as a reversal is also further increased due to being cancellable into Exceed Accel. They will have to punish you before you hit the ground for anything guaranteed.
- Minimum damage: 830 [1100]
- 3rd hit has smaller hitbox than the effect displays, making it whiff on most crouching characters.
| Version | Starter RatingDetermines the starting value of the hitstun/untech decay timer and subsequent combo length | P1Proration applied to future hits when used as the first hit of a combo | P2Proration applied to future hits when used during any part of a combo | Attack LevelDefault Attack Level Values
| |||||||||||||||||||||||||||||||||||
|---|---|---|---|---|---|---|---|---|---|---|---|---|---|---|---|---|---|---|---|---|---|---|---|---|---|---|---|---|---|---|---|---|---|---|---|---|---|---|---|
| 623B | Very Short | 80×3 | 92×3 | 4 | |||||||||||||||||||||||||||||||||||
| 623B OD | Very Short | 80×5 | 92×5 | 4 | |||||||||||||||||||||||||||||||||||
| j.623B | Long | 80×3 | 92×3 | 4 | |||||||||||||||||||||||||||||||||||
| j.623B OD | Long | 80×5 | 92×5 | 4 |
623B:
- Minimum Damage 30%×2, 10%: 840
- Counterhit state for entire move
- fastest reversal
623B OD:
- Minimum Damage 25%×4, 10%: 1100
- Only does final hit if opponent gets hit by preceding hit
- Counterhit state for entire move
j.623B:
- Minimum Damage 30%×2, 10%: 840
- Counterhit state for entire move
j.623B OD:
- Minimum Damage 25%×4, 10%: 1100
- Only does final hit if opponent gets hit by preceding hit
- Counterhit state for entire move
Serpent's Laceration
63214A/B

Down low

Up high
"Orochi Burensen"


- BBCF Yuuki Terumi 63214A Hitbox.png
- BBCF Yuuki Terumi 63214B Hitbox.png
| Version | Damage | GuardHow this attack can be guarded. Throws have their throw range listed instead. | StartupHow many frames the attack needs to go through in order to reach its active frames. The listed startup frame coincides with the move's first active frame. | ActiveHow many frames where there is a hitbox that can hit an opponent. The first active frame occurs on the listed startup frame. | RecoveryHow many frames that the character must go through after an attack's active frames to automatically go back to a neutral stance, or the total duration of the move if it has no hitbox/creates projectiles. | Frame AdvHow many frames the attacker's recovery ends before the defender's blockstun ends if the attack is blocked. A positive value indicates that the attacker recovers first, while a negative value indicates that the defender recovers first. This value usually assumes that the attack's first active frame (of each hit, if multi-hit) is blocked. | On ODRThe difference between the attacker's total animation length and the period the opponent is in overdrive raid. This frame advantage is based off the assumption that both players input during the hitstop of a prior move, so that this attack and ODR start on the same frame. | AttributeSome attacks are invulnerable to attacks with specific attributes. This notes what attributes each attack possesses. H - Head B - Body F - Foot P - Projectile. Independent projectiles will have their Durability level listed, e.g. a projectile with Durability level 2 will show P2 T - Throw D - Doll attack, such as Carl's or Relius' doll Burst - Burst, which has its own unique attribute |
Invuln |
|---|---|---|---|---|---|---|---|---|---|
| 63214A | 800, 500, 1000, 2000 [800, 400×14, 1000, 2500] |
Low, Air | 13+(48 Flash)+2 | 2 | 28 | -13 | F | 13~16 All | |
| 63214B | 800, 400×4, 1000, 2500 [800, 400×14, 1000, 2500] |
High, Air | 13+(48 Flash)+2 | 2 | 16 | -1 | B | 13~16 All |
A multi-kick move, useful for extending combos and as a rare mixup. During the super pause Terumi's sprite is the same for both moves, with only subtle differences afterwards giving away which way to block. Both versions have the same startup time, making it impossible to option select the correct block.
A Version
- Minimum damage: 545 [890]
Hits low. With full meter, this is a legitimate mix-up, but be wary if they have 50 meter to Counter Assault. It's best used for this purpose near the corner for good damage and meter. The A version cannot be followed up without full meter. Wallbounces towards Terumi midscreen; wallsticks in the corner.
As a combo starter, you can either RC until the end of animation which gives more damage, or RC on the second hit which leaves them in a long untechable state, making it useful to recover more heat due to longer combo time. Or you can just use it to do a taunt combo.
As a side note, finishing an opponent with the first or second hit will give you a taunt voice clip while rubbing his heel into his opponents face instead of his usual round win quotes.
B Version
- Minimum damage: 715 [890]
The B version is an overhead. Wallbounces towards Terumi midscreen, wallsticks in the corner, and can be used as a corner combo extender if CT isn’t an option or if you really need the extra damage.
Can be used to end combos, giving you less damage than his other supers, but better Oki.
Overdrive Version
In OD, the number of hits increases, and both versions can be followed up anywhere on the screen, making the mixup more potent and allowing it to be a combo extender in more situations. However, it is outclassed by Messenga or Soutenjin in most situations, due to proration and its long animation costing more Overdrive time.
| Version | Starter RatingDetermines the starting value of the hitstun/untech decay timer and subsequent combo length | P1Proration applied to future hits when used as the first hit of a combo | P2Proration applied to future hits when used during any part of a combo | Attack LevelDefault Attack Level Values
| |||||||||||||||||||||||||||||||||||
|---|---|---|---|---|---|---|---|---|---|---|---|---|---|---|---|---|---|---|---|---|---|---|---|---|---|---|---|---|---|---|---|---|---|---|---|---|---|---|---|
| 63214A | Long | 90 | 89×2,92×2 [89, 98×14, 92×2] |
3 | |||||||||||||||||||||||||||||||||||
| 63214B | Normal | 90 | 89×5,92×2 [89, 98×14, 92×2] |
3 |
63214A:
- Values in [] are during OD
- Minimum Damage 15%×3, 10% [15%×16, 10%]: 545 [1360]
63214B:
- Values in [] are during OD
- Minimum Damage 15%, 10%×5, 15% [15%×16, 10%]: 675 [1360]
Venomous Bite
236236A

This move almost never works
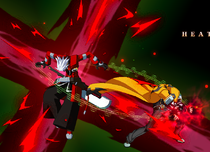
but oh boy when it does
"Ouja Zanrouga"


- BBCF Yuuki Terumi 236236A Hitbox.png
- BBCF Yuuki Terumi 236236A Attack Hitbox.png
| Version | Damage | GuardHow this attack can be guarded. Throws have their throw range listed instead. | StartupHow many frames the attack needs to go through in order to reach its active frames. The listed startup frame coincides with the move's first active frame. | ActiveHow many frames where there is a hitbox that can hit an opponent. The first active frame occurs on the listed startup frame. | RecoveryHow many frames that the character must go through after an attack's active frames to automatically go back to a neutral stance, or the total duration of the move if it has no hitbox/creates projectiles. | Frame AdvHow many frames the attacker's recovery ends before the defender's blockstun ends if the attack is blocked. A positive value indicates that the attacker recovers first, while a negative value indicates that the defender recovers first. This value usually assumes that the attack's first active frame (of each hit, if multi-hit) is blocked. | On ODRThe difference between the attacker's total animation length and the period the opponent is in overdrive raid. This frame advantage is based off the assumption that both players input during the hitstop of a prior move, so that this attack and ODR start on the same frame. | AttributeSome attacks are invulnerable to attacks with specific attributes. This notes what attributes each attack possesses. H - Head B - Body F - Foot P - Projectile. Independent projectiles will have their Durability level listed, e.g. a projectile with Durability level 2 will show P2 T - Throw D - Doll attack, such as Carl's or Relius' doll Burst - Burst, which has its own unique attribute |
Invuln |
|---|---|---|---|---|---|---|---|---|---|
| 236236A | 0 | Unblockable | 1 | 119 (8) | Total: 187 | HBF | 1~112 Guard HBF | ||
| 236236[A] | 0 | Unblockable | 1 | 91 (8) | Total: 159 | HBF | 1~84 Guard HBF | ||
| 236236A Attack | 0, 2800 [0, 80×5, 2800] |
Unblockable | 1+(95 Flash)+0 | All |
Terumi walks forward and casually swings Ouroboros around. Infamously ineffective counter colloquially referred to as the "50 meter taunt". Leaves you unactionable for over 3 full seconds as you slowly pace towards the opponent, and vulnerable to your opponent's biggest counter hit punish for the last second. Does lead to great damage if it lands the way it wants.
Normal version blocks mids and overheads, Overdrive version also blocks lows. Neither version blocks projectiles, dolls, throws or unblockables. When the Guard is triggered, a large unblockable hitbox filling about half of the screen in front of Terumi activates for 8 frames, following up with the main portion of the move when it connects. However, this hit cannot hit airborne opponents, or opponents behind Terumi. As such, it can block but fail to activate on things like high jump-ins, crossups or rising invulnerable moves like Ragna's Inferno Divider GuardMidStartup9Recovery39Advantage-28. It also has a maximum range check in front of Terumi for some reason, just in case the move was a bit too usable.
Having zero hitstop on the guard point means, normally, it should be impossible to buffer a cancel into an invulnerable move to avoid the hit after triggering it. Unfortunately for Terumi, it is instead possible to buffer an Overdrive Cancel by holding the input on startup, then allowing an invulnerable action such as a backdash to be performed afterwards to make up the remaining 2 active frames.
This move is highly situational and is the best used against predictable opponents, rather than throwing it out randomly. Can be used as a nasty punish as well as a pseudo-reversal due to it becoming active on frame one, notably being effective against very deep safejump setups. However, this move is generally way too high-risk to advise using over your other defensive options as it loses to almost everything.
Against heavily telegraphed or reactable moves however (such as Tager's Sledgehammer) you can use it, preferably with full meter to follow up, and most practically after you see someone doing something both committal and compatible with the counter during the OD activation screen freeze. One of Terumi's best starters overall should you find a good way to land it, leading to over 6000 damage with proper routing & resources. It also functionally guarantees Active Flow.
- Holding A during the move shortens the active and overall duration by 28F for some reason.
- 100% minimum damage... for some reason.
| Version | Starter RatingDetermines the starting value of the hitstun/untech decay timer and subsequent combo length | P1Proration applied to future hits when used as the first hit of a combo | P2Proration applied to future hits when used during any part of a combo | Attack LevelDefault Attack Level Values
| |||||||||||||||||||||||||||||||||||
|---|---|---|---|---|---|---|---|---|---|---|---|---|---|---|---|---|---|---|---|---|---|---|---|---|---|---|---|---|---|---|---|---|---|---|---|---|---|---|---|
| 236236A | Long | 100 | 75 | 0 | |||||||||||||||||||||||||||||||||||
| 236236[A] | Long | 100 | 75 | 0 | |||||||||||||||||||||||||||||||||||
| 236236A Attack | Long | 94×2 [96×7] | 5 |
236236A:
- Checks for held button on frame 78
- Cannot guard against lows [unless in OD], or unblockables
- Hitbox activates for 8 frames when an attack is blocked, duration resets when activated again
- Cannot hit airborne opponents, or opponents behind Terumi
- Hitbox will not interact with guard point
- On Guard Point, hitstop for Terumi and opponent is 0F
- Counterhit state for entire move
- parry reversal
236236[A]:
- Cannot guard against lows [unless in OD], or unblockables
- Hitbox activates for 8 frames when an attack is blocked, duration resets when activated again
- Cannot hit airborne opponents, or opponents behind Terumi
- Hitbox will not interact with guard point
- On Guard Point, hitstop for Terumi and opponent is 0F
- Counterhit state for entire move
236236A Attack:
- Values in [] are during OD
- Minimum Damage 100%: 2800 [3200]
Serpent's Cursed Sting
632146D

Terumi players only want one thing...
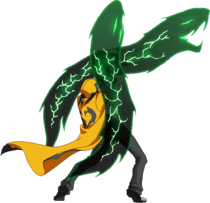
And it's absolutely disgusting
"Jabaku Fuueinjin"
.png)
.png)
- BBCF Yuuki Terumi 632146D Hitbox.png
| Damage | GuardHow this attack can be guarded. Throws have their throw range listed instead. | StartupHow many frames the attack needs to go through in order to reach its active frames. The listed startup frame coincides with the move's first active frame. | ActiveHow many frames where there is a hitbox that can hit an opponent. The first active frame occurs on the listed startup frame. | RecoveryHow many frames that the character must go through after an attack's active frames to automatically go back to a neutral stance, or the total duration of the move if it has no hitbox/creates projectiles. | Frame AdvHow many frames the attacker's recovery ends before the defender's blockstun ends if the attack is blocked. A positive value indicates that the attacker recovers first, while a negative value indicates that the defender recovers first. This value usually assumes that the attack's first active frame (of each hit, if multi-hit) is blocked. | On ODRThe difference between the attacker's total animation length and the period the opponent is in overdrive raid. This frame advantage is based off the assumption that both players input during the hitstop of a prior move, so that this attack and ODR start on the same frame. | AttributeSome attacks are invulnerable to attacks with specific attributes. This notes what attributes each attack possesses. H - Head B - Body F - Foot P - Projectile. Independent projectiles will have their Durability level listed, e.g. a projectile with Durability level 2 will show P2 T - Throw D - Doll attack, such as Carl's or Relius' doll Burst - Burst, which has its own unique attribute |
Invuln |
|---|---|---|---|---|---|---|---|---|
| 800×2, 0, 250×N, 800, see notes | All | 7+(40 Flash)+10 | 4 | 34 | -17 | B | 1~23 All |
Terumi does a sword slash that is followed up by a cinematic if it hits. You should only ever use this move to kill; it does absurd damage, but will always leave you without meter. Also doubles as a slower reversal option, but with much more invulnerability.
At max meter, this is one of the highest-damaging attacks in the game. It's well worth activating Overdrive for mid combo to eke out a bit more meter gain just before activating this.
Normal Version
During the snakebite phase, hits once for every 5 meter Terumi has remaining, rounded up. Each hit will deal 250 damage, with a minimum of 3 hits.
Overdrive Version
Under Overdrive, opponent now will also loses 5% meter per hit, and Terumi gains 1% for every hit during the snakebite phase. In practice, this means you deal 13 hits with 100 meter in OD against an opponent with meter, 14 if you have auto heat regeneration. The move still deals the same damage per hit during the snakebite phase, but the finishing hits are improved.
- The minimal damage list below only consider the worst damage dealt under the Heat requirement (so 50%, 75% and 100%, and no drained Heat or auto heat regen).
| < 25 Heat | 25 to 49 Heat | 50 Heat | |
|---|---|---|---|
| Last kick damage | 1500 | 1500*2 | 1500, 4000 |
| Total minimal damage | 930 | 1030 | 1680 |
| Last kick damage (OD) | 3000 | 1000*3, 2000 | 1000, 2000, 3000 |
| Total minimal damage (OD) | 930 | 1530 | 2030 |
| Starter RatingDetermines the starting value of the hitstun/untech decay timer and subsequent combo length | P1Proration applied to future hits when used as the first hit of a combo | P2Proration applied to future hits when used during any part of a combo | Attack LevelDefault Attack Level Values
| |||||||||||||||||||||||||||||||||||
|---|---|---|---|---|---|---|---|---|---|---|---|---|---|---|---|---|---|---|---|---|---|---|---|---|---|---|---|---|---|---|---|---|---|---|---|---|---|---|
| Very Short | 80 | 94×2, 89, 100×N, 100, see notes [94×2, 100, 101×N, 100, see notes] |
5 |
- Values in [] are during OD
- Second part does hits equal to the amount of heat Terumi has / 5 rounded up. Minimum 3 hits
- Drains all of Terumi's Heat on hit. [Drains 5 Heat from opponent and gives 1 Heat to Terumi for each hit done.]
- Finisher depends on amount of meter Terumi has when he hit the opponent
- 0~24 Heat finisher has base damage 1500 [3000]. P2=20. Minimum damage 10%
- 25~49 Heat finisher has base damage 1500×2 [1000×3, 2000]. P2=94, 20 [94×3, 20]. Minimum damage 10%
- 50 Heat finisher has base damage 1500, 4000 [1000, 2000, 3000]. P2=94, 20 [94×2, 20]. Minimum damage 20%, 10% [20%, 10%, 20%]
- reversal
Screeches of the Condemned
236236D/214214D
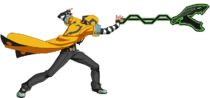
You'll forget this exists, but thankfully so will your opponent

Extremely niche anti-air
"Jarin Renshouga"


- BBCF Yuuki Terumi 236236D Hitbox.png
- BBCF Yuuki Terumi 214214D Hitbox.png
| Version | Damage | GuardHow this attack can be guarded. Throws have their throw range listed instead. | StartupHow many frames the attack needs to go through in order to reach its active frames. The listed startup frame coincides with the move's first active frame. | ActiveHow many frames where there is a hitbox that can hit an opponent. The first active frame occurs on the listed startup frame. | RecoveryHow many frames that the character must go through after an attack's active frames to automatically go back to a neutral stance, or the total duration of the move if it has no hitbox/creates projectiles. | Frame AdvHow many frames the attacker's recovery ends before the defender's blockstun ends if the attack is blocked. A positive value indicates that the attacker recovers first, while a negative value indicates that the defender recovers first. This value usually assumes that the attack's first active frame (of each hit, if multi-hit) is blocked. | On ODRThe difference between the attacker's total animation length and the period the opponent is in overdrive raid. This frame advantage is based off the assumption that both players input during the hitstop of a prior move, so that this attack and ODR start on the same frame. | AttributeSome attacks are invulnerable to attacks with specific attributes. This notes what attributes each attack possesses. H - Head B - Body F - Foot P - Projectile. Independent projectiles will have their Durability level listed, e.g. a projectile with Durability level 2 will show P2 T - Throw D - Doll attack, such as Carl's or Relius' doll Burst - Burst, which has its own unique attribute |
Invuln |
|---|---|---|---|---|---|---|---|---|---|
| 236236D | 800×4, 2000, 3500 [800×8, 3000, 4000] |
Guard Break/Barrier [Unblockable] | 9+(27 Flash)+18 | Until Offscreen | Total 103 | 0 | P* | 1~41 All | |
| 214214D | 800×4, 2000, 3500 [800×8, 3000, 4000] |
Guard Break/Barrier [Unblockable] | 9+(27 Flash)+18 | Until Offscreen | Total 103 | 0 | P* | 1~41 All |
Terumi shoots out a chain either straight forwards (236236D) or at a ~45 degree angle (214214D). After connecting, Terumi goes into a series of strikes. At the end of the sequence, Terumi will switch sides.
- Requires 100 Heat.
Normal Version
Costs 100 Heat and has a good amount of invulnerability. It guard-crushes on block, and if Barrier Blocked, it pulls his opponent to him. This is mainly used to close out rounds when at midscreen and against zoners to hard punish projectiles. Has a minimum distance at which the opponent must be away from Terumi (roughly half screen for 236236D; anti-air version is roughly 1 1/2 character lengths, although if they are too close, it becomes inconsistent) or it will completely pass through the opponent.
Overdrive Version
In OD, both versions of this move are completely unblockable, meaning it can be used to play mind games with the opponent or on Overdrive Raid against projectiles for a massive punish.
- If first hit guard crushes, the second hit will confirm into the rest of the attack.
- 20% Minimum damage: 1740 [2330].
- Both versions have large deadzones.
| Version | Starter RatingDetermines the starting value of the hitstun/untech decay timer and subsequent combo length | P1Proration applied to future hits when used as the first hit of a combo | P2Proration applied to future hits when used during any part of a combo | Attack LevelDefault Attack Level Values
| |||||||||||||||||||||||||||||||||||
|---|---|---|---|---|---|---|---|---|---|---|---|---|---|---|---|---|---|---|---|---|---|---|---|---|---|---|---|---|---|---|---|---|---|---|---|---|---|---|---|
| 236236D | Long | 100 | 94×5 [94×10] | 5 | |||||||||||||||||||||||||||||||||||
| 214214D | Long | 100 | 94×5 [94×10] | 5 |
236236D:
- Values in [] are during OD
- Minimum Damage 20% [20%×8, 15%×2]: 1740 [2330]
- Fires second chain 21F after first chain if first chain hits/blocked
- Chains guard break [unblockable]
- Costs 100 Heat
- reversal
214214D:
- Values in [] are during OD
- Minimum Damage 20% [20%×8, 15%×2]: 1740 [2330]
- Fires second chain 21F after first chain if first chain hits/blocked
- Chains guard break [unblockable]
- Costs 100 Heat
Exceed Accel
Dungeon of Serpents
A+B+C+D during Overdrive

- BBCF Yuuki Terumi A+B+C+D Hitbox.png
| Damage | GuardHow this attack can be guarded. Throws have their throw range listed instead. | StartupHow many frames the attack needs to go through in order to reach its active frames. The listed startup frame coincides with the move's first active frame. | ActiveHow many frames where there is a hitbox that can hit an opponent. The first active frame occurs on the listed startup frame. | RecoveryHow many frames that the character must go through after an attack's active frames to automatically go back to a neutral stance, or the total duration of the move if it has no hitbox/creates projectiles. | Frame AdvHow many frames the attacker's recovery ends before the defender's blockstun ends if the attack is blocked. A positive value indicates that the attacker recovers first, while a negative value indicates that the defender recovers first. This value usually assumes that the attack's first active frame (of each hit, if multi-hit) is blocked. | On ODRThe difference between the attacker's total animation length and the period the opponent is in overdrive raid. This frame advantage is based off the assumption that both players input during the hitstop of a prior move, so that this attack and ODR start on the same frame. | AttributeSome attacks are invulnerable to attacks with specific attributes. This notes what attributes each attack possesses. H - Head B - Body F - Foot P - Projectile. Independent projectiles will have their Durability level listed, e.g. a projectile with Durability level 2 will show P2 T - Throw D - Doll attack, such as Carl's or Relius' doll Burst - Burst, which has its own unique attribute |
Invuln |
|---|---|---|---|---|---|---|---|---|
| 600, 400×6 {600, 1200, 500×8} |
All | 20 [10] | 3 | 19+15L | -10 | B | 1~22 All [1~12 All] |
- Behaves the same as every other Exceed Accel.
- 300/638 Minimum Damage
- Can cancel out of other supers into this to frame trap.
Terumi performs a flying kick towards the opponent, covering much more ground than most EA's. This does usually mean that Terumi will be left in a bad position on block. That, combined with bad pushback, makes this is one of the easiest EA's to punish.
Because of the effects of Terumi's Overdrive, he can super-cancel most of his supers into this move, even on block. This means you can go for a gimmicky, last-ditch, frame trap by cancelling into this move on block.
| Starter RatingDetermines the starting value of the hitstun/untech decay timer and subsequent combo length | P1Proration applied to future hits when used as the first hit of a combo | P2Proration applied to future hits when used during any part of a combo | Attack LevelDefault Attack Level Values
| |||||||||||||||||||||||||||||||||||
|---|---|---|---|---|---|---|---|---|---|---|---|---|---|---|---|---|---|---|---|---|---|---|---|---|---|---|---|---|---|---|---|---|---|---|---|---|---|---|
| Long | 125 | 80 | 4 |
- Values in [] are when canceled into or immediately after activating Overdrive
- Values in {} are during Active Flow
- Minimum Damage 10%: 300 {580+58}
Astral Heat
The Unholy Wrath of the Basilisk
222D when Astral Conditions are met

"Allow me to show you..."

"...the true hand of God!"
"Kamigaeri: Orochizantou Reppuuga"


- BBCF Yuuki Terumi 222D Hitbox.png
| Damage | GuardHow this attack can be guarded. Throws have their throw range listed instead. | StartupHow many frames the attack needs to go through in order to reach its active frames. The listed startup frame coincides with the move's first active frame. | ActiveHow many frames where there is a hitbox that can hit an opponent. The first active frame occurs on the listed startup frame. | RecoveryHow many frames that the character must go through after an attack's active frames to automatically go back to a neutral stance, or the total duration of the move if it has no hitbox/creates projectiles. | Frame AdvHow many frames the attacker's recovery ends before the defender's blockstun ends if the attack is blocked. A positive value indicates that the attacker recovers first, while a negative value indicates that the defender recovers first. This value usually assumes that the attack's first active frame (of each hit, if multi-hit) is blocked. | On ODRThe difference between the attacker's total animation length and the period the opponent is in overdrive raid. This frame advantage is based off the assumption that both players input during the hitstop of a prior move, so that this attack and ODR start on the same frame. | AttributeSome attacks are invulnerable to attacks with specific attributes. This notes what attributes each attack possesses. H - Head B - Body F - Foot P - Projectile. Independent projectiles will have their Durability level listed, e.g. a projectile with Durability level 2 will show P2 T - Throw D - Doll attack, such as Carl's or Relius' doll Burst - Burst, which has its own unique attribute |
Invuln |
|---|---|---|---|---|---|---|---|---|
| 0, 100, 400×36, 20000 | All | 5+(76 Flash)+16 | 16 | Total 76 | -22 | P* | 1~35 All |
Terumi creates a red portal with his Ouroboros chains on the ground in front of him. The portal is large but slightly disconnected from Terumi, meaning it will whiff if you're too close. Can connect from 236D, 6D, CH 6A and numerous other things due to being able to be cancelled from special moves. Compared to other Astral Heats, this is very easy to land and for Terumi to make 100 heat for, making it a very practical way to finish the match.
| Starter RatingDetermines the starting value of the hitstun/untech decay timer and subsequent combo length | P1Proration applied to future hits when used as the first hit of a combo | P2Proration applied to future hits when used during any part of a combo | Attack LevelDefault Attack Level Values
| |||||||||||||||||||||||||||||||||||
|---|---|---|---|---|---|---|---|---|---|---|---|---|---|---|---|---|---|---|---|---|---|---|---|---|---|---|---|---|---|---|---|---|---|---|---|---|---|---|
| Normal | 100 | 94 | 5 |
Colors
 |
 |
 |
 |
 |
 |
 |
 |
 |
 |
 |
 |
 |
 |
 |
 |
 |
 |
 |
 |
 |
 |
 |
 |
To edit frame data, edit values in BBCF/Yuuki Terumi/Data.
Amane
Arakune
Azrael
Bang
Bullet
Carl
Celica
Es
Hakumen
Hazama
Hibiki
Tager
Izanami
Izayoi
Jin
Jubei
Kagura
Kokonoe
Lambda-11
Litchi
Mai
Makoto
Mu-12
Naoto
Nine
Noel
Nu-13
Platinum
Rachel
Ragna
Relius
Susano'o
Taokaka
Tsubaki
Valkenhayn
Terumi
System Pages
Mechanics
Application & Advanced Information
Archived Information